まずは追いかけ具合はこんな感じ
まず BluePrintからActorで適当にAI Gorl アクターを作る

Charactor BPに設定する
AI ControllerでAI Gorl ActorをSpawnする。

Tickで

Line Trace by Channel

つづいてジャンプの前処理処理

ジャンプ


DESIGN AND FUTURE SCIENCE.

まずは追いかけ具合はこんな感じ
まず BluePrintからActorで適当にAI Gorl アクターを作る
Charactor BPに設定する
AI ControllerでAI Gorl ActorをSpawnする。
Tickで
Line Trace by Channel
つづいてジャンプの前処理処理
ジャンプ

ポジTAさんのこのぺーじをvs2022でやる
https://zenn.dev/posita33/books/ue5_starter_cpp_and_bp_001/viewer/chap_01_vs2019_setup
プロジェクトを作成する際に「C++」でプロジェクトを作成します。
[Edit] > [Plugins]を選択します。
独自のPluginを作成するには左上の「Add」ボタンをクリックします。
プラグインの作成手順は以下の手順になります。
| Author | 制作者名 |
| Description | Pluginの説明 |
| Author URL | 制作者のPlugin説明用のURLを書いておくとPluginの制作者名をクリックするとURLに移動する |
| Is Beta Version | チェックボックスを有効にすると、Plugin名の横にBetaが表示される |

「Create Plugin 」を押す。2分ぐらいかかる?
Pluginのウィンドウで作成したPlugin名を検索すると一覧に登録されています。

Editボタンで(Plugin名).pluginファイルで設定をより詳細に変更できます。
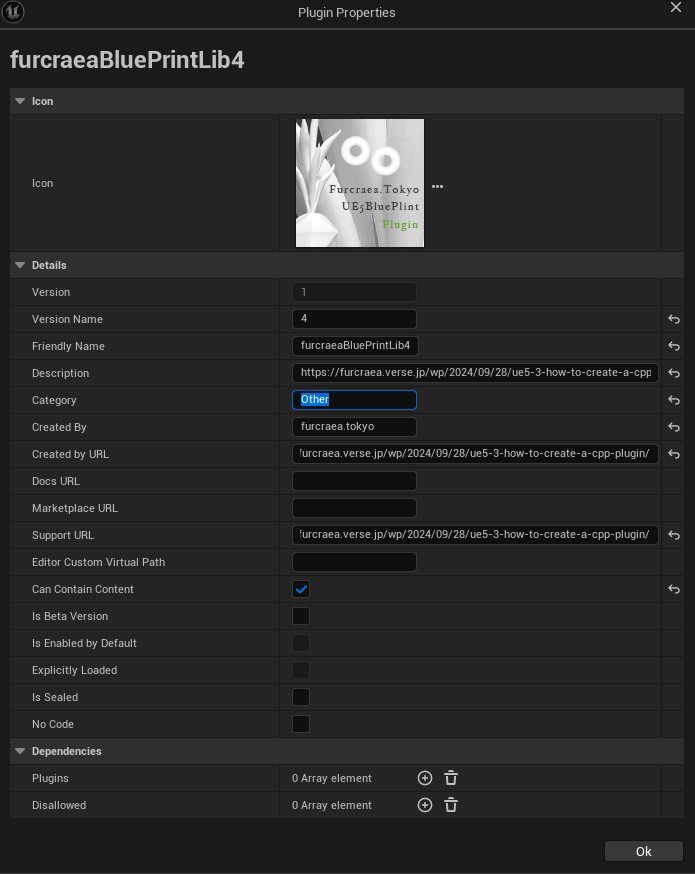
色々設定して128×128のアイコン設定して。。
ContentsBrowserやVisualStudioに追加されたPluginが表示されます。

以下の感じで吐き出される
furcraeaBluePrintLib.h
// Copyright Epic Games, Inc. All Rights Reserved.

#pragma once

#include "Modules/ModuleManager.h"

class FfurcraeaBluePrintLibModule : public IModuleInterface
{
public:

	/** IModuleInterface implementation */
	virtual void StartupModule() override;
	virtual void ShutdownModule() override;
};
furcraeaBluePrintLib.cpp
// Copyright Epic Games, Inc. All Rights Reserved.

#include "furcraeaBluePrintLib.h"

#define LOCTEXT_NAMESPACE "FfurcraeaBluePrintLibModule"

void FfurcraeaBluePrintLibModule::StartupModule()
{
	// This code will execute after your module is loaded into memory; the exact timing is specified in the .uplugin file per-module

}

void FfurcraeaBluePrintLibModule::ShutdownModule()
{
	// This function may be called during shutdown to clean up your module.  For modules that support dynamic reloading,
	// we call this function before unloading the module.

}

#undef LOCTEXT_NAMESPACE

IMPLEMENT_MODULE(FfurcraeaBluePrintLibModule, furcraeaBluePrintLib)
furcraeaBluePrintLibBPLibrary.h
// Copyright Epic Games, Inc. All Rights Reserved.

#pragma once

#include "Kismet/BlueprintFunctionLibrary.h"
#include "furcraeaBluePrintLibBPLibrary.generated.h"

/*
*	Function library class.
*	Each function in it is expected to be static and represents blueprint node that can be called in any blueprint.
*
*	When declaring function you can define metadata for the node. Key function specifiers will be BlueprintPure and BlueprintCallable.
*	BlueprintPure - means the function does not affect the owning object in any way and thus creates a node without Exec pins.
*	BlueprintCallable - makes a function which can be executed in Blueprints - Thus it has Exec pins.
*	DisplayName - full name of the node, shown when you mouse over the node and in the blueprint drop down menu.
*				Its lets you name the node using characters not allowed in C++ function names.
*	CompactNodeTitle - the word(s) that appear on the node.
*	Keywords -	the list of keywords that helps you to find node when you search for it using Blueprint drop-down menu.
*				Good example is "Print String" node which you can find also by using keyword "log".
*	Category -	the category your node will be under in the Blueprint drop-down menu.
*
*	For more info on custom blueprint nodes visit documentation:
*	https://wiki.unrealengine.com/Custom_Blueprint_Node_Creation
*/
UCLASS()
class UfurcraeaBluePrintLibBPLibrary : public UBlueprintFunctionLibrary
{
	GENERATED_UCLASS_BODY()

	UFUNCTION(BlueprintCallable, meta = (DisplayName = "Execute Sample function", Keywords = "furcraeaBluePrintLib sample test testing"), Category = "furcraeaBluePrintLibTesting")
	static float furcraeaBluePrintLibSampleFunction(float Param);
};
furcraeaBluePrintLibBPLibrary.cpp
// Copyright Epic Games, Inc. All Rights Reserved.

#include "furcraeaBluePrintLibBPLibrary.h"
#include "furcraeaBluePrintLib.h"

UfurcraeaBluePrintLibBPLibrary::UfurcraeaBluePrintLibBPLibrary(const FObjectInitializer& ObjectInitializer)
: Super(ObjectInitializer)
{

}

float UfurcraeaBluePrintLibBPLibrary::furcraeaBluePrintLibSampleFunction(float Param)
{
	return -1;
}
参考URL
全部ポジTAさんですありがとうございます。
MaterialParameterCollectionのファイル作って

ポストプロセスマテリアルの中身で参照させて

Set Vector param 呼び出すだけ

変更したいけどうまくいかないの状態
https://forums.unrealengine.com/t/change-post-process-material/448103/9
で解決の状態

スラスラC++で、実行するとエラー
C:\samples\chapter04\4_5>cd C:\samples\chapter04\4_5\
C:\samples\chapter04\4_5>g++ -o list4_5.exe list4_5.cpp
c:/mingw/bin/../lib/gcc/mingw32/9.2.0/../../../../mingw32/bin/ld.exe:
C:\Users\furcr\AppData\Local\Temp\ccs3yFYU.o:list4_5.cpp:(.text+0x72):
undefined reference to `getBmi(double, double)' collect2.exe: error:
ld returned 1 exit statuschapter4.h
// BMIを求める関数のプロトタイプ宣言
double getBmi(double height, double weight);
getBmi.cpp
double getBmi(double height, double weight) {
  double bmi;	// BMIの計算結果を入れる

  // cm単位をm単位にする
  height /= 100;

  // BMIを計算する
  bmi = weight / height / height;

  // 戻り値としてBMIを返す
  return bmi;
}
list4_5.cpp
#include <iostream>
using namespace std;
#include "chapter4.h"

int main() {
  double height;	// 身長
  double weight;	// 体重
  double bmi;		// BMI

  // キー入力をheightに格納する
  cout << "身長(cm)を入力してください:";
  cin >> height;

  // キー入力をweightに格納する
  cout << "体重(kg)を入力してください:";
  cin >> weight;

  // 身長と体重からBMIを計算する
  bmi = getBmi(height, weight);

  // BMIを画面に表示する
  cout << "あなたのBMIは、" << bmi << "です。" << endl;

  return 0;
}
cd_samples4_5_header.cmd
C:\samples\chapter04\4_5>cd C:\samples\chapter04\4_5\

C:\samples\chapter04\4_5>g++ list4_5.cpp getBmi.cpp -o list4_5.exe

C:\samples\chapter04\4_5>list4_5.exe
身長(cm)を入力してください:167
体重(kg)を入力してください:75
あなたのBMIは、26.8923です。

C:\samples\chapter04\4_5>cmd /k
C:\samples\chapter04\4_5>
chapter4.h ファイル内で getBmi(double height, double weight) 関数の実装が正しく行われていることを確認してください。chapter4.h には関数のプロトタイプ宣言が含まれているはずですが、実際の関数の定義が別のファイル(おそらく chapter4.cpp など)にあるはずです。list4_5.cpp と関連するファイルを一緒に指定する必要があります。例えば、次のようにコンパイルしてみてください。g++ list4_5.cpp getBmi.cpp -o list4_5.exe
chapter4.cpp のファイル名は実際のファイル名に合わせて修正してください。
A node that uses HSV to get pretty random colors

参考
https://forums.unrealengine.com/t/make-color-node-with-hsv-for-random-material/328970

skinWeight Mesh Combine
mesh> combine option

MELだと
string $combine[] = `polyUniteSkinned -constructionHistory 0 -mergeUVSets 1`;参考URL
https://help.autodesk.com/cloudhelp/2023/JPN/Maya-Tech-Docs/Commands/polyUniteSkinned.html
To RotatorもFrom Rotator もTo Euler From Euler になりました。!
https://sites.google.com/site/seikodevmemo/top/UE4AC2019-2-1224-ConrtolRig-Main/EyeControlSequence
のサイトのおまけ

ですが、UE5.4ではこうなりました。(下のノードちょっと工事中です。)

で直して着地したのがこれ(失敗)

これでやっと落ち着いた。(回転制限のclampの固定値では制御しきれなかった)

さらにスカートの長さをもものrotationから調節して解決


どうにか完成してよかった。

[UE5][Retarget]How to retarget at runtime
1,各スケルトンのスケルタルメッシュからIKRigを作る
2,IKリターゲッターを作る。
3、動かしたいターゲットのABPを作って
4,Retarget Pose From MeshのノードでIKリターゲッターをセットする

5,BPの構造はこうする。

参考URL
地形アセットを購入したら大量のスタティックメッシュのおかしなコリジョンがついてきた場合にどうぞ!
選択したスタティックメッシュのコリジョンを削除
assets = unreal.EditorUtilityLibrary.get_selected_assets()
AssetDataList = unreal.EditorUtilityLibrary.get_selected_asset_data()

for a in AssetDataList:
    if a.asset_class_path.asset_name == "StaticMesh":
        mesh = unreal.EditorAssetLibrary.find_asset_data(a.package_name).get_asset()
        unreal.EditorStaticMeshLibrary.remove_collisions(mesh)
3DのUIのwidget だけをポストプロセスエフェクトから除外したい。
カスタム深度ステンシルパスをEnabld

キャラクターまたはSkeltalMeshまたはStaticMeshまたはWidgetのCustomDepth PathをオンにするStencil Value」を割り当て

ポストプロセスマテリアルを作成, ポストプロセス用の設定を行ってください

「Switch」ノードを配置し、0~3 の “Input” を追加してください
ステンシル毎に違う色を設定します
“Custom Stencil”で取得できる値は元々整数なので、そのまま”Switch Value”に渡すだけでOKです

作成したポストプロセスマテリアルを、レベル上の PostProcessVolume に設定します

確認します。


参考URL