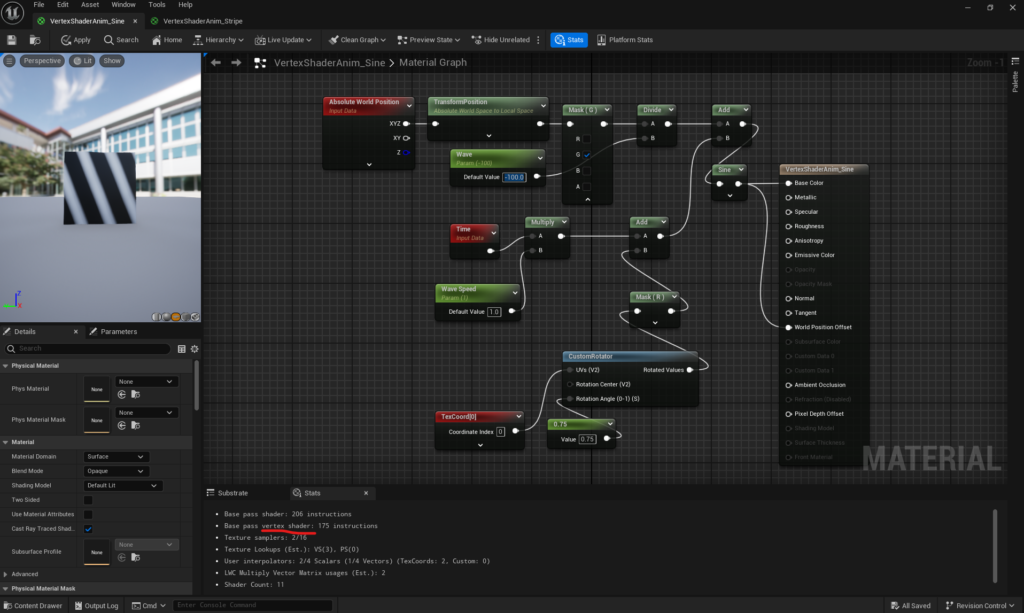
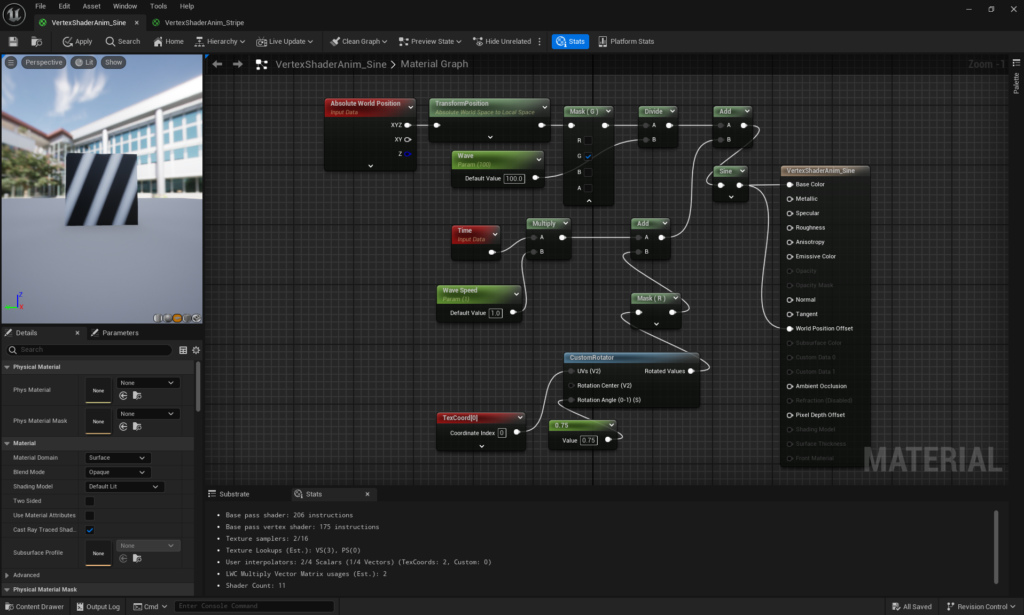
movie
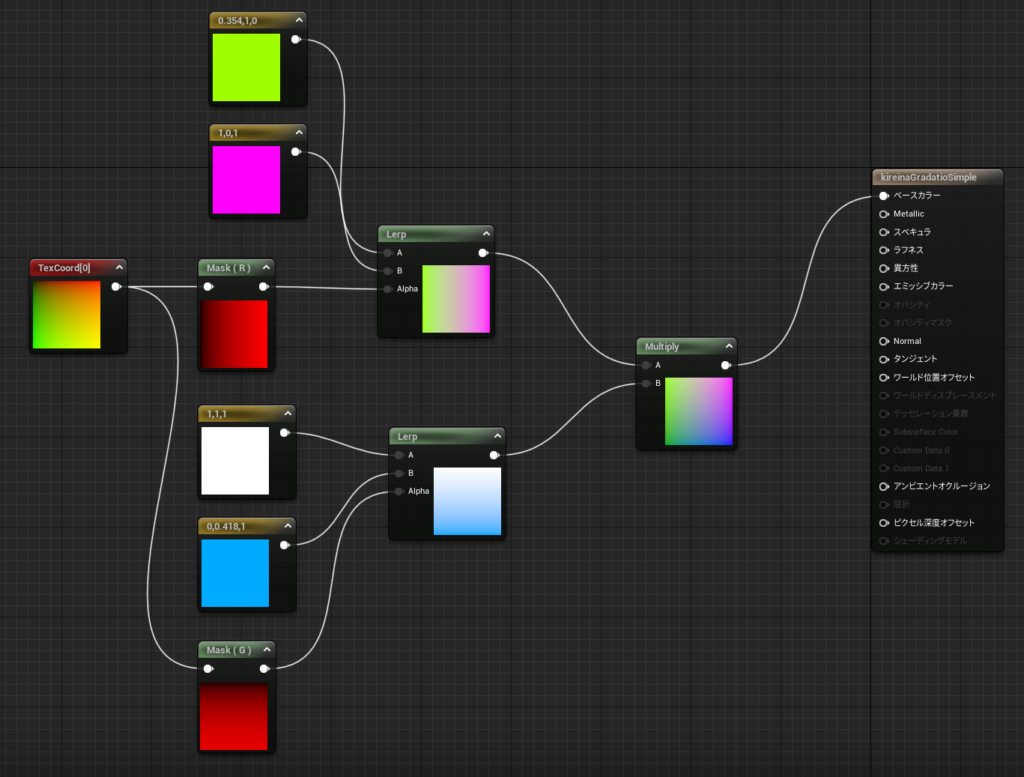
[UE5.3][Vertex Shader][Material]みんな大好きキレイに45度の斜めストライプの動くカラー指定可能なマテリアルが作れましたよ。
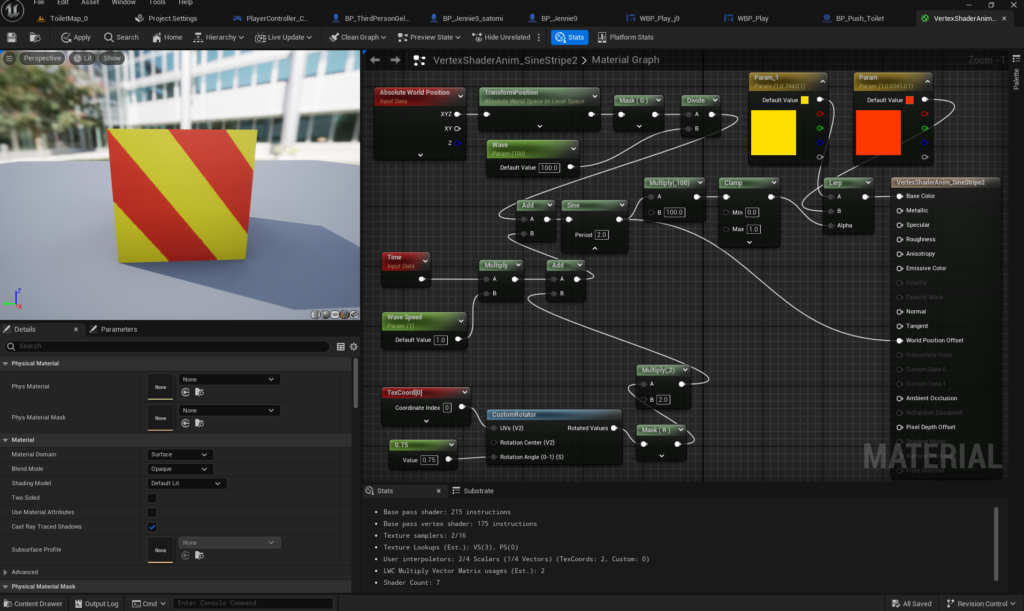
正解はtexCoordの応用だった。
texCoordを縦のグラデーションと横グラデーションに分け
値をLerpのAlphaにつないでお好きな色をA,Bにつなぐ。
2つ作ってMultplyして縦横グラデーションになるようにMIXした。
さらに回転させたい
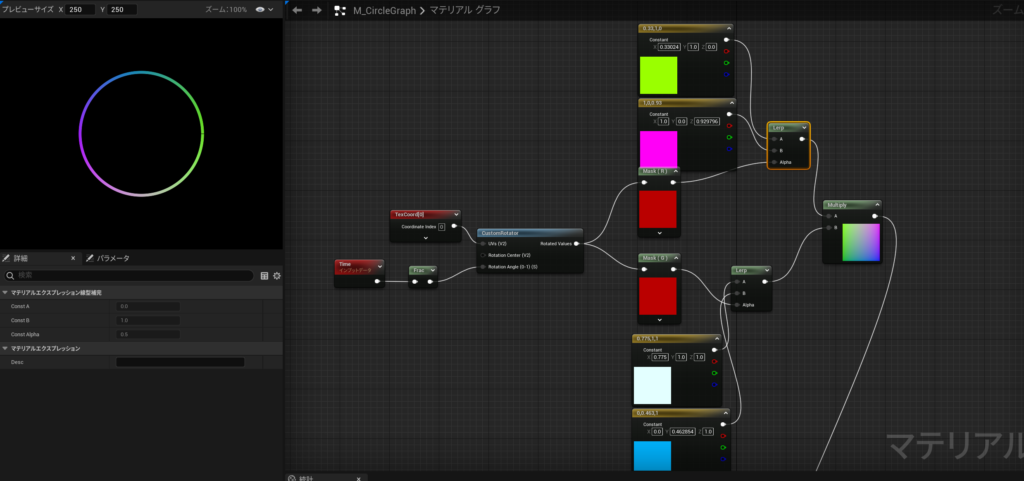
下の部分が見切れていたので追加しました。
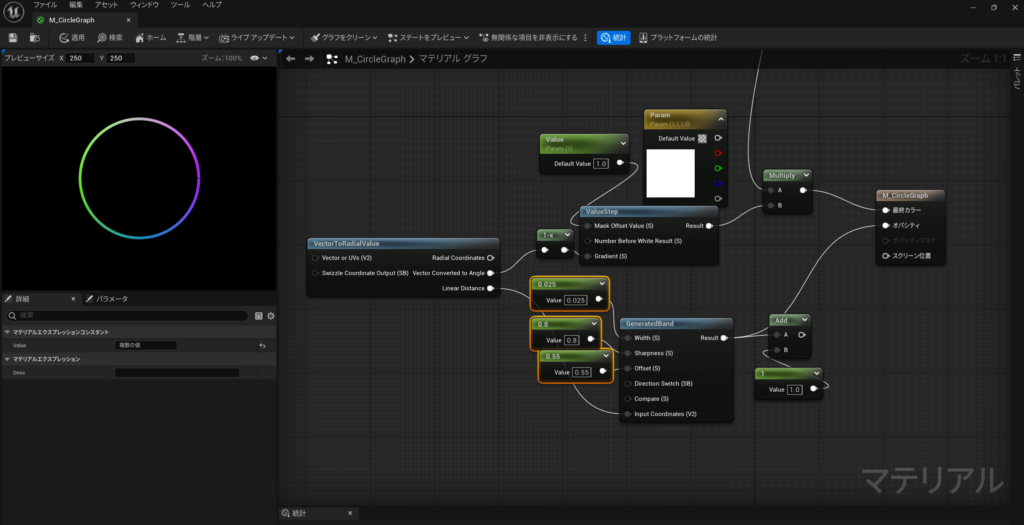
参考
UE4]UMGで使えるでシンプルなグラデーションを作 …historia.co.jp
これは自分の中でかなりおおきな発見だった。
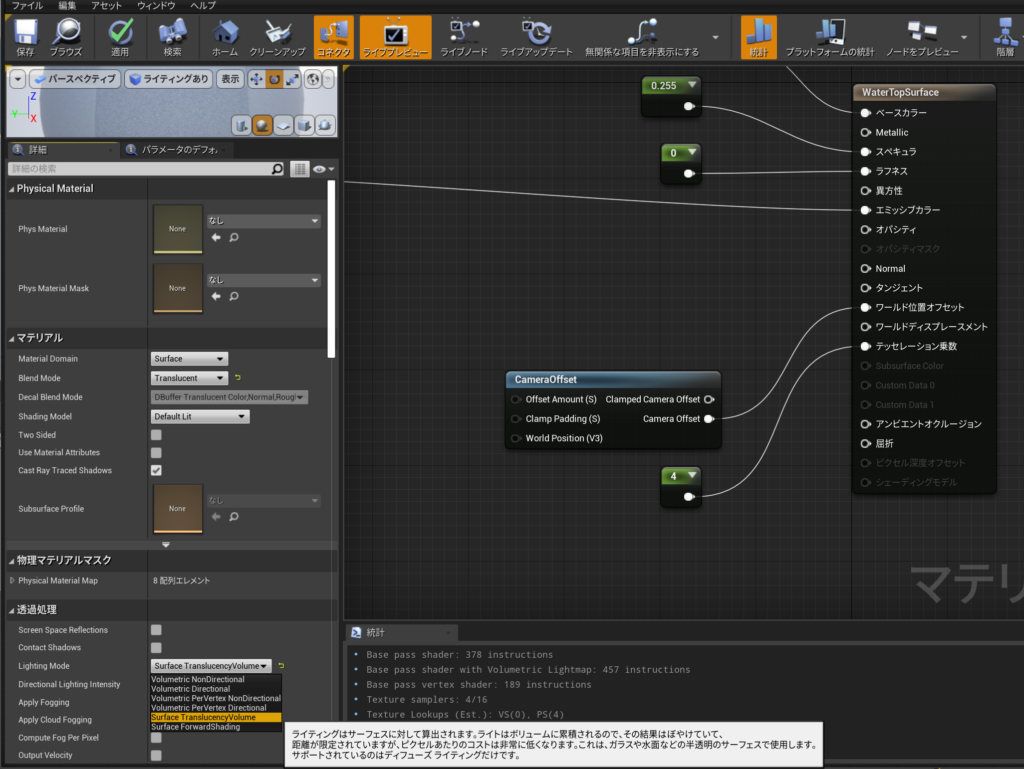
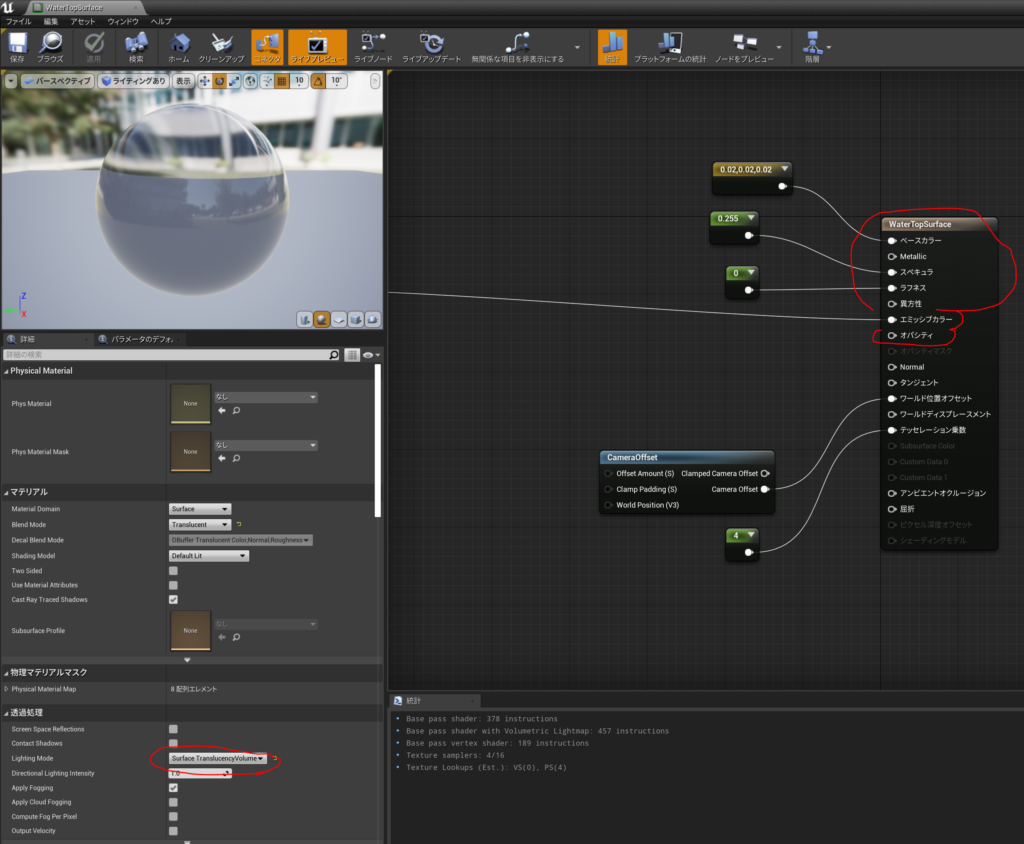
Shading Modelを変更しなくても、透明で、ベースカラー、Metalic スペキュラ、ラフネス、エミッシブ、Normal、タンジェント、ワールド位置オフセット、ワールドディスプレースメント、テッセレーション乗数、アンビエントオクルージョン、屈折が使える
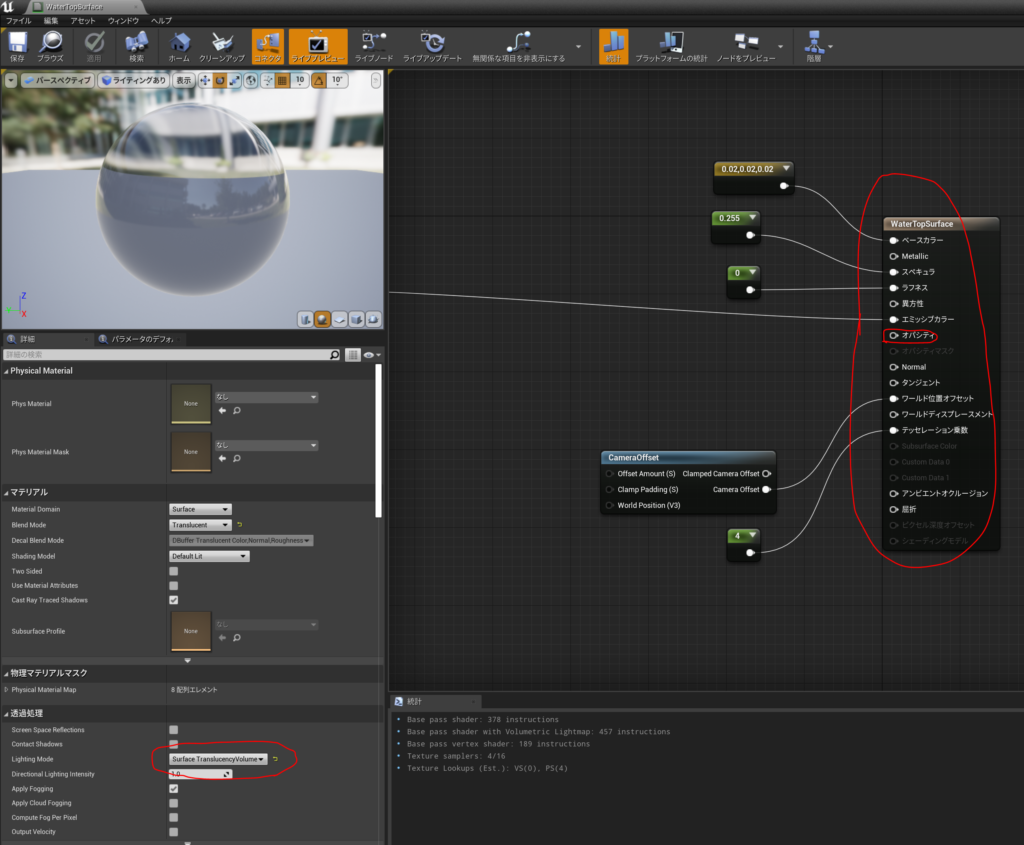
詳細は以下
https://docs.unrealengine.com/4.27/en-US/RenderingAndGraphics/Materials/HowTo/Transparency/
【UnrealEngine】水っぽいマテリアルを作ったときのメモ(屈折率)
https://qiita.com/nchhujimiyama/items/8d2c820f2a1367864569
他にも
できたパッケージはこちらにアップしました。できたら遊んでみてください。
2.83GBあります。
download は以下
DevelopmentBuild チェックポイント(レベル内セーブ機能)があるEasyバージョン
V7 VoicePeak版
https://drive.google.com/file/d/1brxO2bYWV4GZfw9vMK6O_L6ReHHHTFow/view?usp=sharing
V4
https://drive.google.com/file/d/1S25uUMd1k9umFNJ8HRiXHf0QvtRGCTNR/view?usp=sharing
Shipping チェックポイント(レベル内セーブ機能)がないHardバージョン
V6 VoicePeak版
https://drive.google.com/file/d/1khzi3AEROpcaJhmpsGoMqxYDtxVVFj9U/view?usp=sharing
V2
https://drive.google.com/file/d/10s3s-XBcIw3ezOFC3qbgvrI82PXvzn2W/view?usp=sharing
操作方法
キーボードでの操作は以下
Jump スペースバー
スライディング C
弓構え 1
弓発射 マウス左クリック
このレ ベルをやり直し H
キャラクター変更 C
移動 WASD 後ろから敵に近づくと、はがいじめ
カメラ方向 マウス左クリックドラッグ
アイテム回収/構え時は投げ マウス左クリック
アイテム投げ構え マウス右クリック
ゲームパッドでの操作は以下
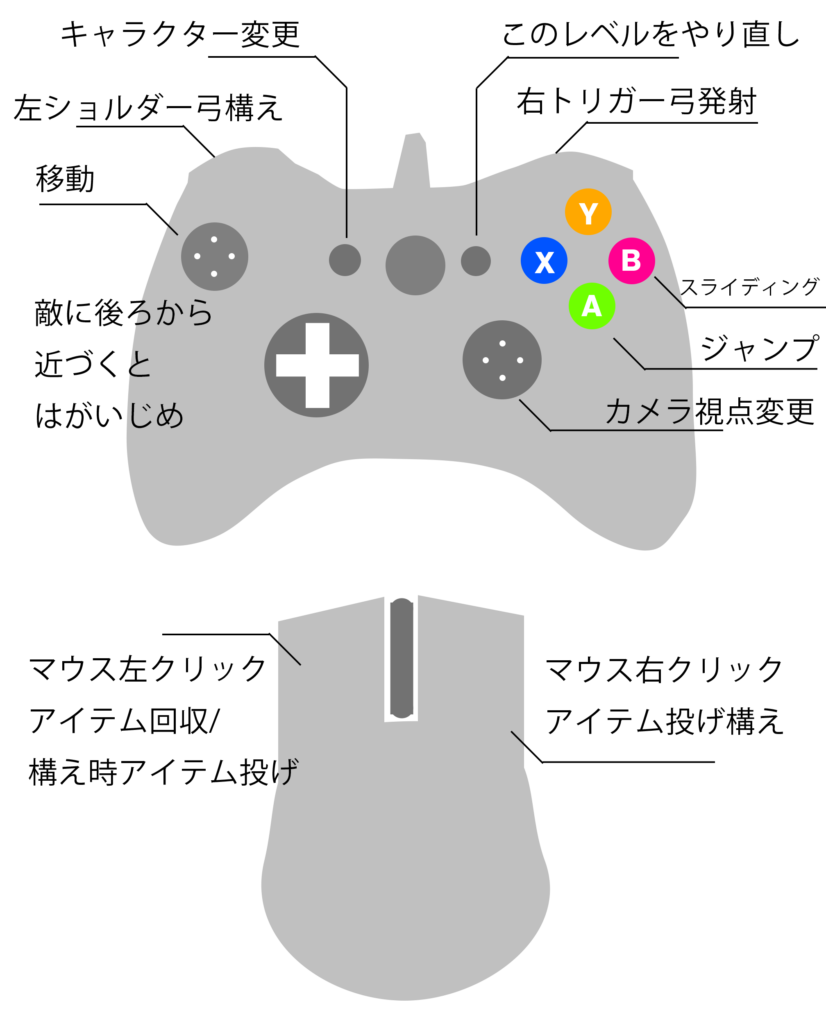
感想、コメントなどくれると泣いて喜びます。笑
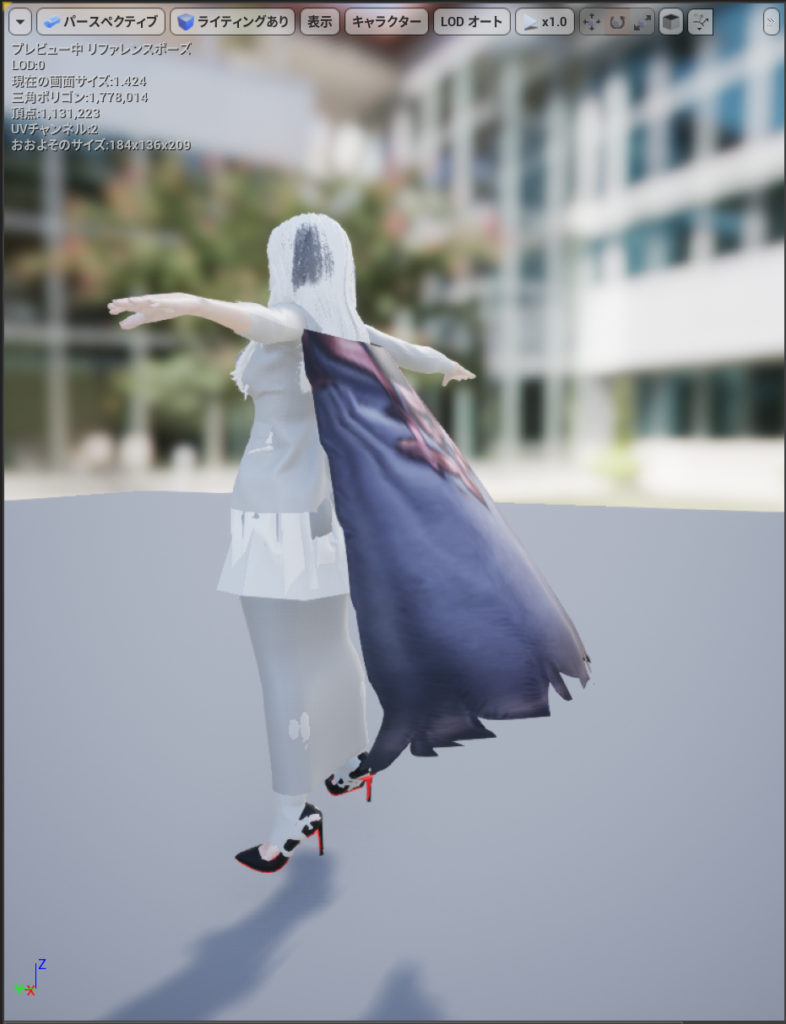
服と髪をなびかせるHair Clothはこれをやった
https://docs.unrealengine.com/4.27/ja/InteractiveExperiences/Physics/Cloth/Overview/
1, [Section Selection (セクション選択)]
2,左クリックを使って、クロスとして使用したいメッシュの一部を選択します。次に右クリックして、コンテキスト メニューを開いて Cloth アセットを作成します。
3,コンテキスト メニューから、[Create Cloth Asset from Selection (選択したものから Cloth アセットを作成)] を選びます。
A,Asset Name – 後で簡単に見つけられるようにアセットに名前を付けてください。
B,Remove from Mesh – クロスとして関連付けたい別個のジオメトリのメッシュの構成要素があれば、このオプションを有効にします。そうでなければ、チェックを入れずにこのままにします。
C,Physics Asset – Cloth アセットがキャラクター用ならば、その Physics アセットを使ってクロス シミュレーションで適切なコリジョンが生じるようにします。
4,[Create] ボタンをクリックします。
5,セクションを再度右クリックして、コンテキスト メニューを表示させて、[Apply Clothing Asset] にマウスをかざし、利用可能なクロス アセットから適用するものを選択します。これで作成した任意のクロス アセットが選択したセクションに関連付けられます。
・ペイント – マウスの左ボタン
・消去 – Shift キー + マウスの左ボタン
・クロスのプレビュー – H キー
[Window] を選択し、リストから [Clothing] を選択します。
[Clothing Data] リストから選択します。
[Activate Cloth Paint] ボタンをクリックして、選択した Cloth アセットをペイントするために使用可能なプロパティを有効にします。
・ブラシの半径を5にして
・強度を0.2
・フォールオフ0.5
でヘアをクリックすると塗れる。ピンクが塗ってない場所
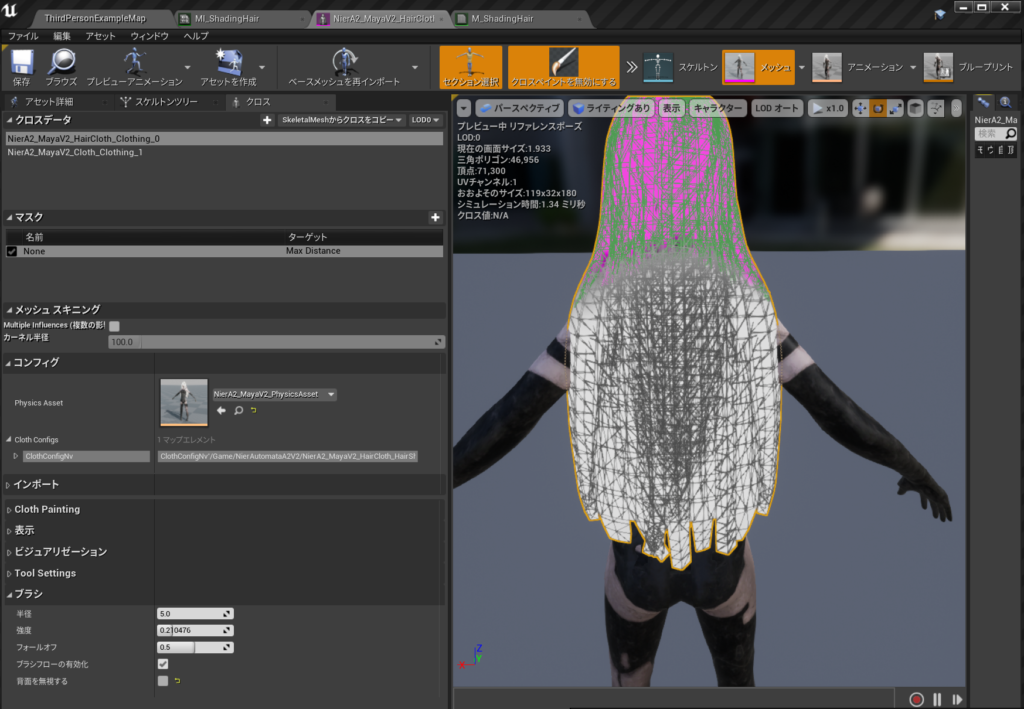
走ってみると
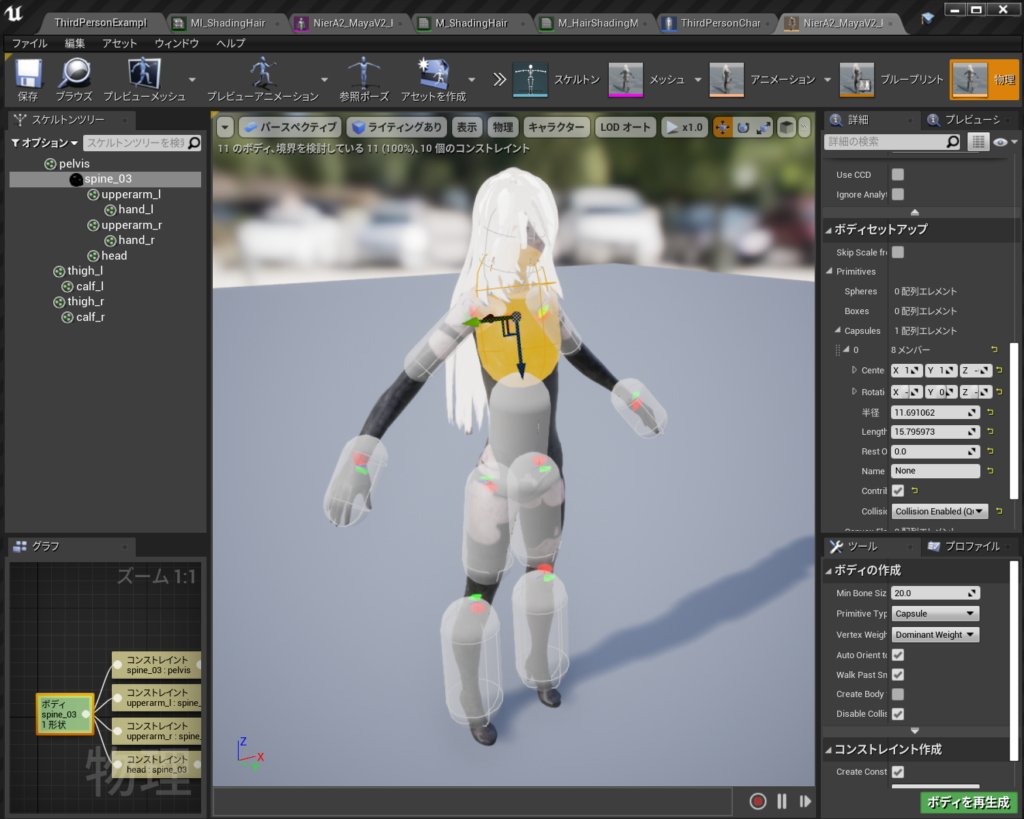
髪が前に来ちゃう
ので
物理ボディを修正した
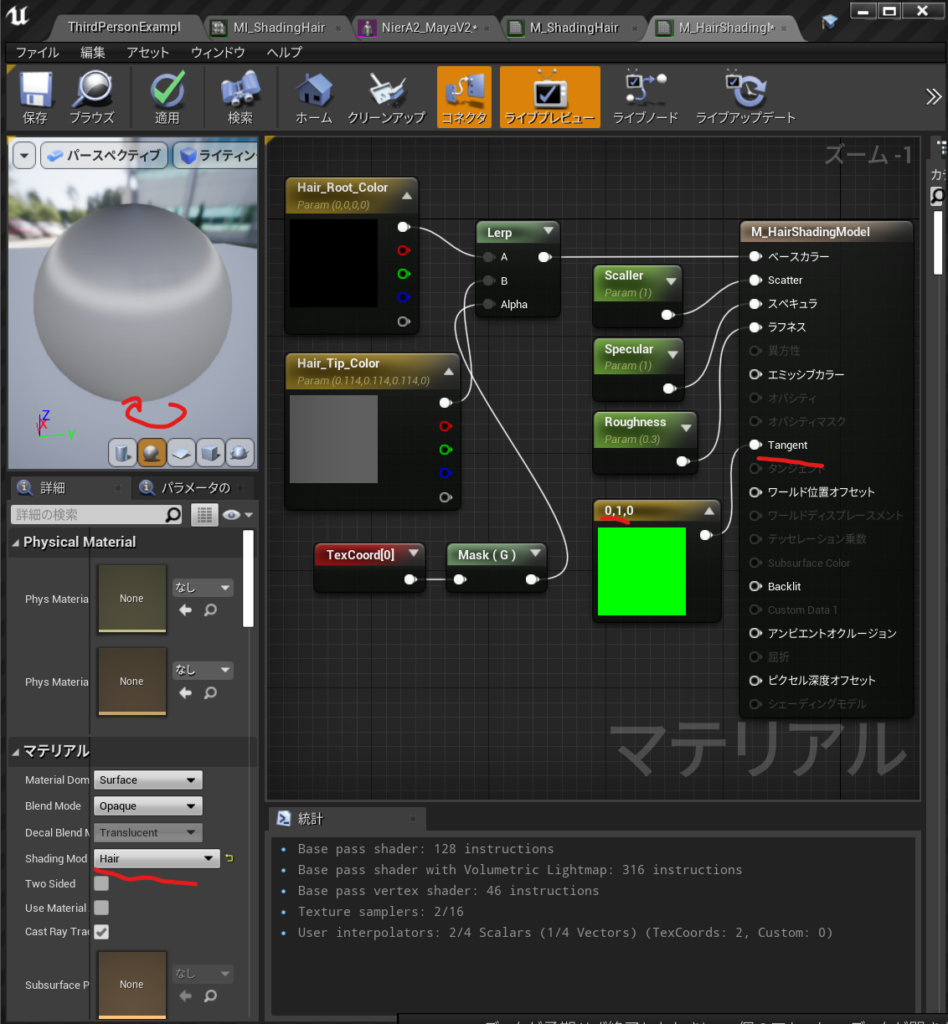
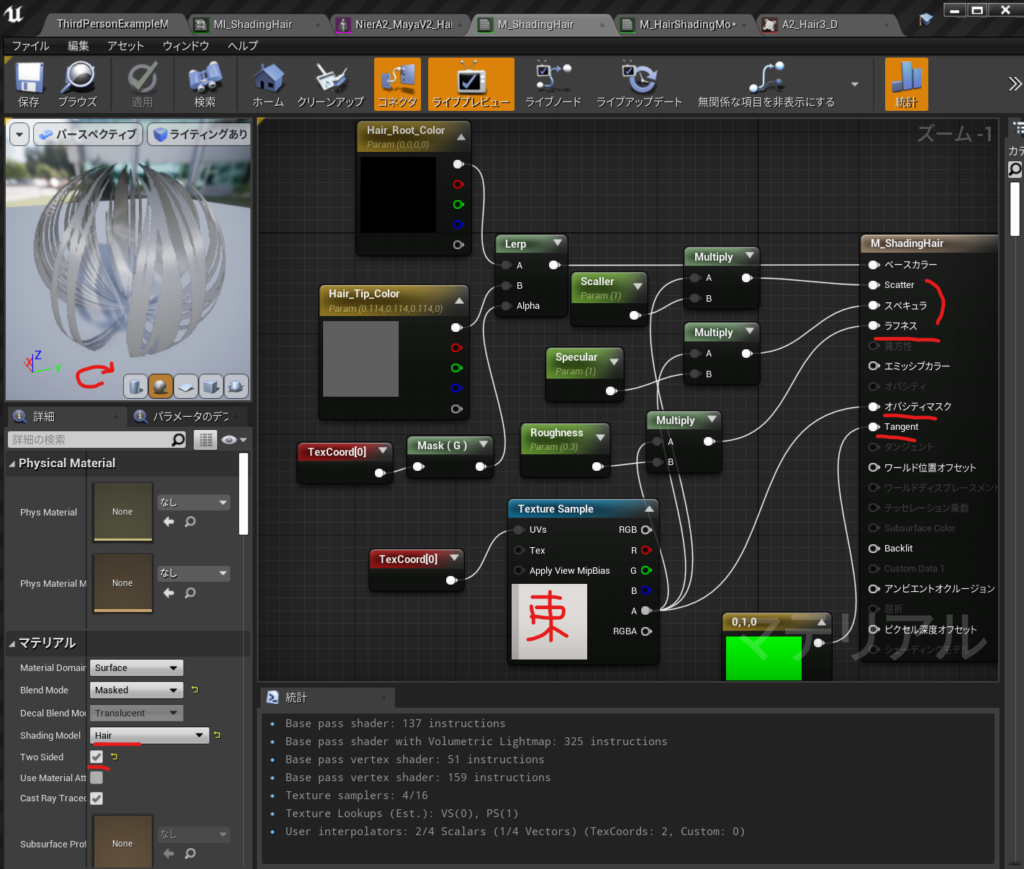
HairShadingModel 基本はこれをやった。
つまりこれで髪の天使の輪みたいなものができる。 (まわしてみないと分からない)
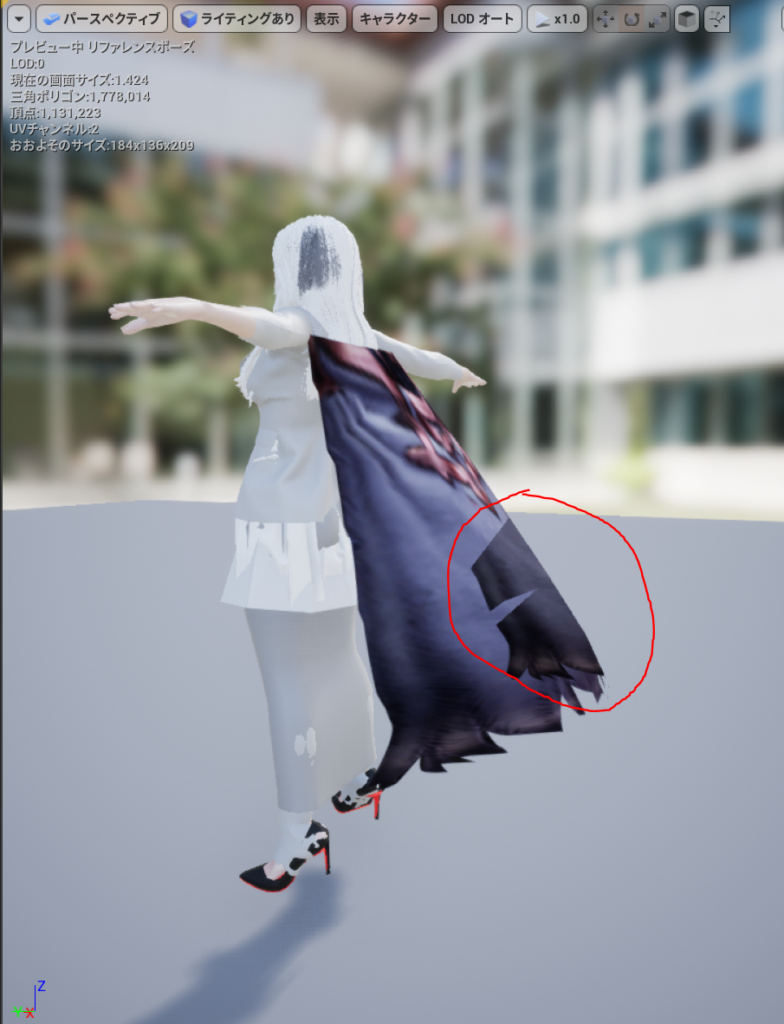
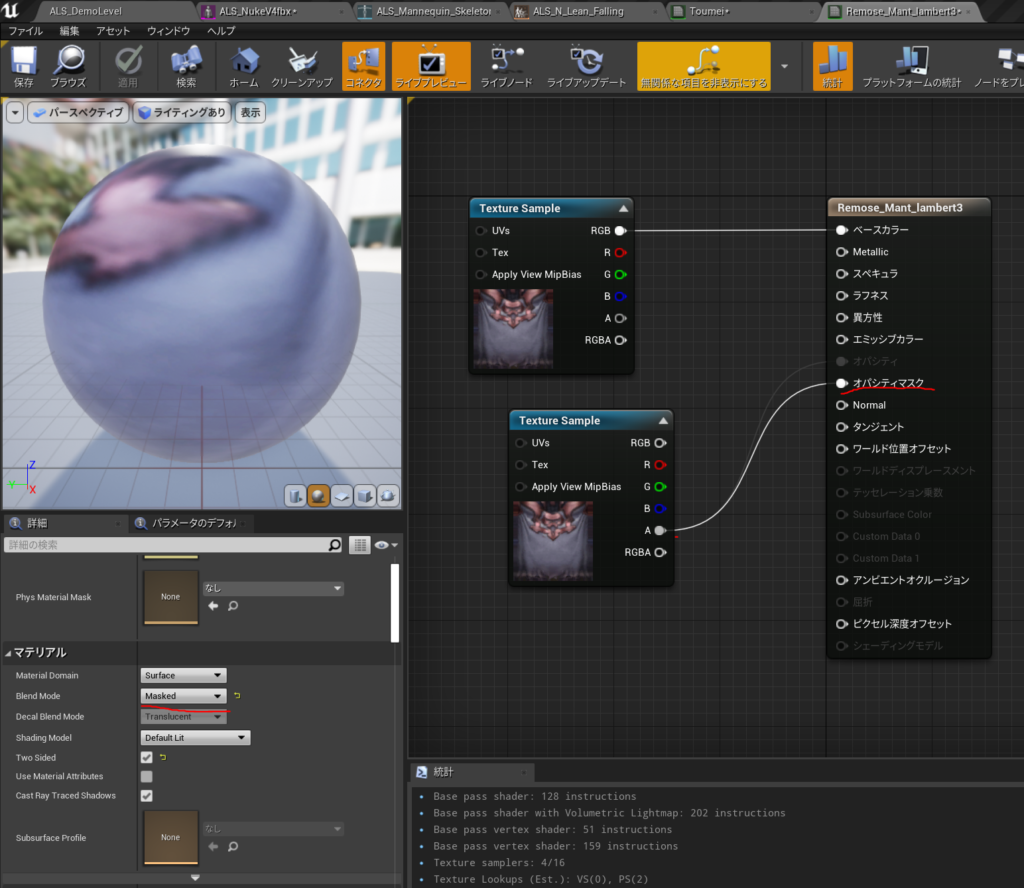
でも髪の束感は出したかったのでOpacityMaskもありにするとこうなる。
束感のために使ってるテクスチャはこれで
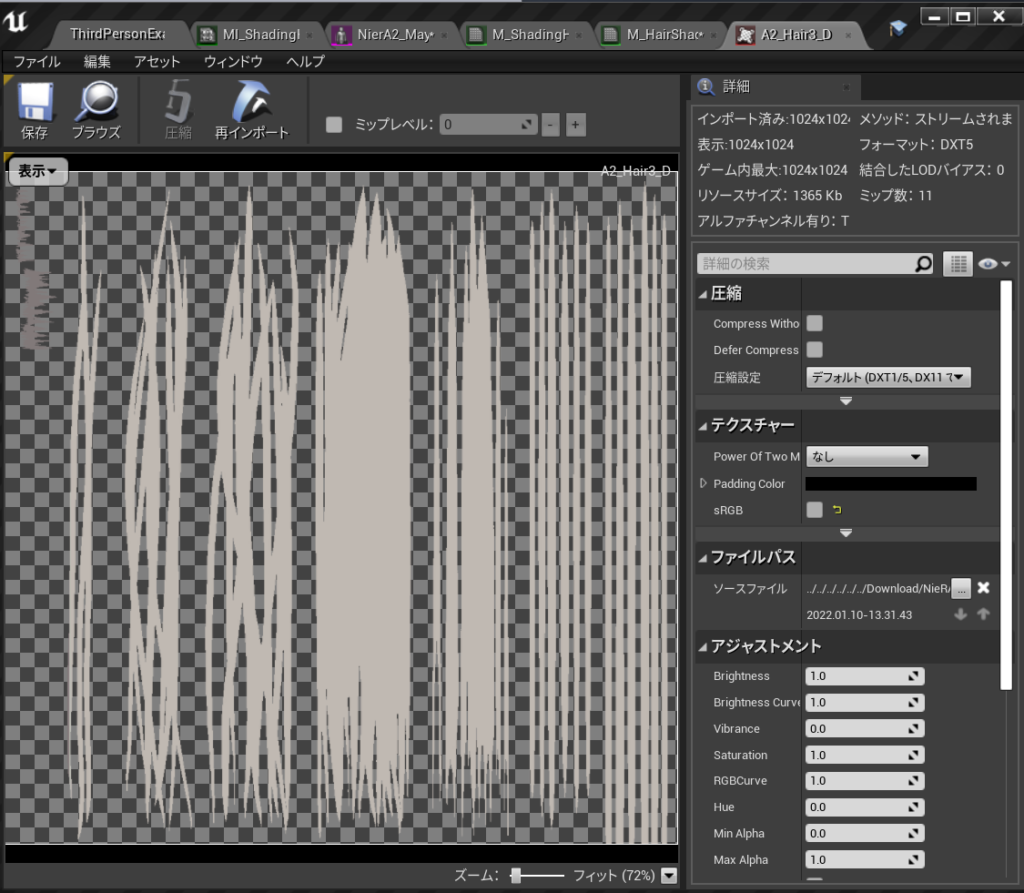
こんな感じにスキャッター、スペキュラ、ラフネスにMultyplyしたらいい感じになった。
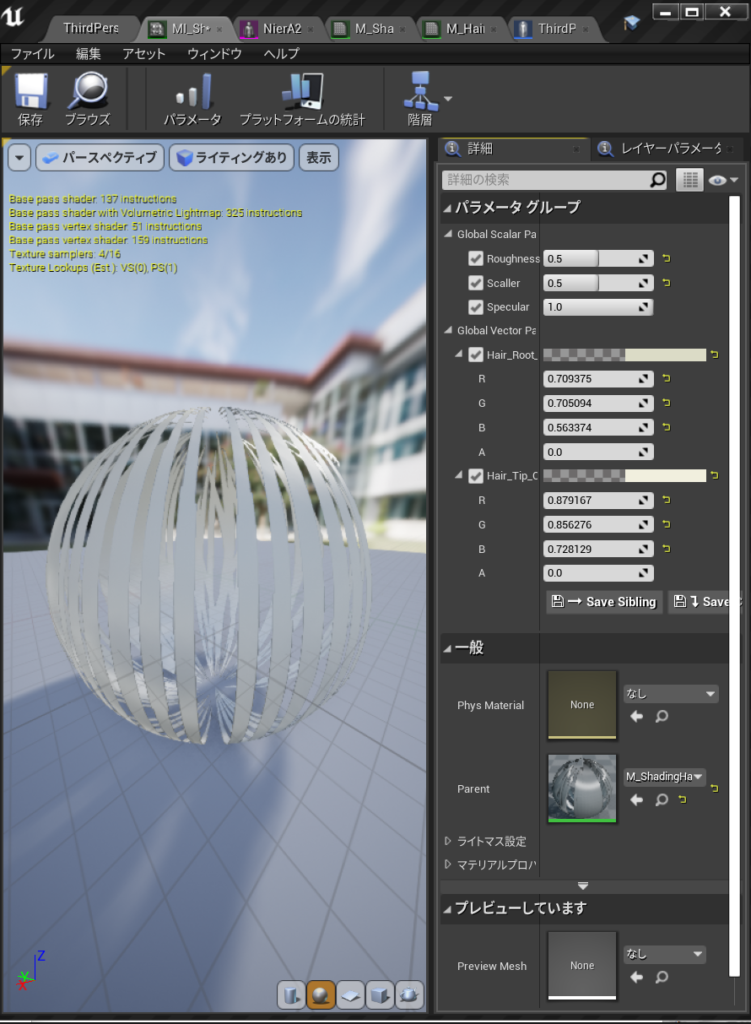
使っているMIでの値はこんな感じ
最後にまたこれをやって
やっとこうなった
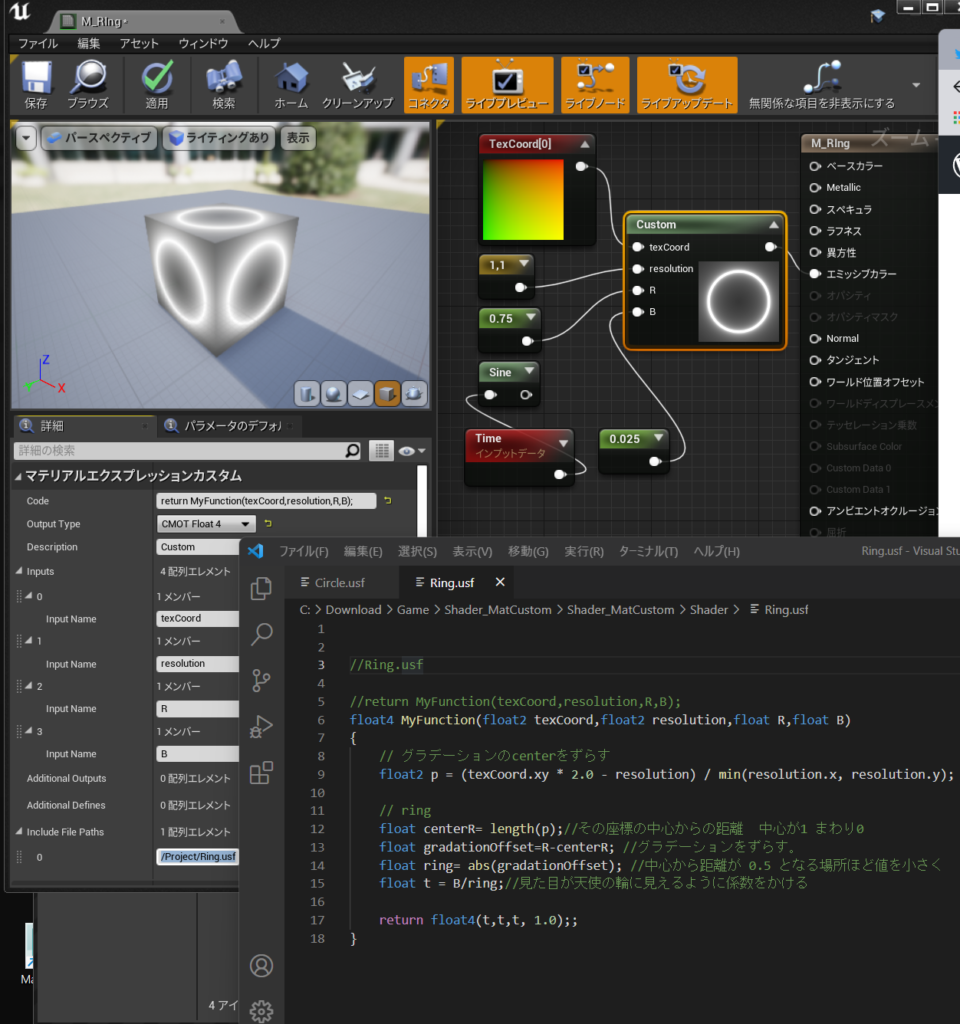
Code : return MyFunction(texCoord,resolution,R);
OutputType: Float4
Inputs : texCoord,resolution,R,B
IncludeFilePath:/Project/Ring.usf
// ring
float centerR= length(p);//その座標の中心からの距離  中心が1 まわり0
float gradationOffset=R-centerR; //グラデーションをずらす。
float ring= abs(gradationOffset); //中心から距離が 0.5 となる場所ほど値を小さく
float t = B/ring;//見た目が天使の輪に見えるように係数をかける
//Ring.usf
//return MyFunction(texCoord,resolution,R,B);
float4 MyFunction(float2 texCoord,float2 resolution,float R,float B)
{
// グラデーションのcenterをずらす
float2 p = (texCoord.xy * 2.0 - resolution) / min(resolution.x, resolution.y);
// ring
float centerR= length(p);//その座標の中心からの距離 中心が1 まわり0
float gradationOffset=R-centerR; //グラデーションをずらす。
float ring= abs(gradationOffset); //中心から距離が 0.5 となる場所ほど値を小さく
float t = B/ring;//見た目が天使の輪に見えるように係数をかける
return float4(t,t,t, 1.0);;
}参考
三平方の定理で円を色分け
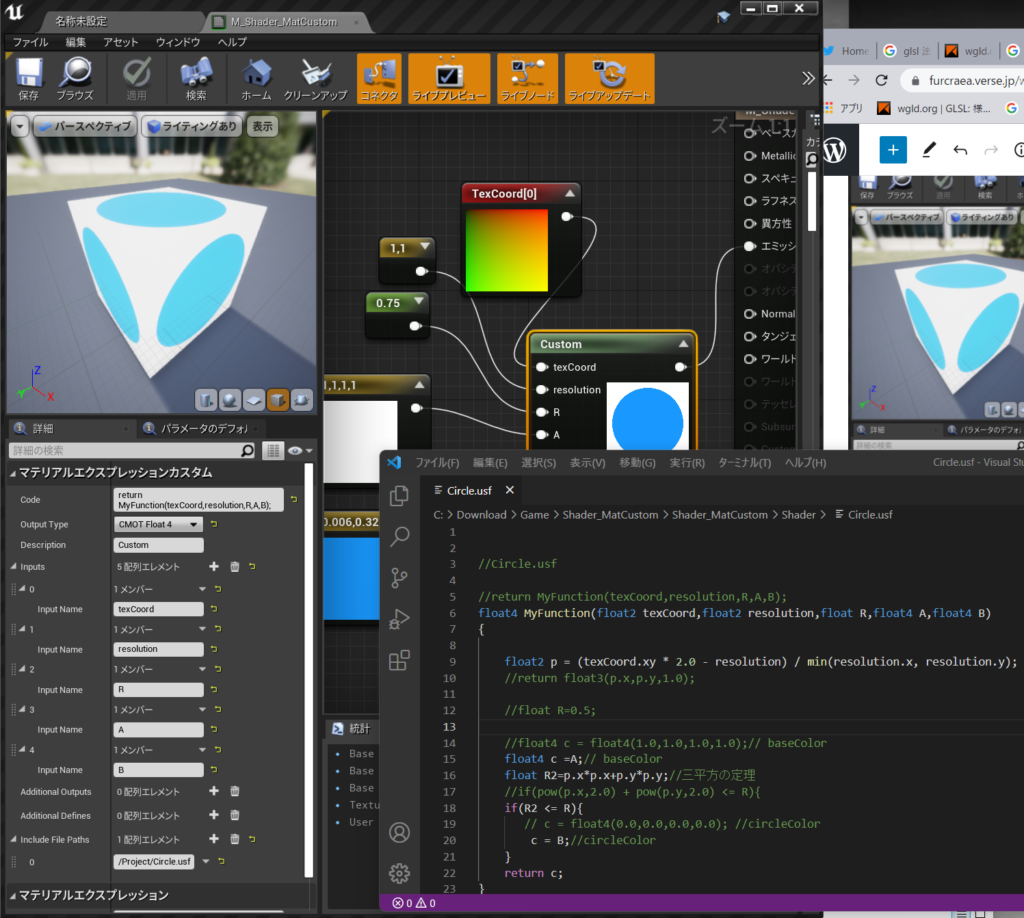

Code: return MyFunction(texCoord,resolution,R,A,B);
OutputType:Float4
Inputs: texCoord,resolution,R,A,B
Input File Paths: /Project/Circle.usf
pow(V,2.0)でVの2乗って意味
https://docs.microsoft.com/en-us/windows/win32/direct3dhlsl/dx-graphics-hlsl-pow
つかわないでみた。
float R2=p.x*p.x+p.y*p.y;//三平方の定理
//Circle.usf

//return MyFunction(texCoord,resolution,R,A,B);
float4 MyFunction(float2 texCoord,float2 resolution,float R,float4 A,float4 B)
{

	float2 p = (texCoord.xy * 2.0 - resolution) / min(resolution.x, resolution.y);
	//return float3(p.x,p.y,1.0);

    //float R=0.5;

    //float4 c = float4(1.0,1.0,1.0,1.0);// baseColor
    float4 c =A;// baseColor
    float R2=p.x*p.x+p.y*p.y;//三平方の定理
    //if(pow(p.x,2.0) + pow(p.y,2.0) <= R){
    if(R2 <= R){
       // c = float4(0.0,0.0,0.0,0.0); //circleColor
        c = B;//circleColor
    }
    return c;
}
参考
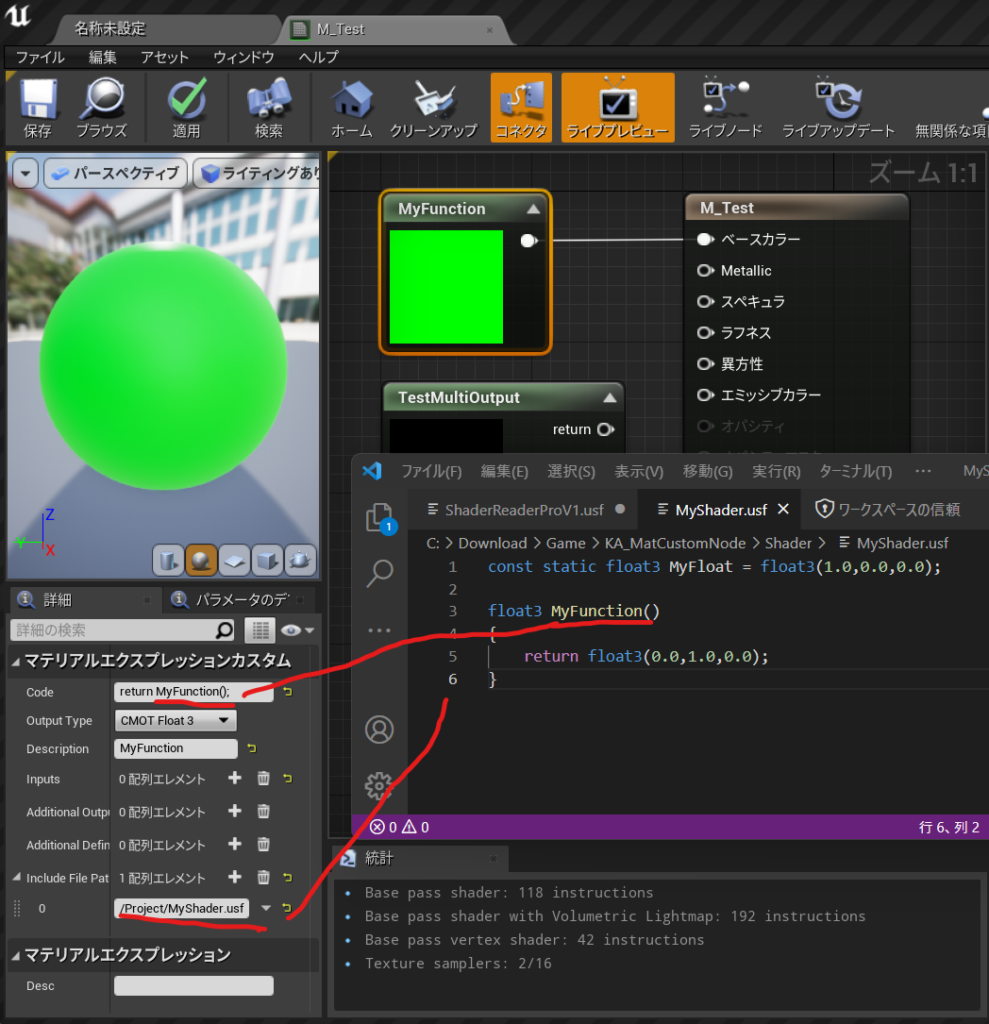
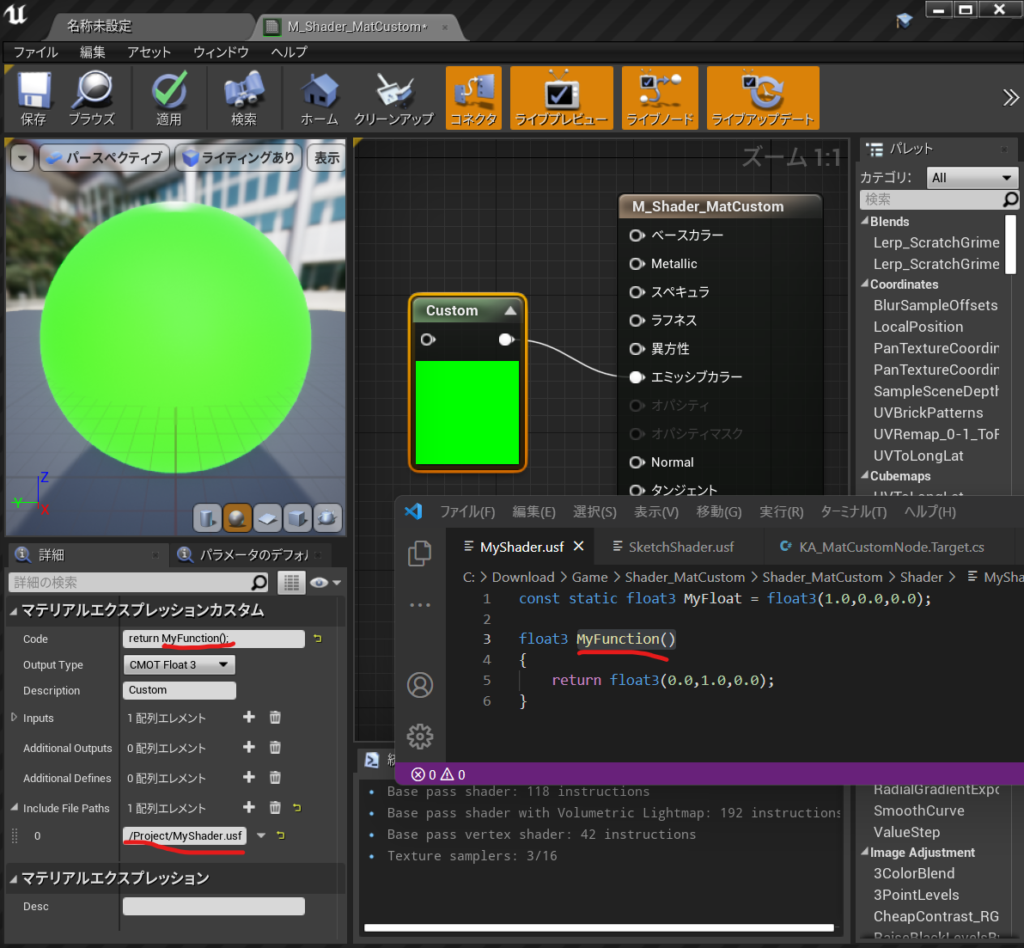
失敗1、2020年になってCustomノードが安定してきたみたいで
constで宣言しておくとそのままMyFloat使える
Codeにreturn MyFloat;で使える。
CodeにMyreturn MyFunction();で関数を呼び出せる。
const static float3 MyFloat = float3(1.0,0.0,0.0);

float3 MyFunction()
{
	return float3(0.0,1.0,0.0);
}
TestOutput1 = float3(0,0,1);
return 0.0;
Additional Output :TestOutput1
OutputType CMOT Float1
で
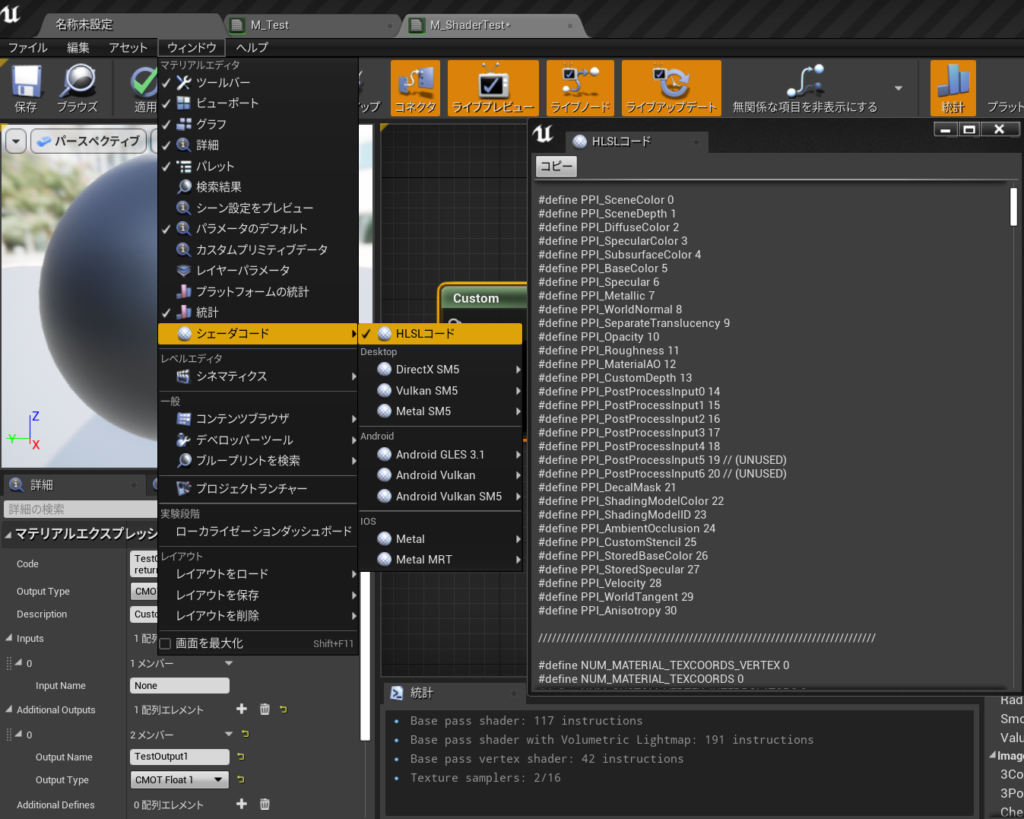
コンパイルされて自動生成されたHLSLコードの中身は
エラーコードで出てくるこれは
/Engine/Generated/Material.ush
マテリアルエディタのメニュー「ウインドウ>シェーダーコード>HLSL コード」を選択。
すると HLSL コードのウインドウが開き、コンパイルされた全マテリアルの内容が HLSL で表示される。
このプロジェクトの作り方は
【UE4】USF(Unreal Shader File) をすぐに始める環境設定 Project編さん
でのShaderフォルダの読み込み設定が必要だった。。50個ぐらいエラーがでるので見ない方がいいかも
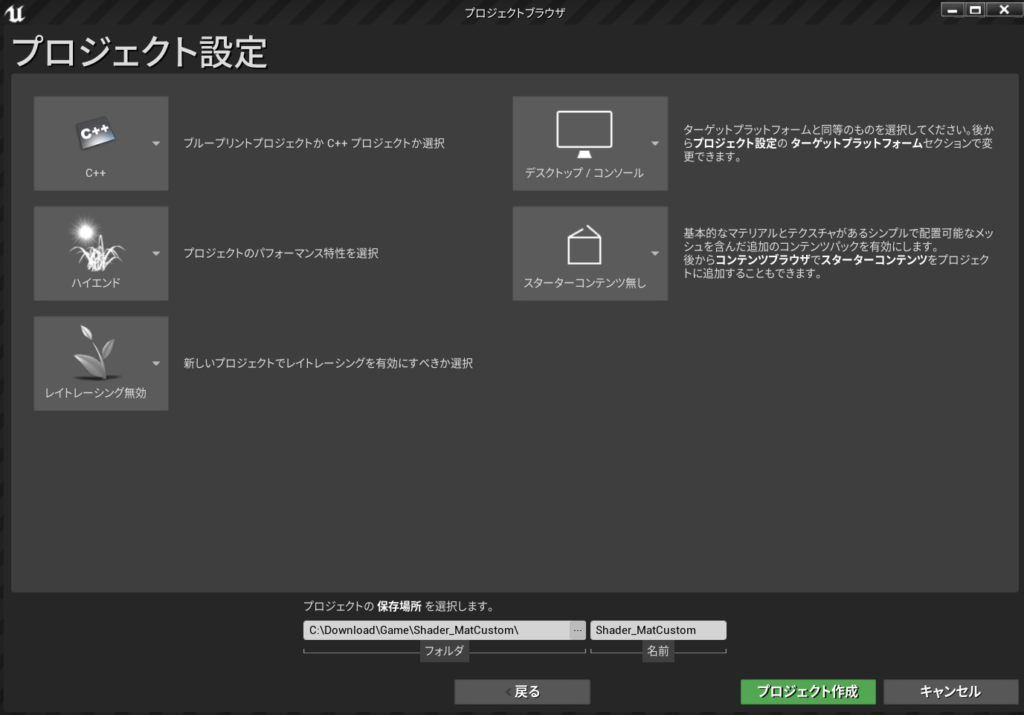
今回はプロジェクト名は:Shader_MatCustomにしたよ
プロジェクト設定でCPP

Shader_MatCustom.h
// Copyright Epic Games, Inc. All Rights Reserved.

#pragma once

#include "CoreMinimal.h"

#include "Modules/ModuleManager.h"

class FShader_MatCustom : public IModuleInterface
{
public:
    virtual void StartupModule() override;
    virtual void ShutdownModule() override;


};
Shader_MatCustom.cpp
// Copyright Epic Games, Inc. All Rights Reserved.

#include "Shader_MatCustom.h"
#include "Modules/ModuleManager.h"

IMPLEMENT_PRIMARY_GAME_MODULE( FShader_MatCustom, Shader_MatCustom, "Shader_MatCustom" );//3つの書き換え


void FShader_MatCustom::StartupModule()
{
    FString ShaderDirectory = FPaths::Combine(FPaths::ProjectDir(), TEXT("Shader"));
    if (!AllShaderSourceDirectoryMappings().Contains("/Project"))
    {
        AddShaderSourceDirectoryMapping("/Project", ShaderDirectory);
    }

}

void FShader_MatCustom::ShutdownModule()
{
}
Shader_MatCustom.Build.cs
// Copyright Epic Games, Inc. All Rights Reserved.

using UnrealBuildTool;

public class Shader_MatCustom : ModuleRules  // ←クラス名リネーム
{
	public Shader_MatCustom(ReadOnlyTargetRules Target) : base(Target)  // ←クラス名リネーム
	{
		PCHUsage = PCHUsageMode.UseExplicitOrSharedPCHs;

		PublicDependencyModuleNames.AddRange(new string[] {  //改行して展開した。
			"Core",
			"CoreUObject",
			"Engine",
			"InputCore",
			"RenderCore",  // ←追記
			"RHI"         // ←あとで必要になるので追記(パス追加に関係ない)
		});

		PrivateDependencyModuleNames.AddRange(new string[] {  });


		// Uncomment if you are using Slate UI
		// PrivateDependencyModuleNames.AddRange(new string[] { "Slate", "SlateCore" });

		// Uncomment if you are using online features
		// PrivateDependencyModuleNames.Add("OnlineSubsystem");

		// To include OnlineSubsystemSteam, add it to the plugins section in your uproject file with the Enabled attribute set to true
	}
}
VSでビルドをしてコンパイル
Shaderフォルダ作成
マテリアル作成
CustomNode作成
MyShader.usf作成
IncludeFilePathに/Project/MyShader.usf
MyShader.usf
const static float3 MyFloat = float3(1.0,0.0,0.0);

float3 MyFunction()
{
	return float3(0.0,1.0,0.0);
}
やっとうまくいったので
C++サンプルプロジェクトは丸ごとだ。.slnも入ってるよ
https://drive.google.com/file/d/1-ClY_v2cudLARAkMmAfPGrAnFndNnWIX/view?usp=sharing
参照
キンアジさんのところで見つけてしまった。
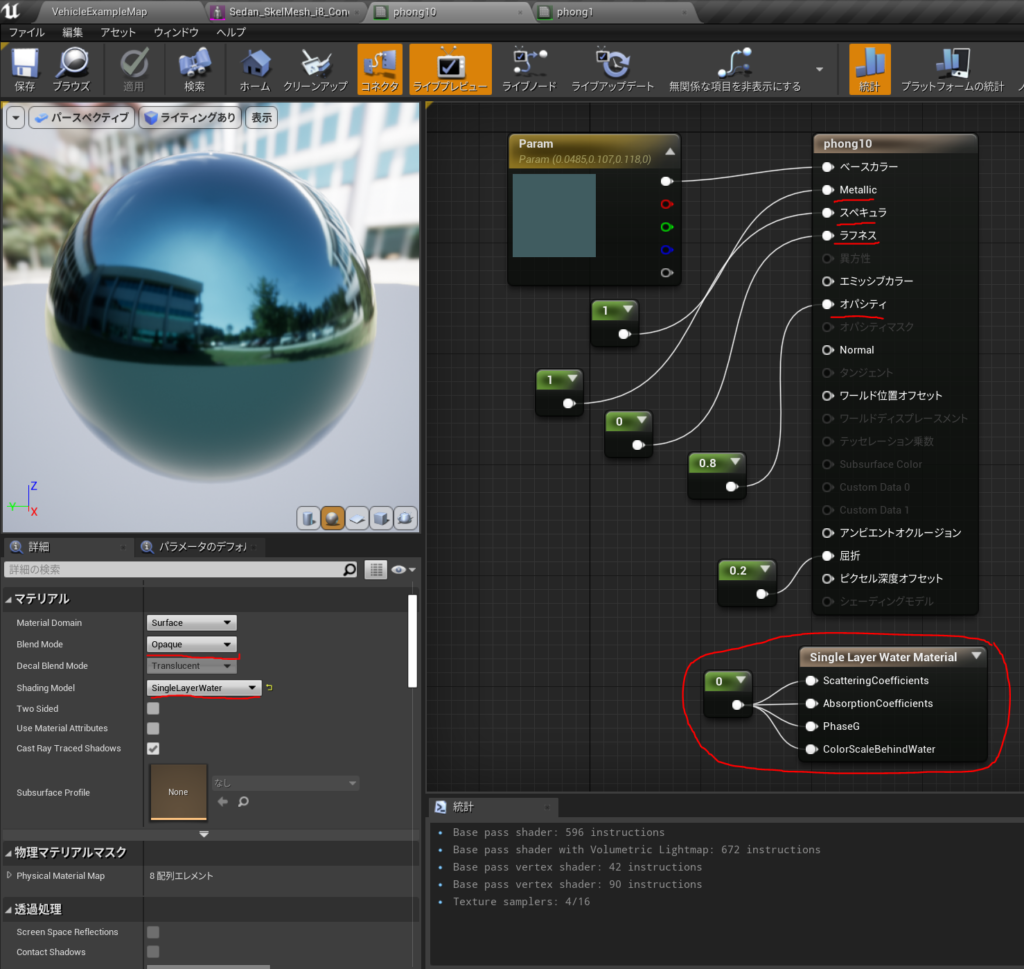
プレヴューだとわからないが
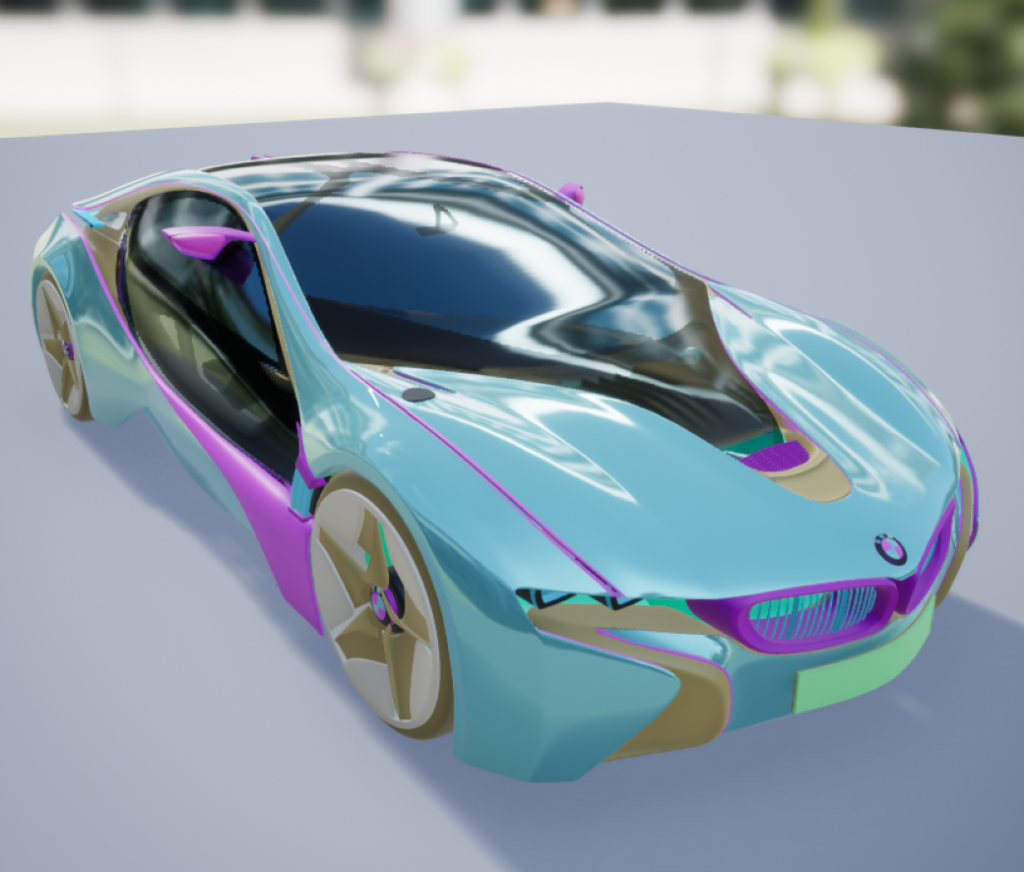
メッシュプレビューだとわかる。 車のガラス面に使ってみた。
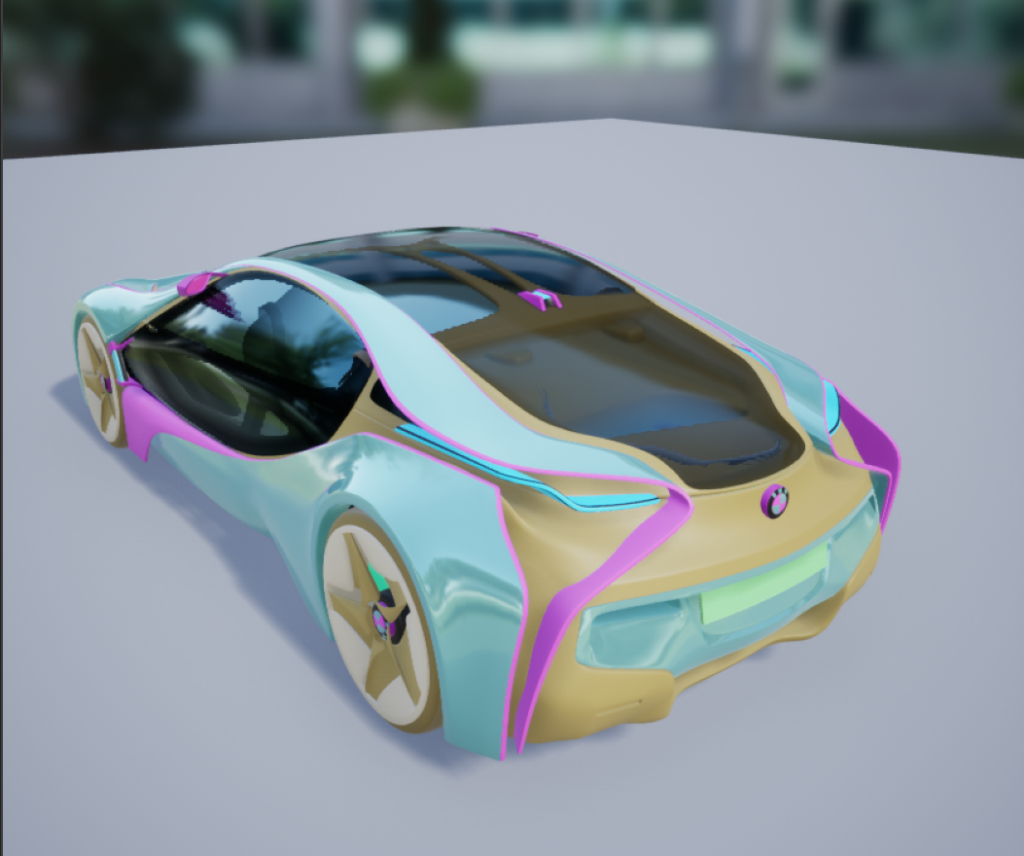
opacity 0.8でもあんまり透けない
参考URL
もっとやりかたがあった。
https://docs.unrealengine.com/4.27/en-US/RenderingAndGraphics/Materials/HowTo/Transparency/
作成したTransparency_Materialをコンテンツ ブラウザでダブルクリックして開きます。開いたら、 Translucencyカテゴリの[Details]パネルで、 [ Lighting Mode ]をVolumetric NonDirectionalからSurface TranslucencyVolumeに変更します。

すると

