あー基本をわすることなかれ.
遠まわりして、深夜の3時まで悩んでしまった。
BreakOutFloat2Componentsも初見
MakeFloat2も1度見たことあったかどうか
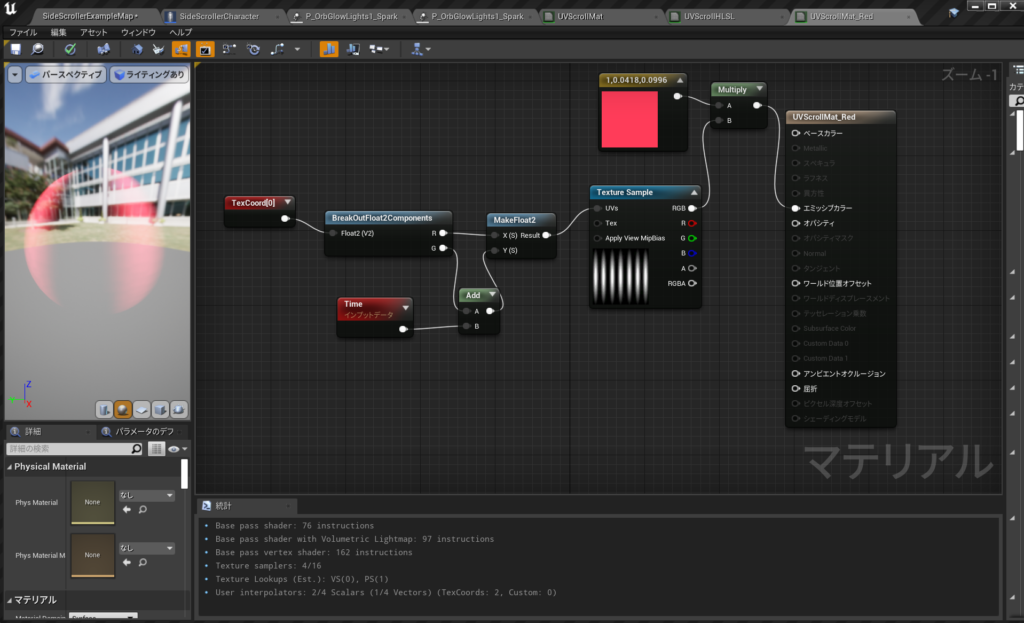
なぜだかHLSLでこうしても動かなかった
return float2(texCoord.x,texCoord.y+Time);参考

DESIGN AND FUTURE SCIENCE.
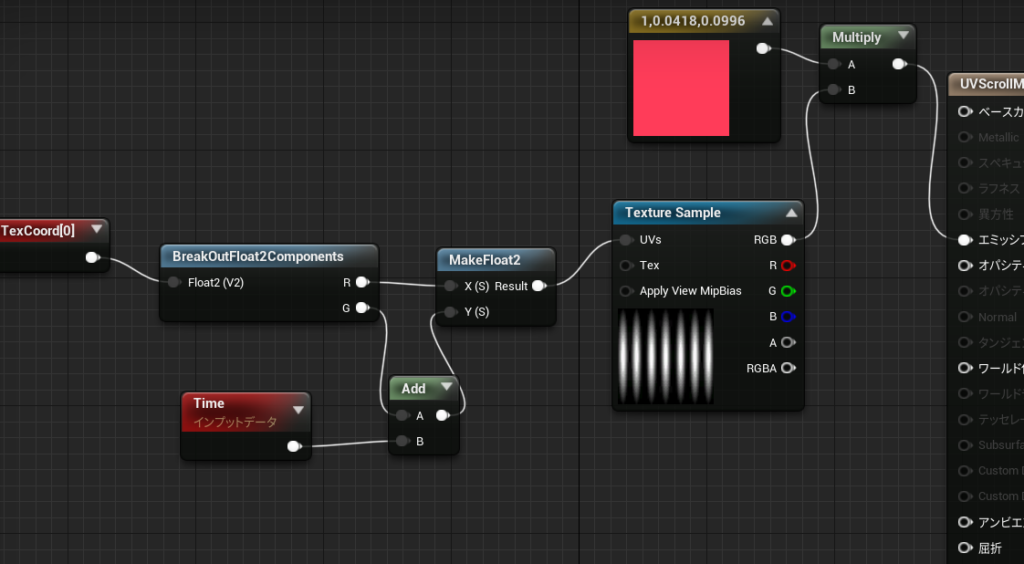
あー基本をわすることなかれ.
遠まわりして、深夜の3時まで悩んでしまった。
BreakOutFloat2Componentsも初見
MakeFloat2も1度見たことあったかどうか
なぜだかHLSLでこうしても動かなかった
return float2(texCoord.x,texCoord.y+Time);参考
UEソースコードを読むためのC++の勉強なので、パスを書いておく
UE_4.25\Engine\Source\Runtime\Engine\Public\DrawDebugHelpers.hの
DrawDebugCamera()を使うための
/** Draw a debug camera shape. FOV is full angle in degrees. */ENGINE_API void
/ **デバッグカメラの形状を描画します。 FOVは度単位の全角です。 * /エンジンのAPI
DrawDebugCamera(const UWorld* InWorld, FVector const& Location, FRotator const& Rotation, float FOVDeg, float Scale=1.f, FColor const& Color=FColor::White, bool bPersistentLines=false, float LifeTime=-1.f, uint8 DepthPriority = 0);
UE_4.25\Engine\Source\Runtime\Engine\Classes\GameFramework\Controller.hのGetPlayerViewPoint()
/**
* Returns Player’s Point of View
* For the AI this means the Pawn’s ‘Eyes’ ViewPoint
* For a Human player, this means the Camera’s ViewPoint
*
* @output out_Location, view location of player
* @output out_rotation, view rotation of player
*/
/ *
プレイヤーの視点を返します
AIの場合、これはポーンの「目」ビューポイントを意味します
人間のプレイヤーの場合、これはカメラのビューポイントを意味します
@output out_Location、プレーヤーの場所を表示
@output out_rotation、プレーヤーの回転を表示
*/
virtual void GetPlayerViewPoint( FVector& Location, FRotator& Rotation ) const;
Gun.cpp
#include "DrawDebugHelpers.h"
void AGun::PullTrigger()
{
UE_LOG(LogTemp,Warning,TEXT("You have been shot!! "));
//MuzzleFlashSocket
UGameplayStatics::SpawnEmitterAttached(MuzzleFlash, Mesh, TEXT("MuzzleFlashSocket"));
APawn* OwnerPawn = Cast<APawn>(GetOwner());
if(OwnerPawn==nullptr)
{
return;
}
AController* OwnerController= OwnerPawn ->GetController();
if(OwnerController==nullptr)
{
return;
}
FVector Location;
FRotator Rotation;
OwnerController->GetPlayerViewPoint( Location, Rotation );
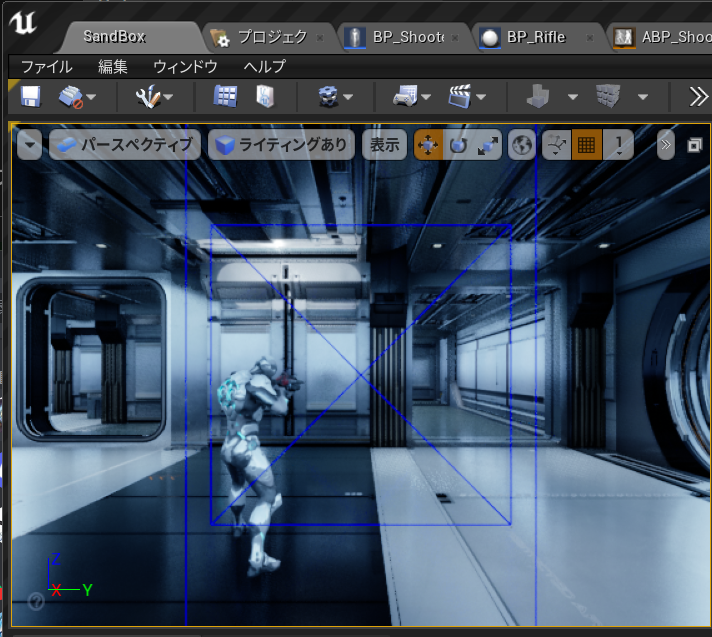
//DrawDebugCamera(UWorld, Location, Rotation, float FOVDeg, float Scale=1.f, FColor const& Color=FColor::White, bool bPersistentLines=false, float LifeTime=-1.f, uint8 DepthPriority = 0);
float FOVDeg=90;
float Scale=2.f;
FColor const& Color=FColor::Blue;
bool bPersistentLines=true;
float LifeTime=-1.f;
uint8 DepthPriority = 0;
DrawDebugCamera(GetWorld(), Location, Rotation, FOVDeg, Scale, Color, bPersistentLines, LifeTime, DepthPriority);
}
勉強したこと
Gun.hで
/// Indicates that this property can be edited by property windows in the editor EditAnywhere,
/////このプロパティがエディタのプロパティウィンドウで編集できることを示します
スポーンするものはポインタで。
	UPROPERTY(EditAnyWhere)
	UParticleSystem* MuzzleFlash;
Gun.cppで
//簡単な方法
static UParticleSystemComponent* SpawnEmitterAttached(class UParticleSystem* EmitterTemplate, class USceneComponent* AttachToComponent, FName AttachPointName = NAME_None);
// Backwards compatible version of SpawnEmitterAttached for C++ without Scale
//スケールなしのC ++用のSpawnEmitterAttachedの下位互換バージョン
//デフォルト引数がなくて多く使いずらいもの
static UParticleSystemComponent* SpawnEmitterAttached(class UParticleSystem* EmitterTemplate, class USceneComponent* AttachToComponent, FName AttachPointName, FVector Location, FRotator Rotation, EAttachLocation::Type LocationType);
#include "Kismet/GameplayStatics.h"
UGameplayStatics::SpawnEmitterAttached(MuzzleFlash, Mesh, TEXT("MuzzleFlashSocket"));
そしたらエディタでエミッタを設定する
このチュートリアルは長いので先にやりたいものをやることにした
Simple Shooter をやれればいいので、さきにやってみた。UE4.25が必要だ。
Pythonは実務レベルだけどUEC++はあまちゃんです。まちがいもあるかも。。。
勉強したこと
1,あらかじめ”Gun”というクラスをUEエディタでC++クラスのActorとして作成しておく。
Gun.hにはAGun
class SIMPLESHOOTERCP2_API AGun : public AActor
{
~省略~
}
ここでAGunというアクターのサブクラスを作成したことになる
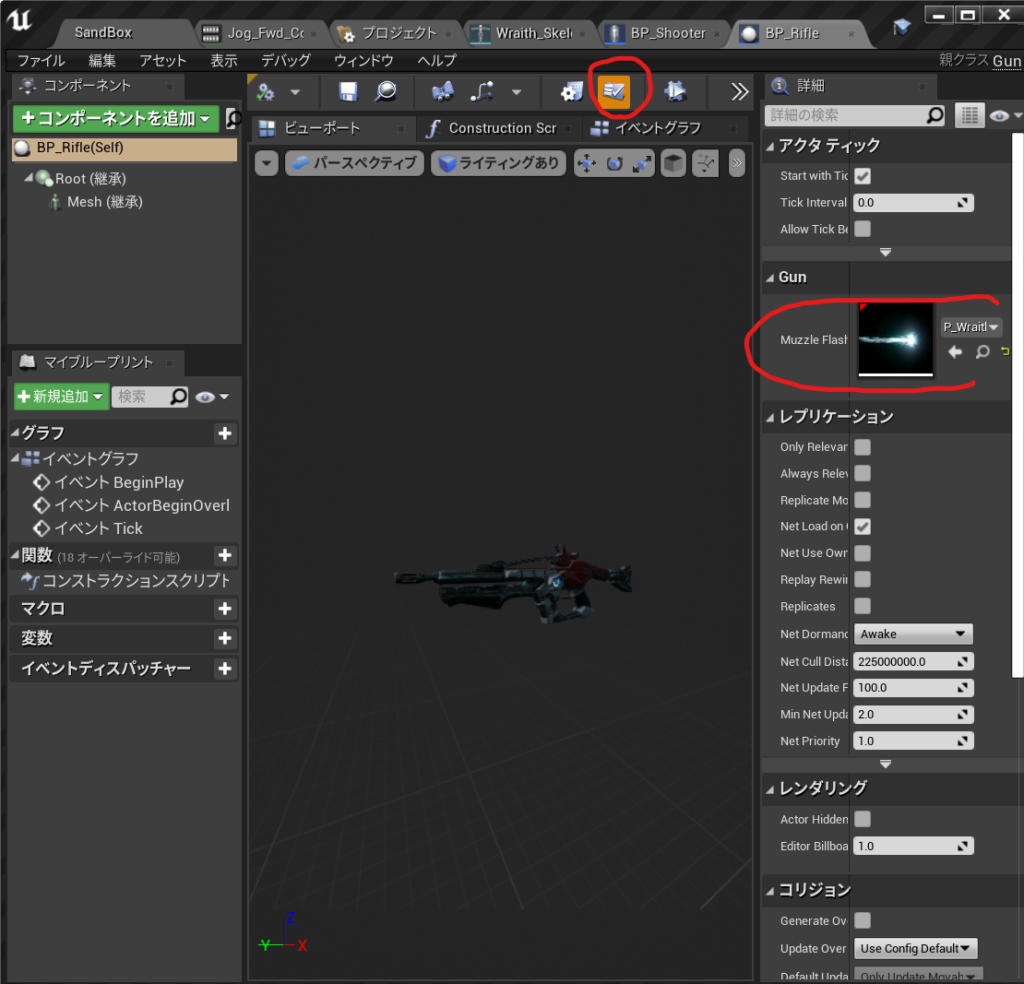
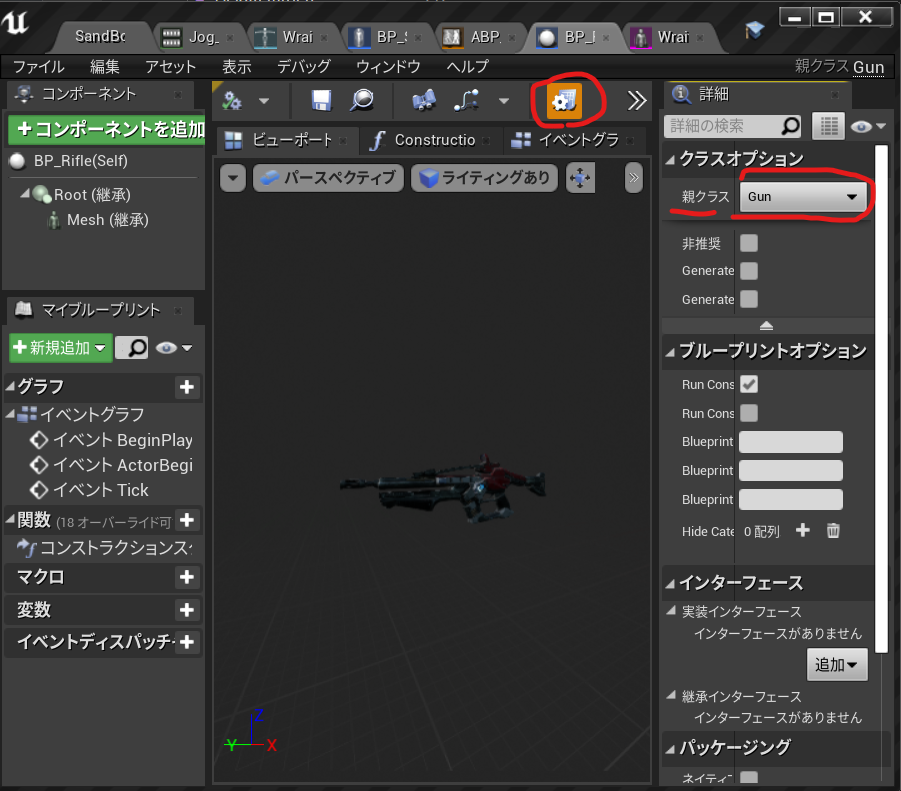
2,BP_Gunというブループリントを作成する。
3,BP_Gunの親クラスの設定をGunにする。画像参照
■Gun持たせたいキャラクターの.hで
クラス自体 とAGun型の変数を宣言
UnrealEngineで作ったサブクラスの参照を持ちたいときは
class AGun;//AGunというクラスをつかいますよ宣言
//UE用プロパティをデフォルトの時だけ編集する
//TClassType型を型安全性で渡すことができるテンプレート
//AGun型のクラス自体を宣言
UPROPERTY(EditDefaultOnly)
TSubclassOf<AGun> GunClass
//銃の実際のインスタンスを指していないので、これはポインタにはなりません。この変数で
//取得しているのは、クラス自体です。

//UE用のプロパティ宣言
//AGun型のUEのスポーン用インスタンスの参照を持ちたいときはポインタ
UPROPERTY()
AGun* Gun;//AGun型の変数を宣言■Gun持たせたいキャラクターの.cppで インスタンス化するときこんな感じ
//AGunクラスのGun変数にワールドのSpawnActorメソッドにAGun型とクラス自体を渡す
Gun = GetWorld()->SpawnActor<AGun>(GunClass);
そんなこんなで今回のもってる銃を隠して持たせるコードはこう。
//AGunクラスのGun変数にワールドクラスのSpawnActorメソッドにAGun型とクラスを渡す
Gun = GetWorld()->SpawnActor<AGun>(GunClass);//銃をワールドに配置
//ボーン名からSkinMeshを隠します
GetMesh()->HideBoneByName(TEXT("weapon_r"),EPhysBodyOp::PBO_None );
//MeshのSocket名の場所に相対的な位置をキープしてで配置します。
Gun->AttachToComponent(GetMesh(), FAttachmentTransformRules::KeepRelativeTransform, TEXT("weaponSocket"));
//オーナーの設定これを使用して、後で所有するキャラクターへの参照を取得できます。
Gun->SetOwner(this);
すばらしい参考
[UE4] C++で動的にアクターを生成(スポーン)する方法で一番実用的だった方法https://qiita.com/Kuroyanagi96/items/7849dfaed83fc8df5741
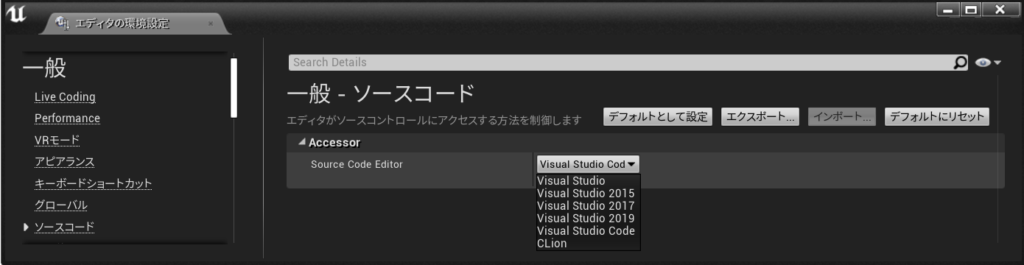
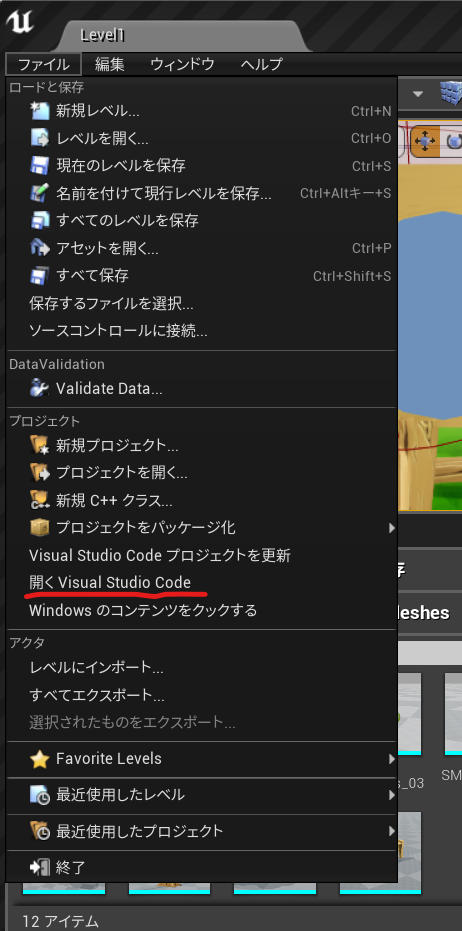
エディタの環境設定>一般>ソースコードAccessor>Source Code Editor >Visual Studio Code
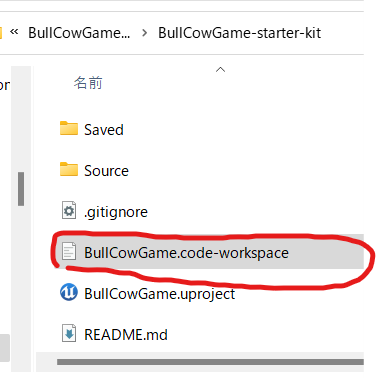
Generate Visual Studio Code Project (Visual Studio Code プロジェクトを作成)
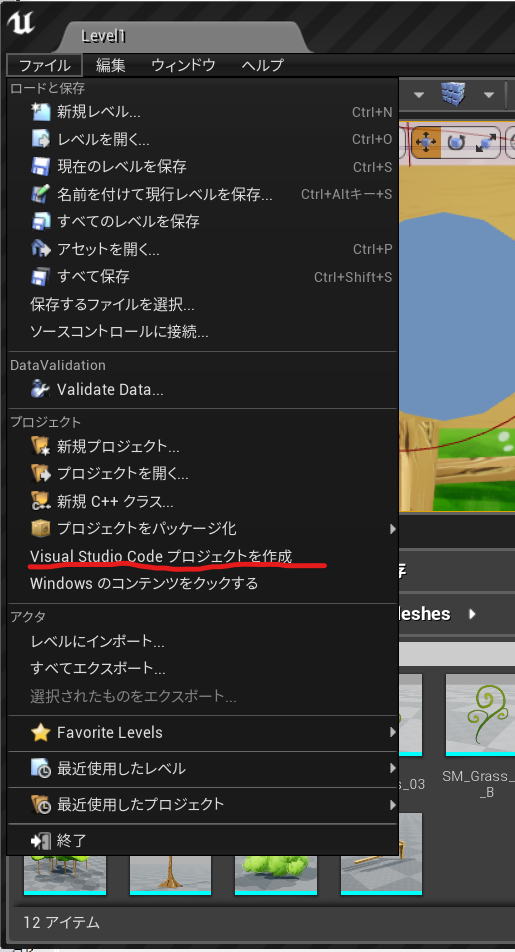
workspaceができる
Open Visual Studio Code (開く Visual Studio Code)
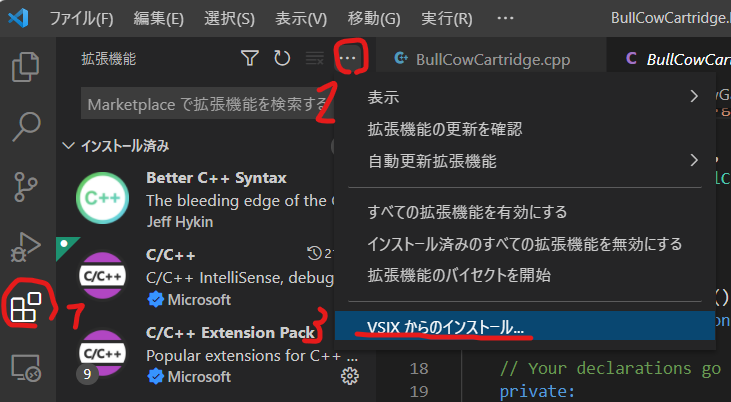
インテリセンスの影響で壊れるコードをサポートする拡張をインストール
https://gist.github.com/boocs/f63a4878156295b6e854cac68672f305
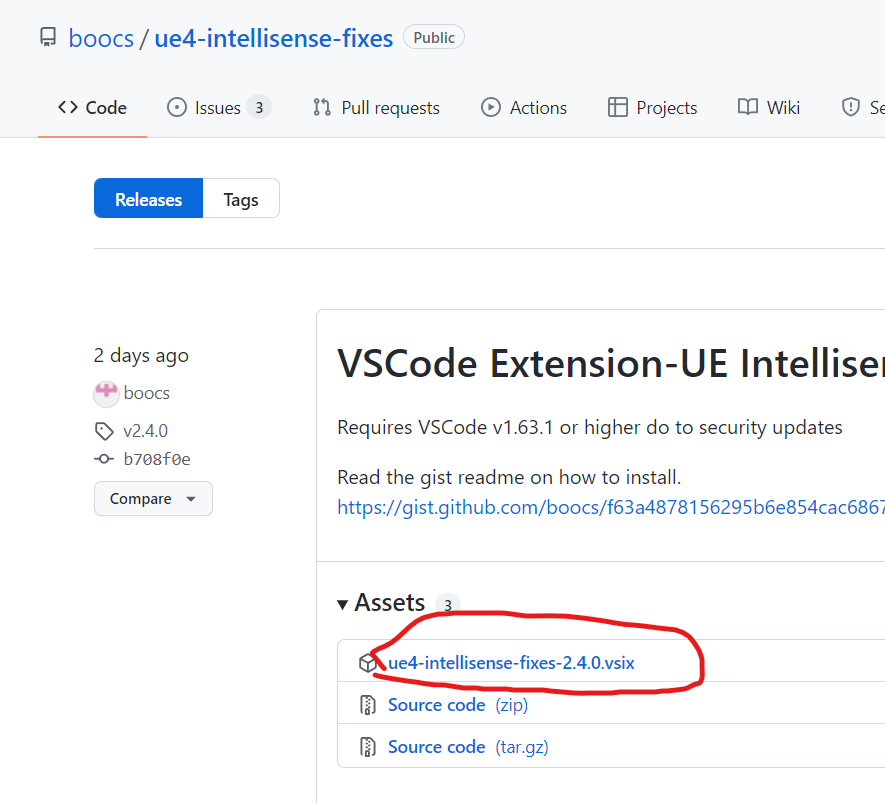
ダウンロードしたVSIXを選ぶとインストール完了
ファイル>ユーザー設定>設定>
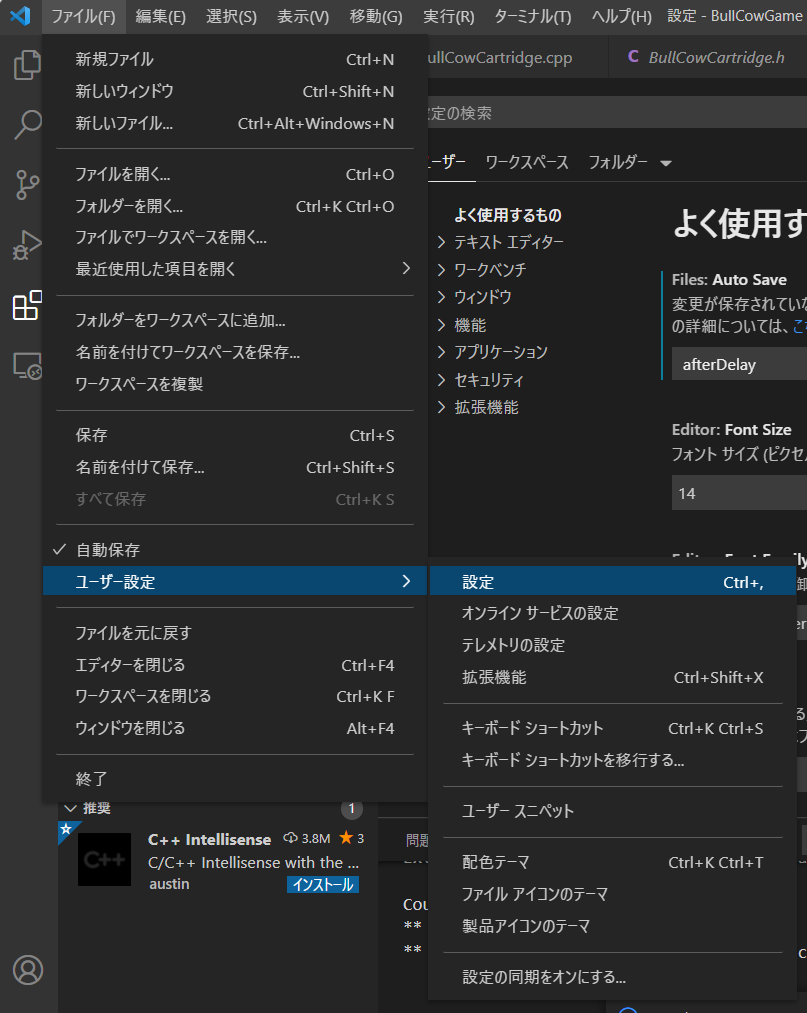
ue intellisense と検索して出てくるチェックを二つオンにした。

いちどVSCodeを再起動
UE4>Studio Code (開く Visual Studio Code)
#include <iostream>
#include <ctime>
void PrintIntroduction(int Diffculty)
{
    //Coment
    std::cout << "\n\nYou are a secret agent breaking into a "<< Diffculty;
    std::cout << " secure server room...\nEnter the correct code to continue...\n\n";
}
bool PlayGame(int Diffculty)
{
    PrintIntroduction(Diffculty);

    const int CodeA = rand() % Diffculty;
    const int CodeB = rand() % Diffculty;
    const int CodeC = rand() % Diffculty;

    const int CodeSum = CodeA + CodeB + CodeC;
    const int CodeProduct = CodeA * CodeB * CodeC;
    /*
    Comment
    */
    std::cout << std::endl;
    std::cout << "There are 3 nember in the code";
    std::cout << "\nThe codes add-up to: " << CodeSum ;
    std::cout << "\nThe codes multiply to give: " << CodeProduct << std::endl;

    //Store Player guess
    int GuessA,GuessB,GuessC;
    std::cin >> GuessA >> GuessB >> GuessC;
    //std::cout << "You Entered: " << GuessA << GuessB << GuessC;

    int GuessSum = GuessA + GuessB + GuessC;
    int GuessProduct = GuessA * GuessB * GuessC;

    //std::cout << "The codes add-up to: " << GuessSum << std::endl;
    //std::cout << "The codes multiply to give: " << GuessProduct << std::endl;

    //Check the player Guess
    if(GuessSum==CodeSum && GuessProduct== CodeProduct)
    {
        std::cout << "You Win \n";
        return true;
    }
    else
    {
        std::cout << "You Lose \n";
        return false;
    }
}

int main()
{
    srand(time(NULL));

    int LevelDifficalty = 1;
    int const MaxDiffculty=5;
    while (LevelDifficalty <= MaxDiffculty)//loop game
    {
        std::cout << rand() % 10 << "\n";
        bool bLevelComplete = PlayGame(LevelDifficalty);
        std::cin.clear();//Clear any Error
        std::cin.ignore();//Discard the buffer

        if (bLevelComplete)
        {
            ++LevelDifficalty;
        }

    }
    std::cout << "You is God!! ";

    return 0;
}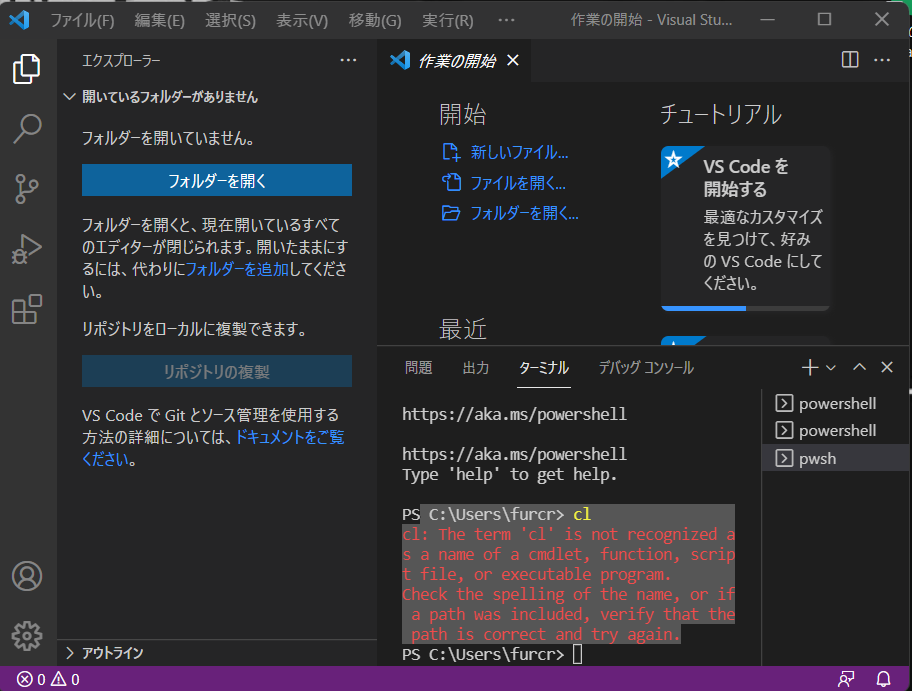
このエラーでclができない。
なんかパスが通ってないのかと思ったが
なにもおかしくない VSCodeの起動方法が間違っていた。
clを動かしたければ、VScodeをDeveloper Command Prompt for VS 2019から起動してくださいってことだった。
1,アプリの検索虫眼鏡>dev
2,Click * Visual Studio 2019 Developer Command Prompt
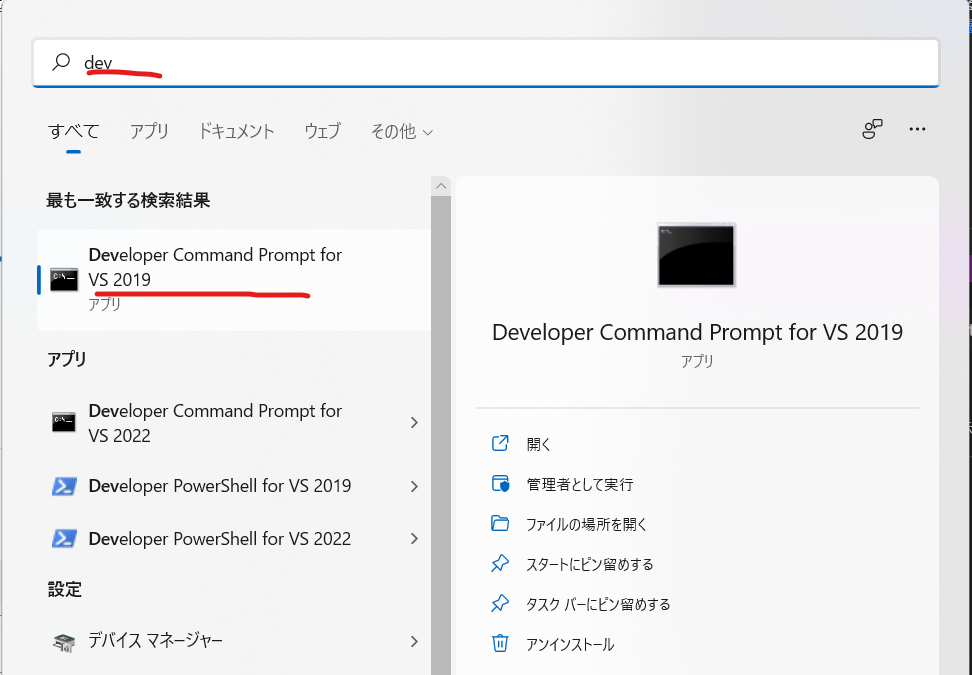
3,入力:code
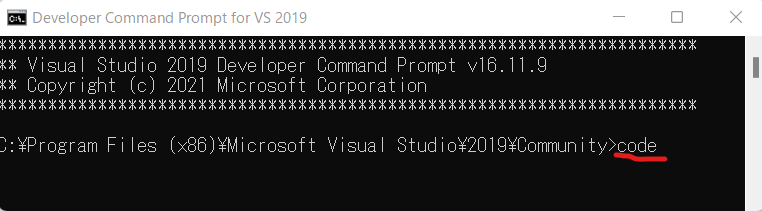
** Visual Studio 2019 Developer Command Prompt v16.11.9
** Copyright (c) 2021 Microsoft Corporation
C:\Program Files (x86)\Microsoft Visual Studio\2019\Community>code
4,VSCode > 新しいターミナル

PowerShell 7.2.1
Copyright (c) Microsoft Corporation.
https://aka.ms/powershell
Type ‘help’ to get help.
5,PS C:\Users\furcr> cl
Microsoft(R) C/C++ Optimizing Compiler Version 19.29.30139 for x86
Copyright (C) Microsoft Corporation. All rights reserved.
使い方: cl [ オプション… ] ファイル名… [ /link リンク オプション… ]
PS C:\Users\furcr>
できたね!!
ということでダブルクリックで起動したいので。ショートカットのバッチを作ろうとしたがそんな簡単な話ではないみたい。なので
Visual Studio 2019 Developer Command Promptをタスクバーにピン止めした。
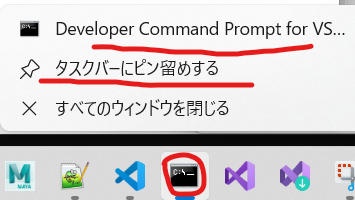
「今度からはこれをクリックしてcodeと入力しようと思う。」
以上、おわり!
—————————————VsDevCmd.batのお話—————————————————
ちなみに
Visual Studio 2019 Developer Command Promptのリンク先はこんなんなってて
%comspec% /k “C:\Program Files (x86)\Microsoft Visual Studio\2019\Community\Common7\Tools\VsDevCmd.bat”
中身も287行あるのねなんか自動化しずらい。。。。。ので一旦保留
@if NOT "%VSCMD_DEBUG%" GEQ "3" @echo off

@REM If in debug mode, we want to log the environment variable state
@REM prior to VSDevCmd.bat being executed. This is disabled by default
@REM and is enabled by setting [VSCMD_DEBUG] to some value.
if "%VSCMD_DEBUG%" NEQ "" (
        @echo [DEBUG:%~n0] Writing pre-initialization environment to %temp%\dd_vsdevcmd16_preinit_env.log
        set > %temp%\dd_vsdevcmd16_preinit_env.log
)

@REM Dump the pre-initialization environment if debug level is 2 or greater (detailed or full trace).
if "%VSCMD_DEBUG%" GEQ "2" (
    @echo [DEBUG:%~nx0] --------------------- VS Developer Command Prompt Environment [pre-init] ---------------------
    set
    @echo [DEBUG:%~nx0] --------------------- VS Developer Command Prompt Environment [pre-init] ---------------------
)

@REM script-local error counter
set __vscmd_vsdevcmd_errcount=0

@REM Parse the command line and set variables needed.
@REM Need to use this variable instead of passing arguments to escape
@REM the /? option, which will otherwise display the help for 'call'.
set "__VSCMD_ARGS_LIST=%*"
call "%~dp0vsdevcmd\core\vsdevcmd_start.bat"
set __VSCMD_ARGS_LIST=

@REM if -? was specified, then help was already printed and we can exit.
if "%VSCMD_ARG_HELP%"=="1" goto :end

@REM Set VisualStudioVersion for compatibility with previous revisions of the
@REM VS Developer Command Prompt.
set "VisualStudioVersion=16.0"

@REM set the version number to ensure the banner/logo can print it.
@REM We set the version number to the general VS Version (e.g. 15.0)
@REM but will attempt to get a more specific build number from
@REM devenv.exe, if that file is found.
set "VSCMD_VER=16.0"
call :get_vscmd_ver
call :print_vscmd_header

if "%VSCMD_DEBUG%" GEQ "2" (
    @echo [DEBUG:%~nx0] -clean_env : %VSCMD_ARG_CLEAN_ENV%
    @echo [DEBUG:%~nx0] -test : %VSCMD_TEST%
    @echo [DEBUG:%~nx0] VS160COMNTOOLS : "%VS160COMNTOOLS%"
)

@REM Process scripts 'core' and then 'ext in alphabetical order'.
call :process_core
call :process_ext

@rem Normalize common variables with semi-colon separated lists
call :normalize_multipath_variable PATH
call :normalize_multipath_variable INCLUDE
call :normalize_multipath_variable LIB
call :normalize_multipath_variable LIBPATH

goto :end

@REM ------------------------------------------------------------------------
:process_core

@REM *****************************************************************
@REM This section processes known scripts under vsdevcmd\core.
@REM These scripts must be explicitly included in this section to be
@REM called.
@REM
@REM This section should only contain support for components that
@REM are required by environment scripts (i.e. dependencies). All
@REM leaf node scripts should be placed in vsdevcmd\ext, instead.
@REM *****************************************************************

@REM *** .NET Framework ***
:core_dotnet
if EXIST "%VS160COMNTOOLS%VsDevCmd\core\dotnet.bat" call :call_script_helper core\dotnet.bat

@REM *** msbuild ***
:core_msbuild
if EXIST "%VS160COMNTOOLS%VsDevCmd\core\msbuild.bat" call :call_script_helper core\msbuild.bat

@REM *** Windows SDK ***
:core_winsdk
if EXIST "%VS160COMNTOOLS%VsDevCmd\core\winsdk.bat" call :call_script_helper core\winsdk.bat

exit /B 0

@REM ------------------------------------------------------------------------
:process_ext

if "%VSCMD_ARG_NO_EXT%"=="1" (
    if "%VSCMD_DEBUG%" GEQ "1" @echo [DEBUG:%~nx0] Skipping vsdevcmd\ext scripts since -no_ext was specified
    goto :ext_end
)

@REM *****************************************************************
@REM This section executes all .bat files found in vsdevcmd\ext.
@REM Any "leaf node" script should be placed in this directory.
@REM A few notes:
@REM * For determinism sake, the scripts are called in alphabetical
@REM   order.
@REM * This section does NOT recursively look in sub-directories
@REM   under vsdevcmd\ext. Sub-directories may be used for
@REM   "implementation detail" scripts called by .bat files in the
@REM   vsdevcmd\ext folder.
@REM *****************************************************************

@REM Iterate through ext scripts
if NOT EXIST "%VS160COMNTOOLS%vsdevcmd\ext\" (
    @echo [ERROR:%~nx0] Cannot find 'ext' folder "%VS160COMNTOOLS%vsdevcmd\ext\"
    set /A __vscmd_vsdevcmd_errcount=__vscmd_vsdevcmd_errcount+1
    goto :ext_end
)

for /F %%a in ( 'dir "%VS160COMNTOOLS%vsdevcmd\ext\*.bat" /b /a-d-h /on' ) do (
    call :call_script_helper ext\%%a
)

:ext_end
set __vscmd_dir_cmd_opt=
exit /B 0

@REM ------------------------------------------------------------------------
:call_script_helper
if NOT EXIST "%VS160COMNTOOLS%vsdevcmd\%1" (
    @echo [ERROR:%~nx0] Script "vsdevcmd\%1" could not be found.
    set /A __vscmd_vsdevcmd_errcount=__vscmd_vsdevcmd_errcount+1
    exit /B 1
)

if "%VSCMD_TEST%" NEQ "" set __VSCMD_INTERNAL_INIT_STATE=test
if "%VSCMD_ARG_CLEAN_ENV%" NEQ "" set __VSCMD_INTERNAL_INIT_STATE=clean

if "%VSCMD_DEBUG%" GEQ "1" @echo [DEBUG:%~nx0] calling "%1"
call "%VS160COMNTOOLS%vsdevcmd\%1"

set __VSCMD_INTERNAL_INIT_STATE=

if "%ERRORLEVEL%" NEQ "0" (
    if "%VSCMD_DEBUG%" NEQ "" @echo [ERROR:%1] init:FAILED code:%ERRORLEVEL%

    set /A __vscmd_vsdevcmd_errcount=__vscmd_vsdevcmd_errcount+1
    exit /B 1
) else (
    if "%VSCMD_DEBUG%" GEQ "1" @echo [DEBUG:%1] init:COMPLETE
)
exit /B 0

:get_vscmd_ver

@REM VsDevCmd.bat location: Microsoft Visual Studio 16.0\Common7\Tools
@REM get version from VsWhere.exe
@REM fallback to printing default

set __VSCMD_VER=

@REM If vswhere.exe is not found we skip this section as it doesn't effect operation.
if NOT EXIST "%ProgramFiles(x86)%\Microsoft Visual Studio\Installer\vswhere.exe" (
    if "%VSCMD_DEBUG%" GEQ "2" @echo [DEBUG:%~nx0] "%ProgramFiles(x86)%\Microsoft Visual Studio\Installer\vswhere.exe" not found.
    goto:end_vswhere
) else (
    set "__vscmd_vswhere_path=%ProgramFiles(x86)%\Microsoft Visual Studio\Installer\"
)

@REM Looking for a line of the form "<semver>+<bld>", so we split the
@REM contents of the line on '+'.
pushd "%__vscmd_vswhere_path%"
for /F "tokens=1,* delims=+" %%A in ('vswhere.exe -property catalog_productSemanticVersion -path "%~dp0%~nx0"') do (
    if "%VSCMD_DEBUG%" GEQ "1" @echo [DEBUG:%~nx0] Found version "%%A"
    set "__VSCMD_VER=%%A"
)
popd
set __vscmd_vswhere_path=

:end_vswhere

if "%__VSCMD_VER%" == "" (
    if "%VSCMD_DEBUG%" GEQ "1" @echo [DEBUG:%~nx0] SemanticVersion not found
) else (
    if "%VSCMD_DEBUG%" GEQ "2" @echo [DEBUG:%~nx0] Setting VSCMD_VER="%VSCMD_VER%".
    set "VSCMD_VER=%__VSCMD_VER%"
)

:get_vscmd_ver_end

set __VSCMD_VER=
exit /B 0

@REM ------------------------------------------------------------------------
:print_vscmd_header

@REM Allow other Visual Studio developer shells to override just the shell name in the banner text
if "%VSCMD_BANNER_SHELL_NAME_ALT%"=="" (
    set "__VSCMD_BANNER_SHELL_NAME=Developer Command Prompt"
) else (
    set "__VSCMD_BANNER_SHELL_NAME=%VSCMD_BANNER_SHELL_NAME_ALT%"
)

@REM Allow other Visual Studio command prompts to override the banner text
if "%VSCMD_BANNER_TEXT_ALT%"=="" (
    set "__VSCMD_BANNER_TEXT=Visual Studio 2019 %__VSCMD_BANNER_SHELL_NAME% v%VSCMD_VER%"
) else (
    set "__VSCMD_BANNER_TEXT=%VSCMD_BANNER_TEXT_ALT%"
)

if "%VSCMD_ARG_no_logo%"=="" (
    @echo **********************************************************************
    @echo ** %__VSCMD_BANNER_TEXT%
    @echo ** Copyright ^(c^) 2021 Microsoft Corporation
    @echo **********************************************************************
)

set __VSCMD_BANNER_TEXT=
set __VSCMD_BANNER_SHELL_NAME=
exit /B 0

@REM ------------------------------------------------------------------------
@REM call :normalize_multipath_variable <variable name>
@REM Removes trailing semi-colons from semi-colon separated list variable
:normalize_multipath_variable
set "__NORMALIZE_VAR=%1"
call set "__NORMALIZE_VAR_CONTENT=%%%__NORMALIZE_VAR%%%"

if "%__NORMALIZE_VAR_CONTENT:~-1%"==";" (
    set "%__NORMALIZE_VAR%=%__NORMALIZE_VAR_CONTENT:~0,-1%"
)

set "__NORMALIZE_VAR="
set "__NORMALIZE_VAR_CONTENT="

exit /B 0

@REM ------------------------------------------------------------------------
:end

@REM Send Telemetry if user's VS is opted-in
if "%VSCMD_SKIP_SENDTELEMETRY%"=="" (
    if "%VSCMD_DEBUG%" NEQ "" (
        @echo [DEBUG:%~nx0] Sending telemetry
        powershell.exe -NoProfile -Command "& {Import-Module '%~dp0\Microsoft.VisualStudio.DevShell.dll'; Send-VsDevShellTelemetry -NewInstanceType Cmd;}"
    ) else (
        START "" /B powershell.exe -NoProfile -Command "& {if($PSVersionTable.PSVersion.Major -ge 3){Import-Module '%~dp0\Microsoft.VisualStudio.DevShell.dll'; Send-VsDevShellTelemetry -NewInstanceType Cmd; }}" > NUL
    )
)

@REM Script clean-up of environment variables used to track
@REM command line options and other state that does not need to
@REM persist past the end of the script.
call "%~dp0vsdevcmd\core\vsdevcmd_end.bat"

if "%__vscmd_vsdevcmd_errcount%" NEQ "0" (
    @echo [ERROR:%~nx0] *** VsDevCmd.bat encountered errors. Environment may be incomplete and/or incorrect. ***
    @echo [ERROR:%~nx0] In an uninitialized command prompt, please 'set VSCMD_DEBUG=[value]' and then re-run
    @echo [ERROR:%~nx0] vsdevcmd.bat [args] for additional details.
    @echo [ERROR:%~nx0] Where [value] is:
    @echo [ERROR:%~nx0]    1 : basic debug logging
    @echo [ERROR:%~nx0]    2 : detailed debug logging
    @echo [ERROR:%~nx0]    3 : trace level logging. Redirection of output to a file when using this level is recommended.
    @echo [ERROR:%~nx0] Example: set VSCMD_DEBUG=3
    @echo [ERROR:%~nx0]          vsdevcmd.bat ^> vsdevcmd.trace.txt 2^>^&1
    set __vscmd_vsdevcmd_errcount=
    call :final_log
    exit /B 1
) else (
    if "%VSCMD_TEST%" NEQ "" @echo [TEST:%~nx0] *** VsDevCmd.bat tests are complete. ***
)

set __vscmd_vsdevcmd_errcount=

@REM ------------------------------------------------------------------------
:final_log

@REM Dump then environment after execution of vsdevcmd.bat.  This is used
@REM for debugging issues with the developer command prompt.  This logging
@REM is disabled by default and will only be enabled by setting of [VSCMD_DEBUG]
@REM in the environment
if "%VSCMD_DEBUG%" NEQ "" (
    @echo [DEBUG:%~n0] Writing post-execution environment to %temp%\dd_vsdevcmd16_env.log
    set > "%temp%\dd_vsdevcmd16_env.log"
)

@REM Dump the post-initialization environment if debug level is 2 or greater (detailed or full trace).
if "%VSCMD_DEBUG%" GEQ "2" (
    @echo [DEBUG:%~nx0] --------------------- VS Developer Command Prompt Environment [post-init] ---------------------
    set
    @echo [DEBUG:%~nx0] --------------------- VS Developer Command Prompt Environment [post-init] ---------------------
)

exit /B 0
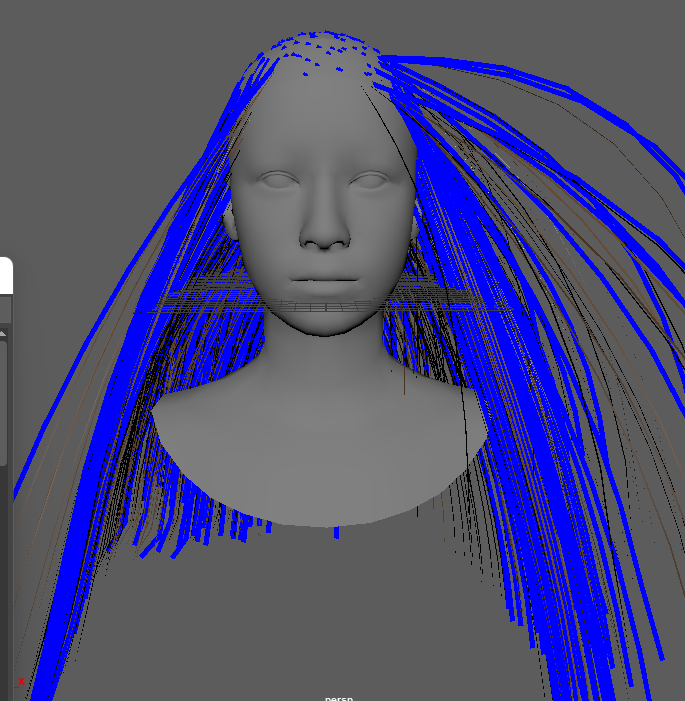
顔のメッシュを用意したら
複製して
頭皮にあたる部分を範囲選択ツールで選択して反転削除します。
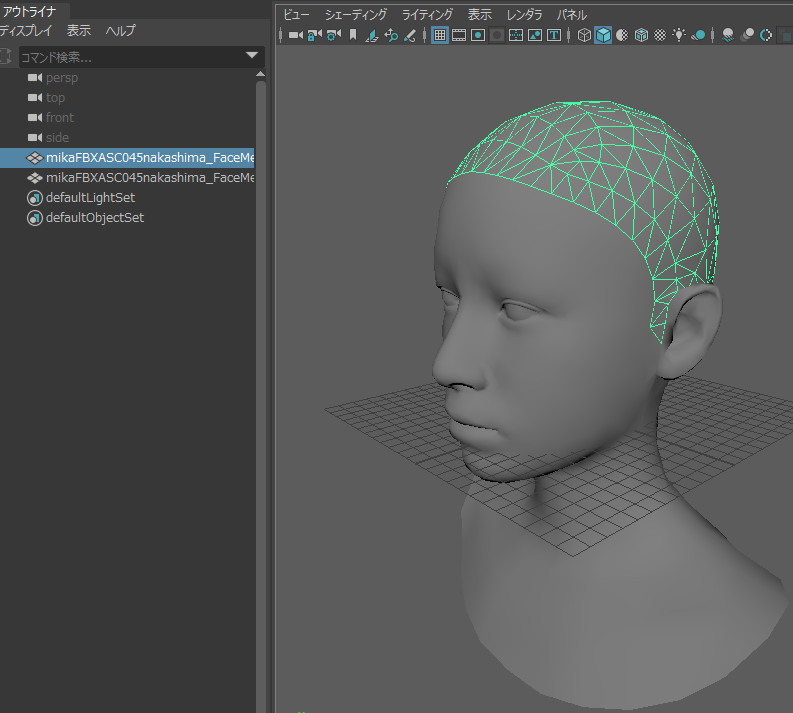
頭皮を分離したら「FurBall」プリセットを適用します。

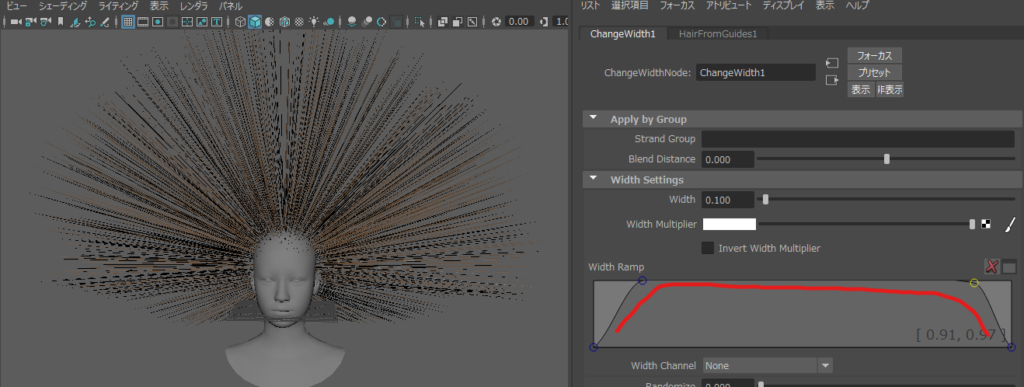
Ornatrix Oparator Stackから
GuidesFromMesh1を選択
アトリビュートエディタで
Guides > Lengthで長さを調整できます。50.0にしました。
Ornatrix Oparator Stackから
ChangeWidth1>を選択
Width Settings>Width 0.1
Width Rampのカーブを調整します。最初細くて中盤太くて最後細いようにします。
———————————————-動かないのでやめた
//Ornatrix Oparator Stackから
//EditGuides1を選択 このガイドで髪の方向を決められます。
//メニューからEdit Slinksを選択します。
//なにも効果なくブラシもが効かないのでやめた
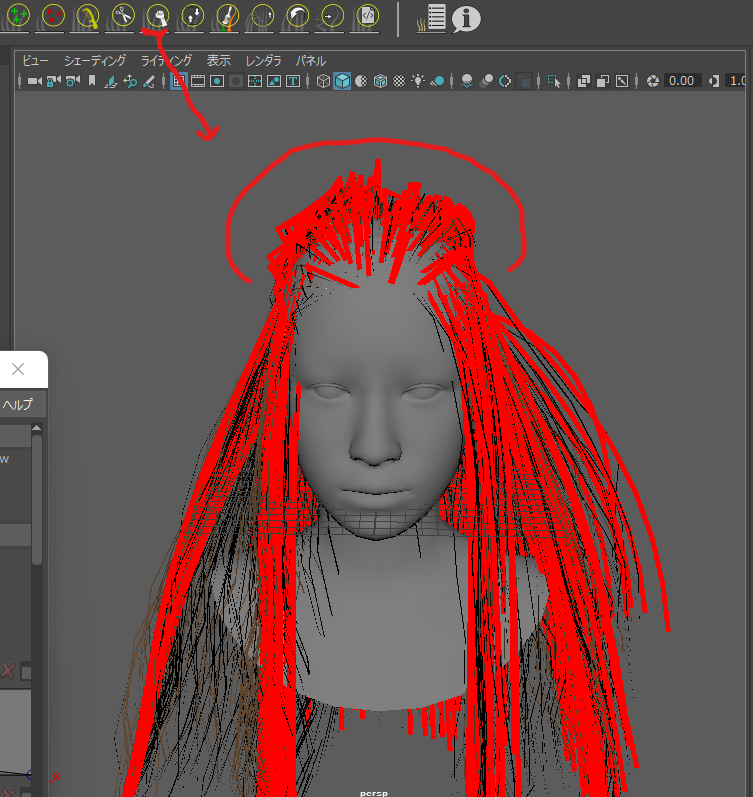
Ornatrix Oparator Stackから
EditGuides1を選択
ガイドは選択ツールで右クリックしてControlPoint先端を位置調整できる
正面からみて、左右のControl Pointをざっくり選択します
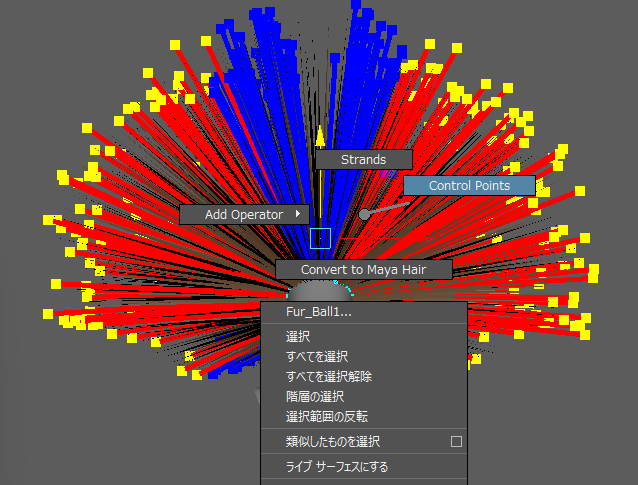
移動ツールで下げます。
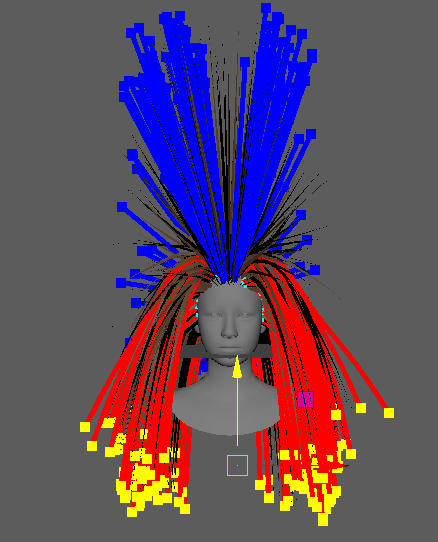
上に残った前髪はControl Pointを選択して後ろに向かって下げます。
(Control Pointでさげると生え際の方向を残したまま下げられます)
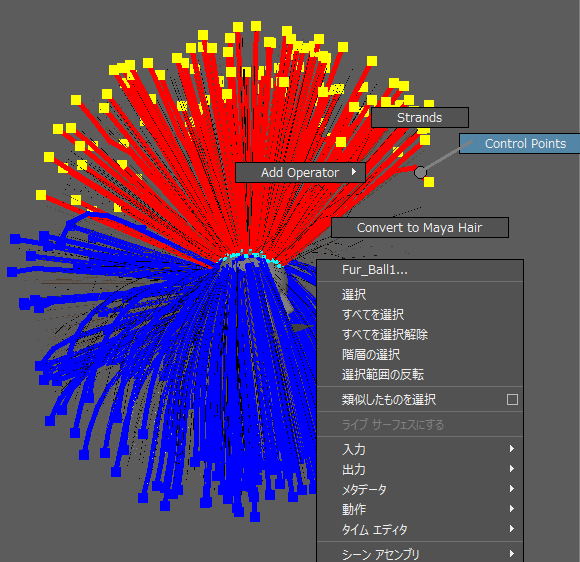
同じく後ろ髪もControl Pointでおろします
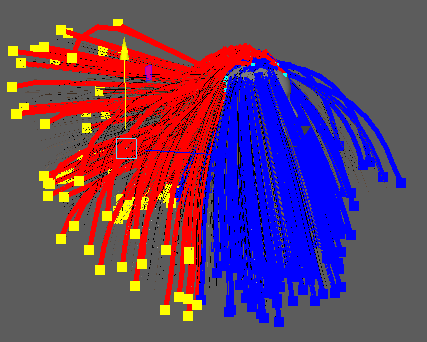
おろします

前髪もControllPointを選択しておろします。
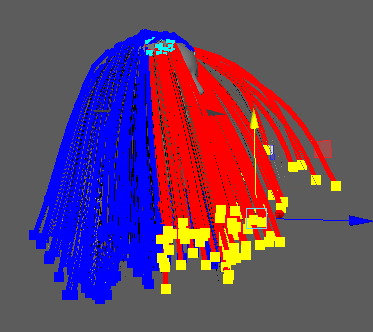
自然な毛流れができました。
ちなみにCombでやると前髪の立ち上がりがなくなってはげ頭になってしまします。
ここからは頭のトップに毛が張り付いているのでGrab Brushにして立ち上げられますがだいたい失敗します。
ヘアのトップの髪のカーブがガタガタだったら
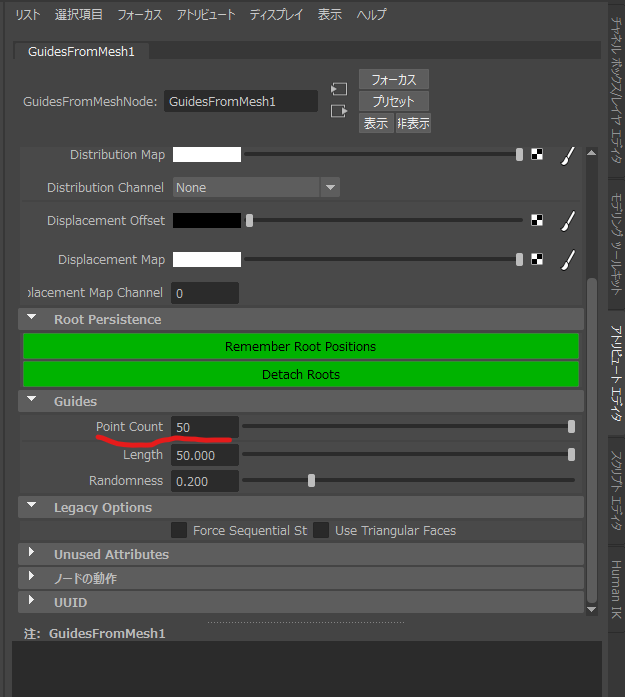
Ornatrix Oparator Stackから
GuidesFromMesh1を選択
アトリビュートエディタで
Guides>Point Count10から50ぐらいにあげれば滑らかになる
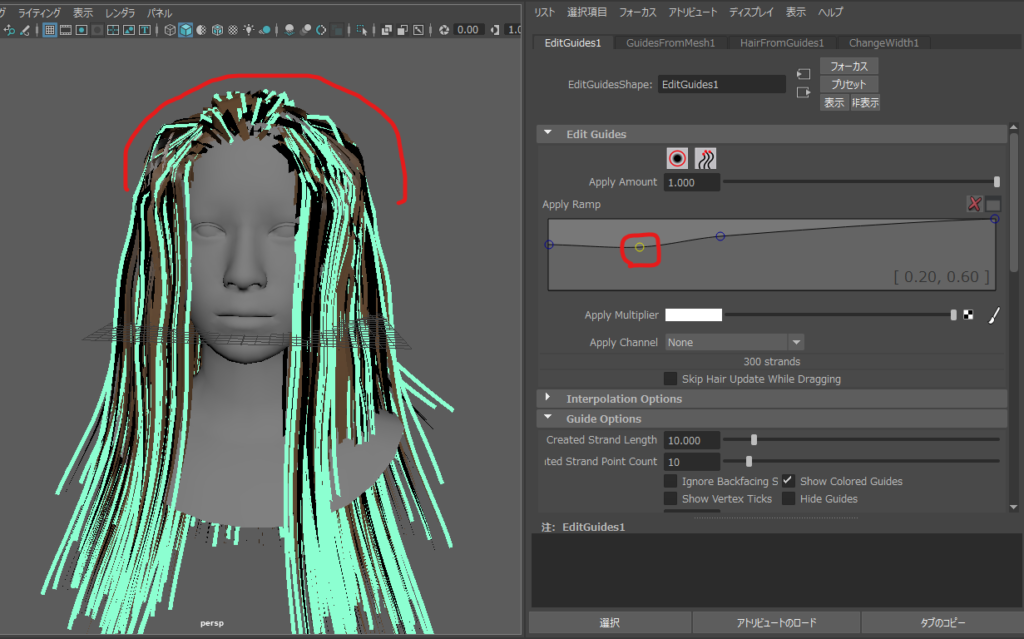
Control Pointの先端だけ持ってきたこの状態だと
Ornatrix Oparator Stackから
EditGuides1を選択して
Edit GuideのApply Rampで生え際の立ち上がり具合を調整できます。
ストレートヘアは完成です。
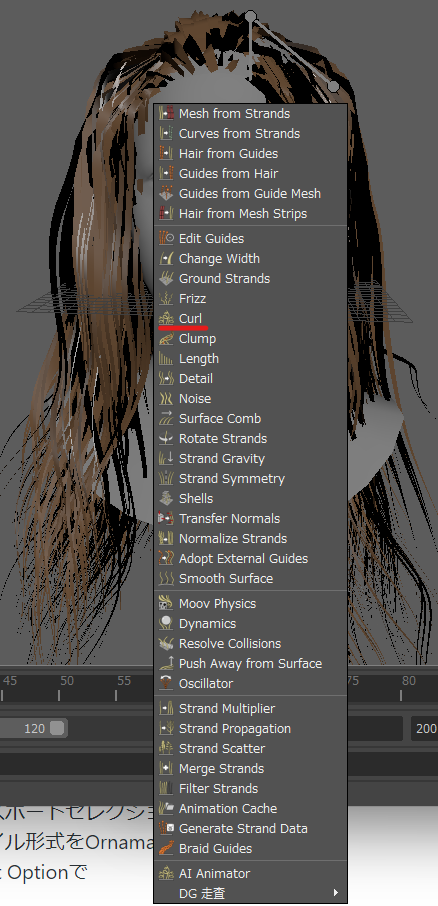
髪を選択して右クリックでAdd Oparater
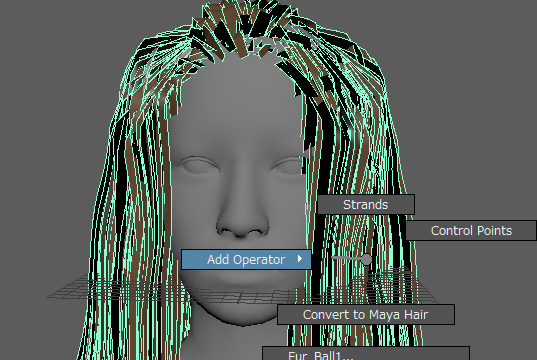
Curl選択で
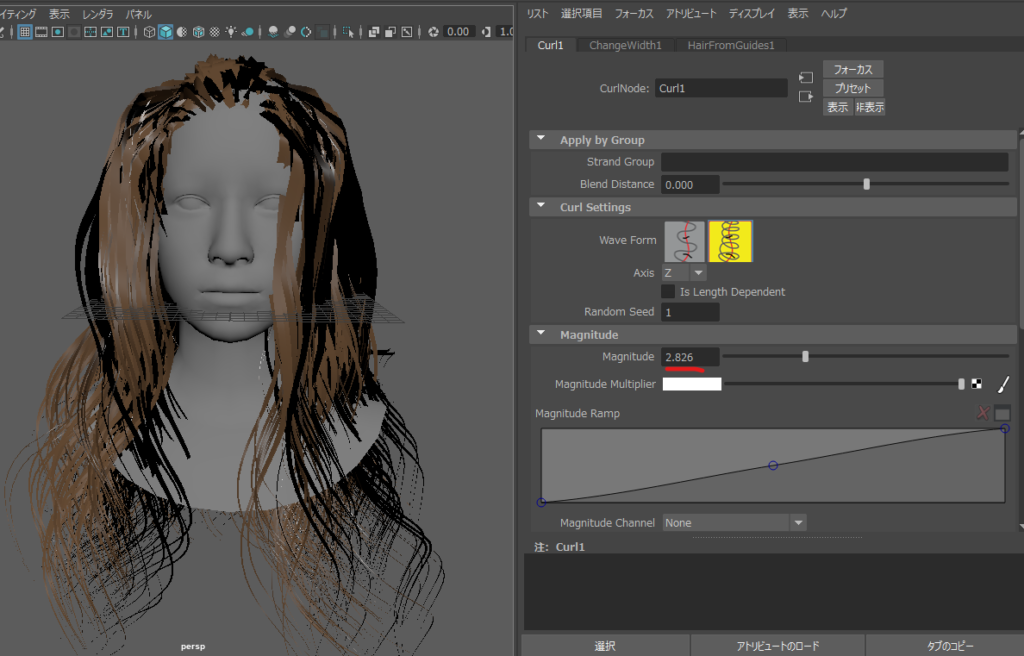
でPerm Hairパーマヘアになる。
Magnitude でカールの具合が設定できる2.8ぐらいにした。
で完成したら
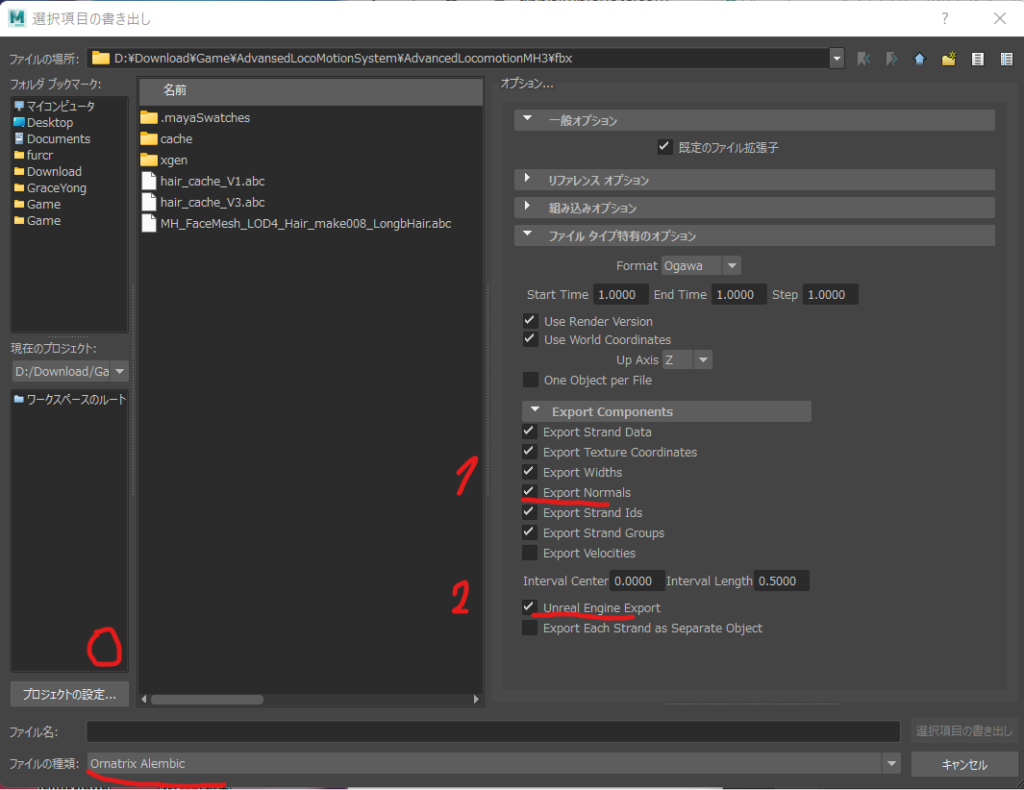
Alembicとしてエクスポートします。
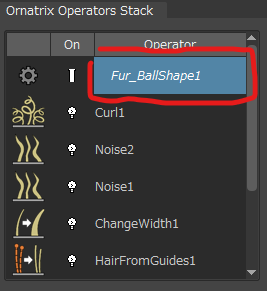
Ornatrix Oparator Stackから
Fur_BallShape1を選択して
を選択して
エクスポートセレクションで
ファイル形式をOrnamatrix Alembicを選び
Export Optionで
Export Normalsと
Unreal Engine Exportにチェックを入れます。
あとは
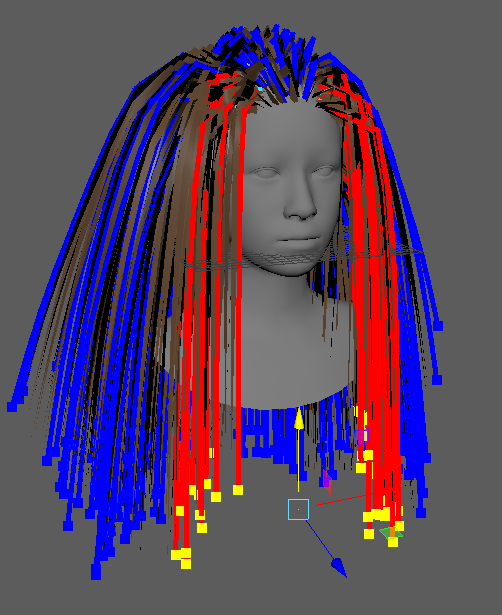
Unreal Engine UE4.26.2 のAlembic Groom Importerをオンにして
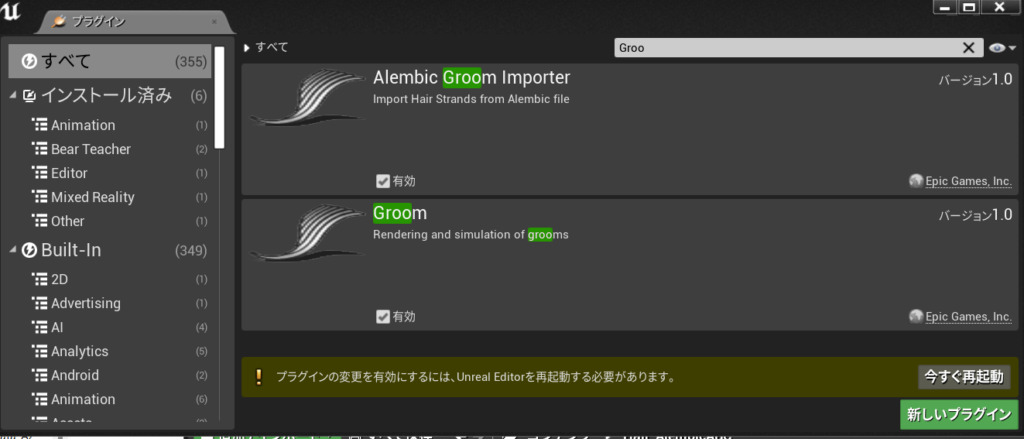
ファイルをコンテンツブラウザにドラッグします。
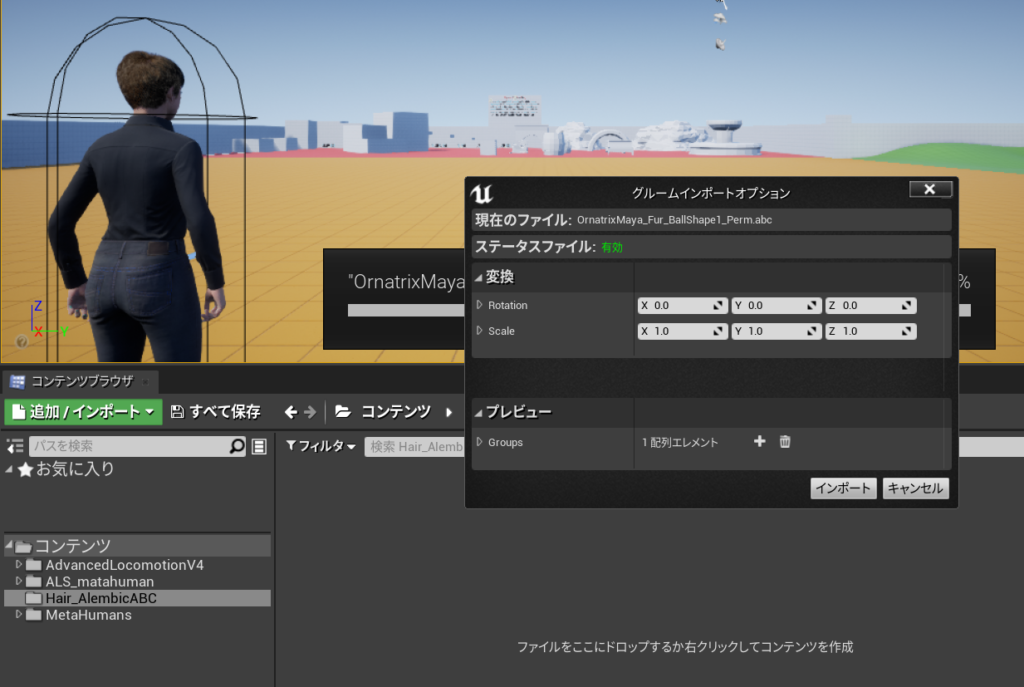
保存したら
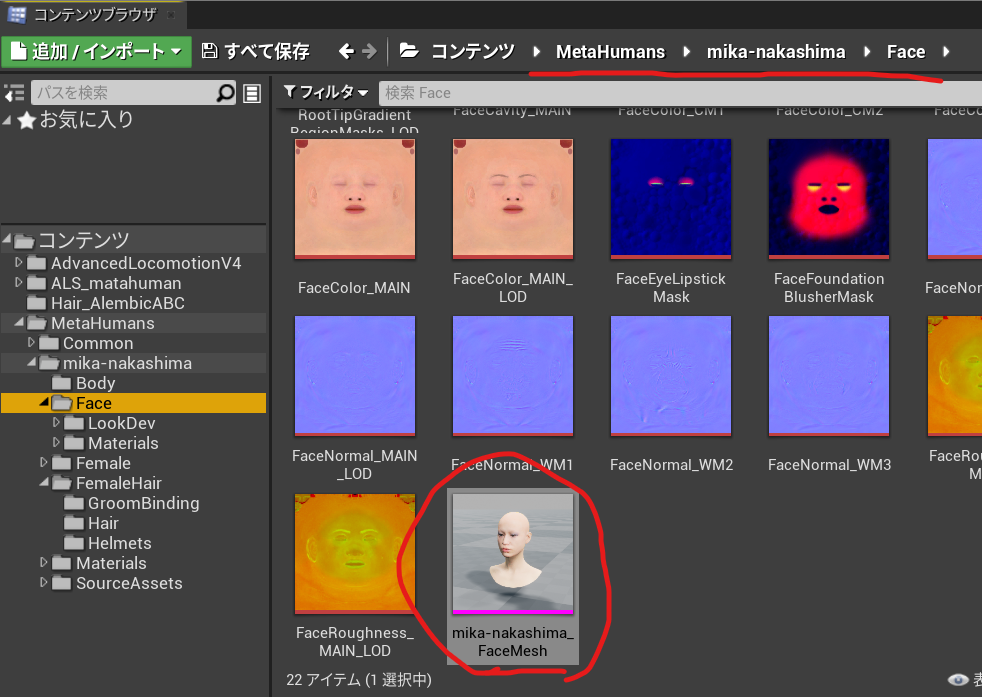
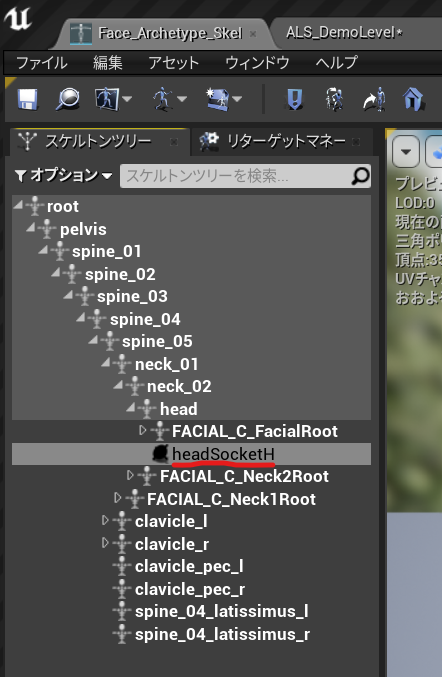
MetaHumanで作成した頭のSkeltalMeshを開いて
スケルトンへ移動
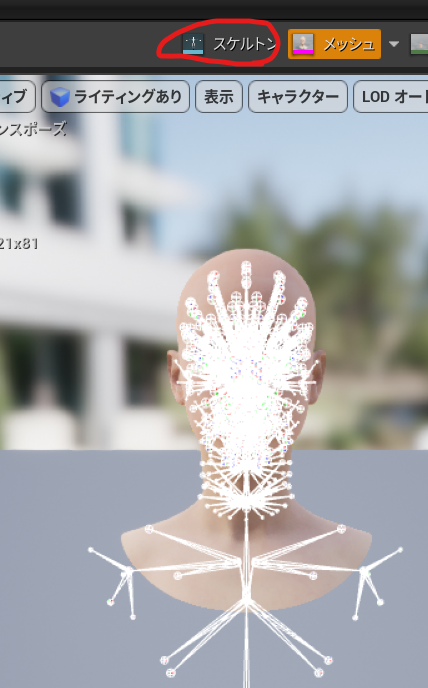
スケルトンツリー>head>ソケットを作成 「headSocket」とし保存
MetaHuman_CharactorBPに移動して(今回はALS_Metahuman_CharacterBP)
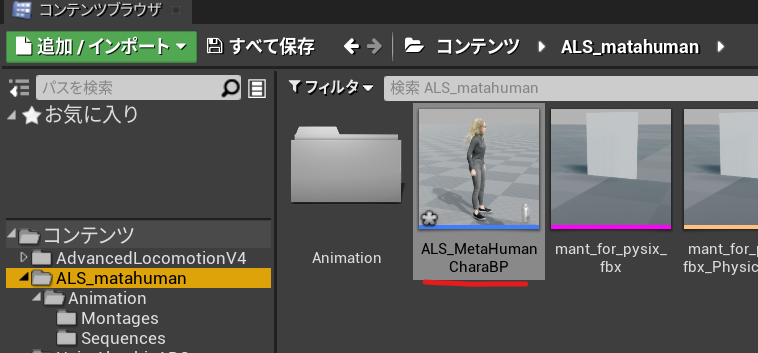
Hairを選択しGroomをインポートしたものに変更
親ソケットにheadSocketを選択し
位置 -1 2 1
回転に -90 90 90 で
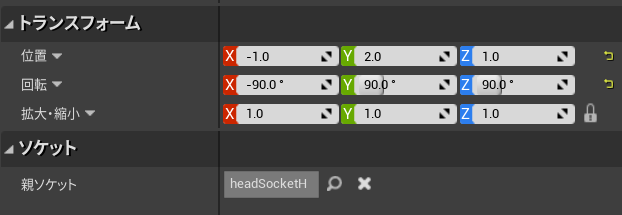
ピッタリ頭にくっついた!!
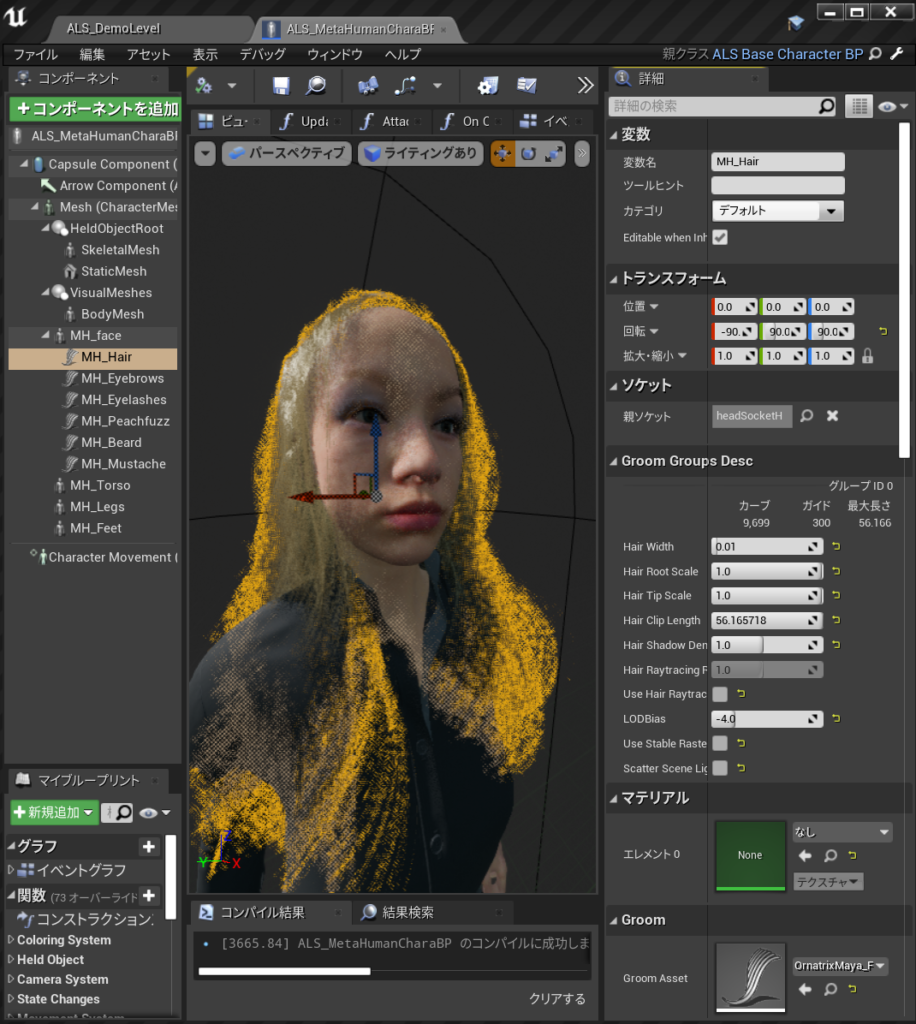
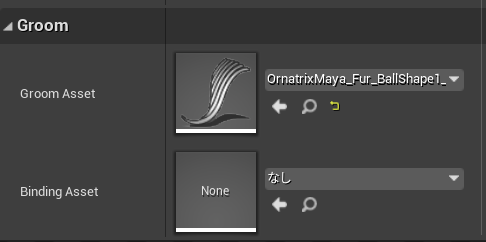
マテリアルはM_hair_v2をあてると透けないみたい。
だがなんだかもっといい感じでもないので
ちゃんと透けなくするため元のmetahumanのHair のGroomComponentをコピーしてきてを
ショートヘアーを重ねた
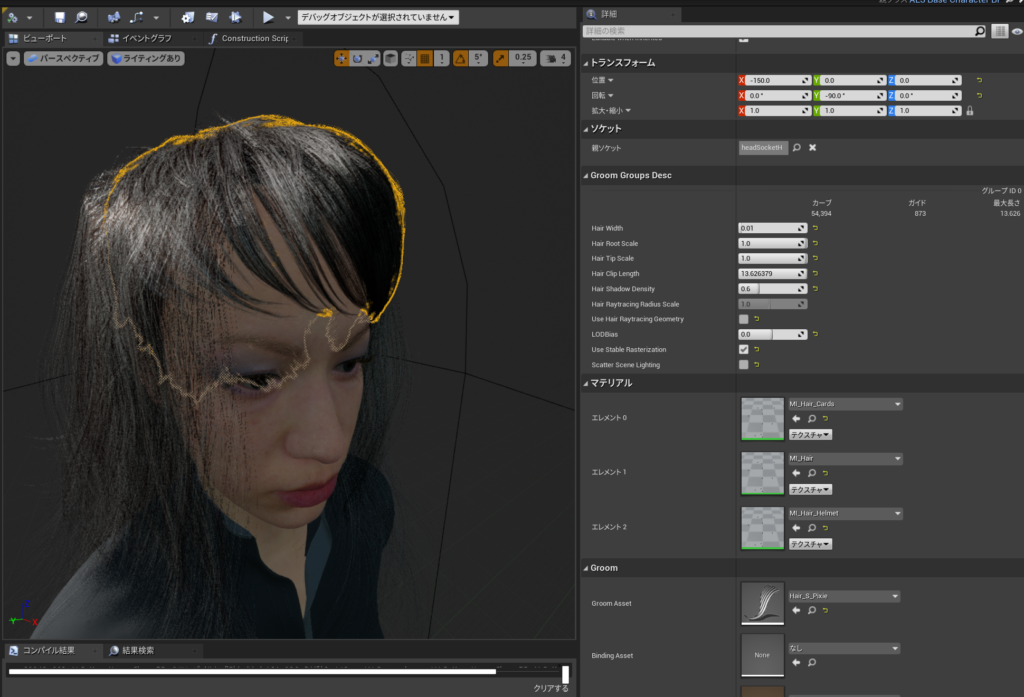
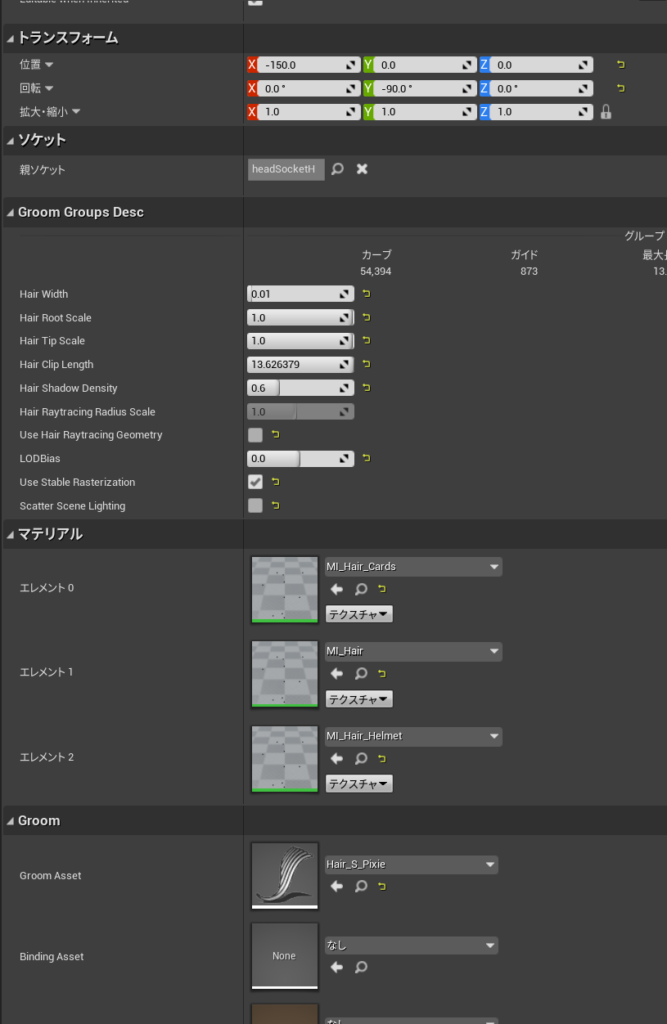
設定はこのように
位置 x:-150
回転 y:-90
Bnding Assetはクリアした。
完成
走らせると。。。。作ったグルームがファサっとならない。課題はある様子
参考URL
Tutorial Video Unreal Engine 4.26.1 Niagara Morphing Tutorial Part 1
Morphingのやりかたは色々ありそうだけど、UE4.26.2ではこのチュートリアルが確実にできた。
エミッタのアセットは使わないタイプ。
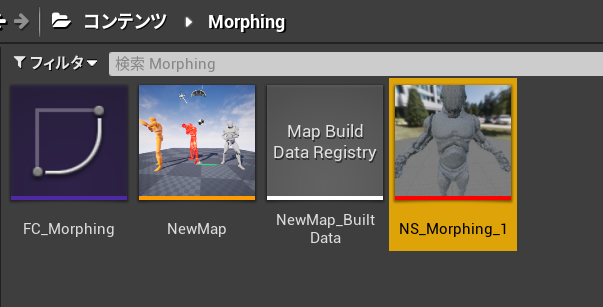
SM_SourceとSM_Targetのスケルタルメッシュ引数でブループリントから渡せるようになる。
ナイアガラ用のノードを作成するためにスクラッチパッドで3つグラフを作ることになる
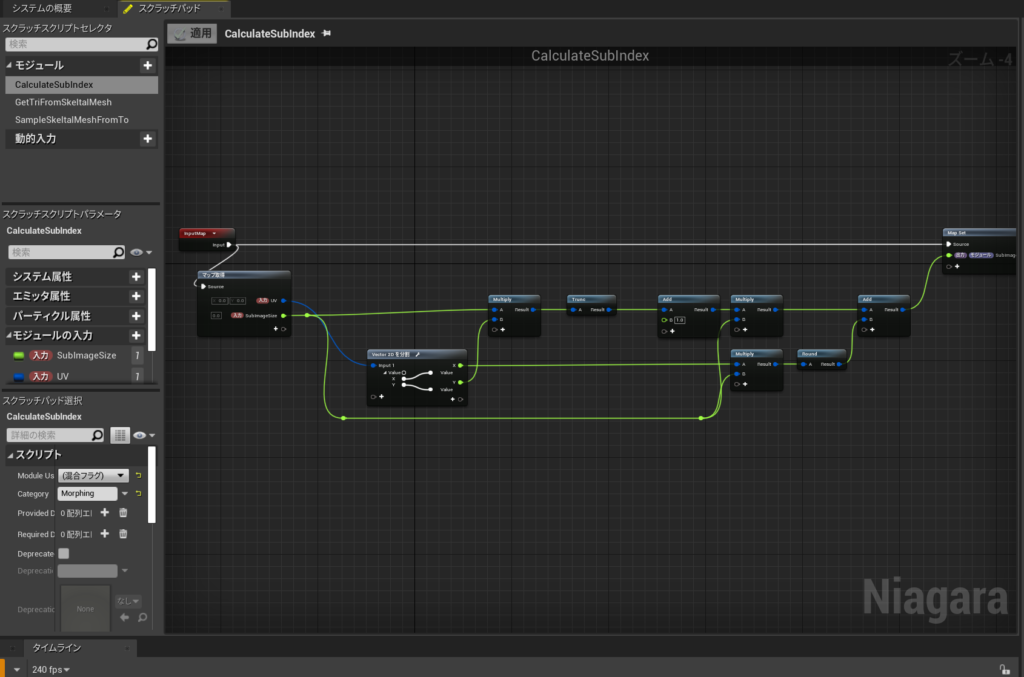
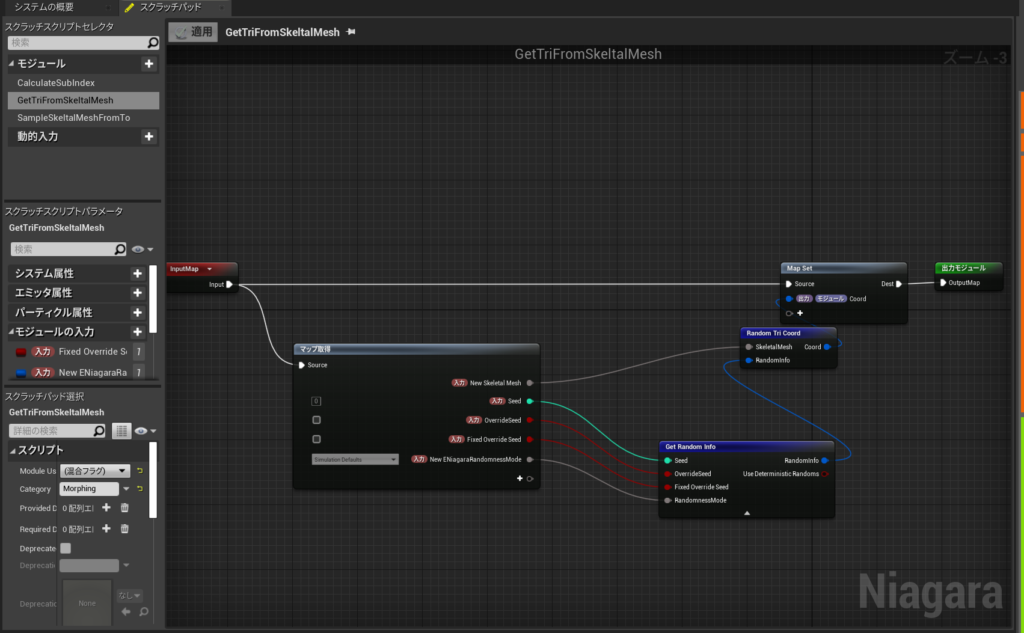

パラメーターもめっちゃ多いので大変だった。丸2日かかった。おつかれした。
チュートリアルを提供してくれたArt Hitecaさんに感謝。修行並みだけど

UnrealEngine 年号表
UnrealEngineのバージョンがチュートリアルビデオと違って再現できない罠に何回かハマった。ビデオチュートリアルにバージョン入れるよりももUnrealEngineの左上にUだけじゃなくてバージョンを入れてくれたら神なのにな。
UnrealEngine
Release Notes
https://docs.unrealengine.com/4.27/en-US/WhatsNew/Builds/
をもとにして年号をつくってみた。リリースノートの中身のSDKとかの年号拾ってるだけなので結構適当なのでなにか問題あったらコメントください。
UnrealEngine 年号表
Unreal Engine 1:1998
Unreal Engine 2:2003
Unreal Engine 3:2004
Unreal Engine 4:2005年ごろに開発され2014年3月20日、初版となる4.0.0リリース
Unreal Engine 4.1 2014 Code updated to build against March 2014 XDK.
Unreal Engine 4.2 2014 May 2014 XDK is now supported.
Unreal Engine 4.3 2014 Xbox One New: Updated to XDK June 2014 QFE 1
Unreal Engine 4.4 2014 New: 2014 The engine is set to use the July 2014 QFE1 XDK by default.
Unreal Engine 4.5 2014 Xbox one Unreal Engine 4.5 has been updated to use the September 2014 QFE1 XDK. You will need to install this XDK
Unreal Engine 4.6 2014
Unreal Engine 4.7 2014 Xbox One builds now require the November 2014 QFE1 XDK.
Unreal Engine 4.8 2015 New: Updated the default XDK to the April 2015 version.
Unreal Engine 4.9 2015 v1.39 Moved UnrealVS development to VS2015. This and subsequent versions will be available for
Unreal Engine 4.10 2015 New: Visual Studio 2015 Support
Unreal Engine 4.11 2016 The FBX SDK has been upgraded to version 2016.1.1.
Unreal Engine 4.12 2016 Xbox One: Upgraded to March 2016 XDK.
Unreal Engine 4.13 2016 Sequencer been updated with new Live Recording improvements as shown at Siggraph Real-Time Live! 2016.
Unreal Engine 4.14 2016 Xbox One: Upgraded to August 2016 QFE 2
Unreal Engine 4.15 2016
Unreal Engine 4.16 2017 https://docs.unrealengine.com/latest/INT/BuildingWorlds/VRMode/GDC2017/
Unreal Engine 4.17 2017 Following The Human Race GDC 2017 demo https://www.youtube.com/watch?v=MQ3QuZtrxl0
Unreal Engine 4.18 2017 contains the Desktop-class Forward Renderer used in the Wingnut AR demo at WWDC 2017
Unreal Engine 4.19 2017 LiveLinkMaya.zip. for Maya 2016/2017 and 2018 for Windows
Unreal Engine 4.20 2018 GDC 2018 presentation Programmable VFX with Unreal Engine’s Niagara
Unreal Engine 4.21 2018 Xbox One: XDK: June 2018 QFE-4
Unreal Engine 4.22 2019 ew: Visual Studio 2019 Support
Unreal Engine 4.23 2019 New: Chaos – Destruction (Beta)Revealed in a demo at GDC 2019
Unreal Engine 4.24 2019 XboxOne Firmware Version: Recovery May 2019 10.0.18362.3055
Unreal Engine 4.25 2020 ?
Unreal Engine 4.26 :2021 The Datasmith Exporter for Revit adds support for Revit 2021.
Unreal Engine 4.27 :2021 Support for Sketchup 2021
Unreal Engine 5EA:2020年5月14