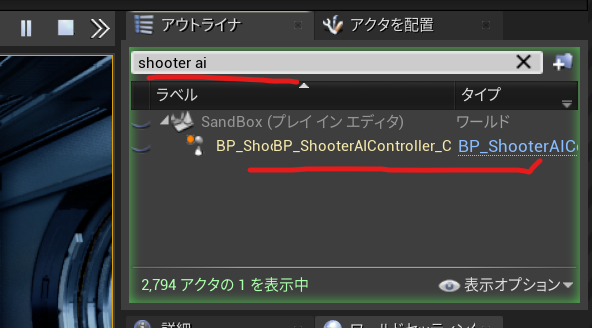
新規C++クラスを作る 親クラスにAIコントローラーを選ぶ
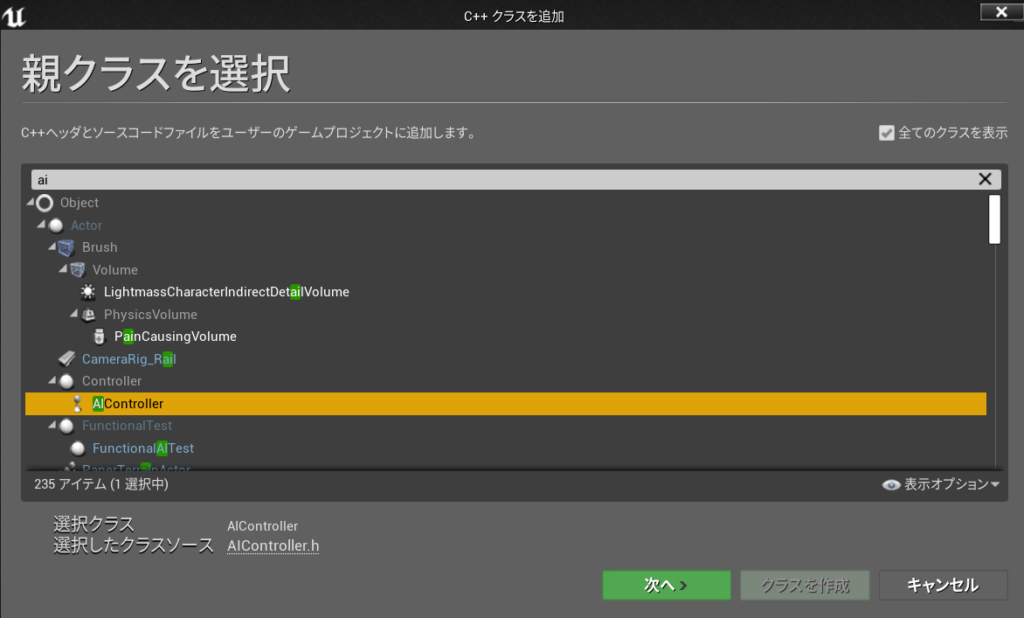
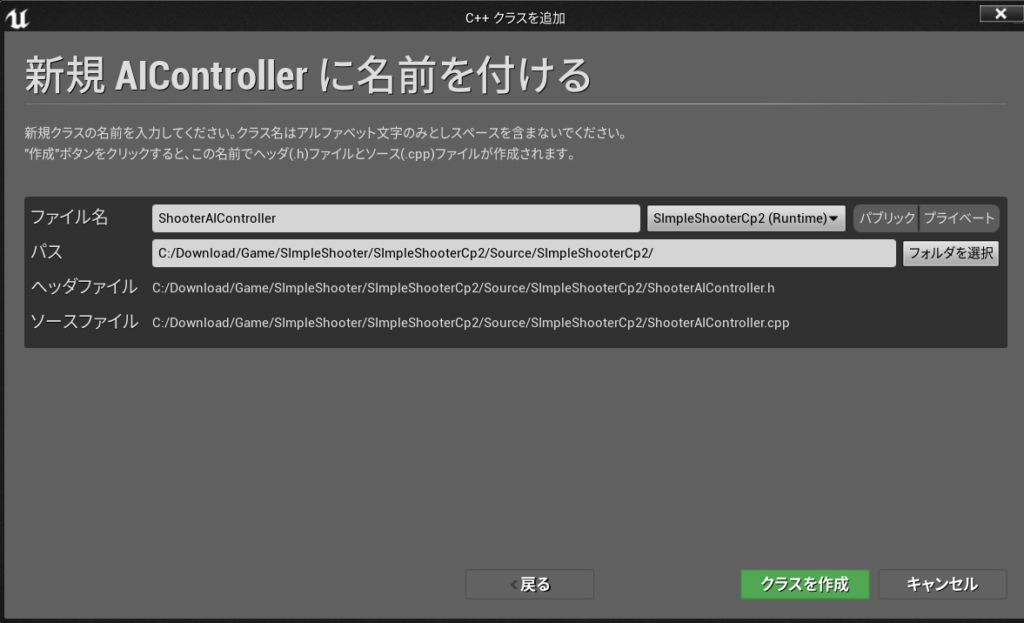
名前は ShooterAIController
このクラスを使ってブループリントクラスを作る
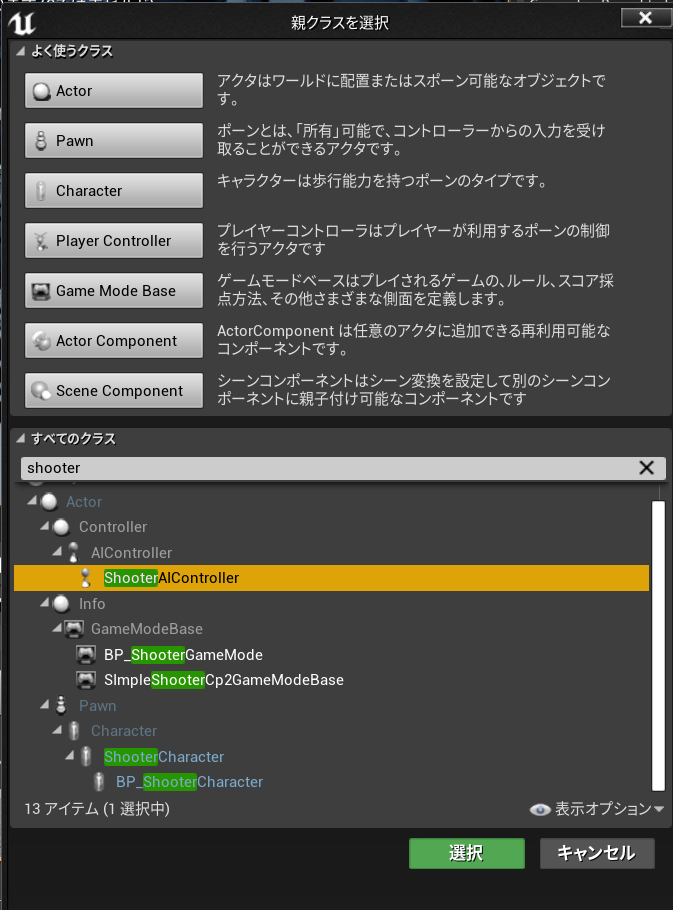
名前を BP_ShooterAIController
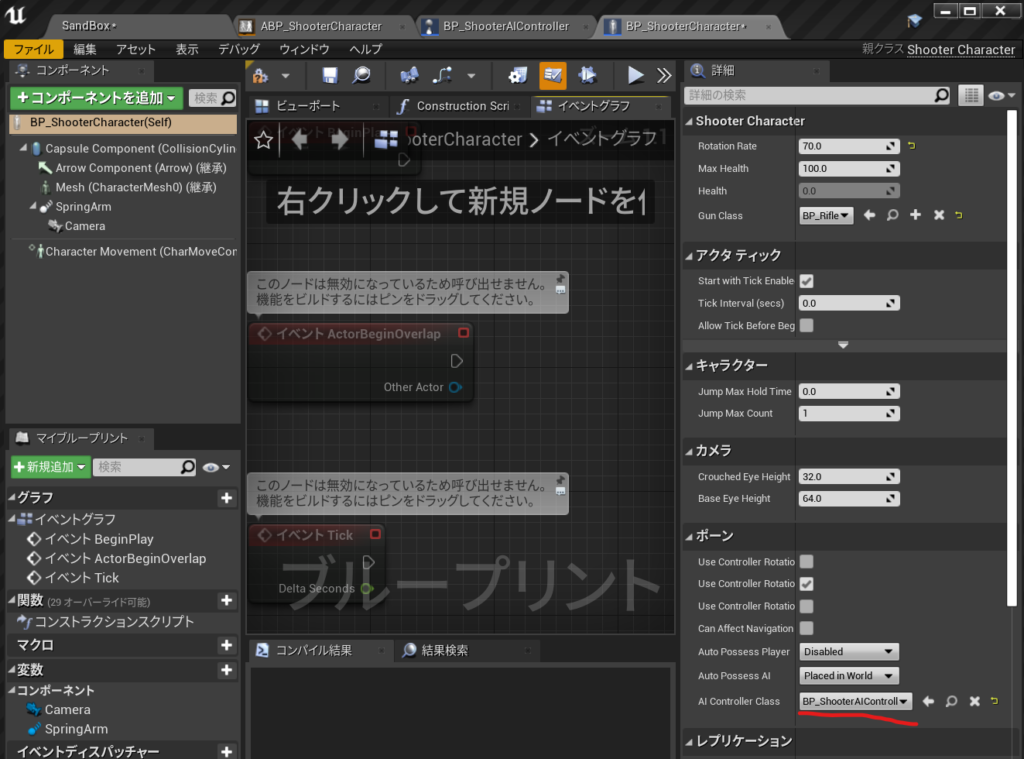
BP_ShooterCharacterを開いて ポーンのAI ContrallerClassにBP_ShooterAIControllerを設定
実行してBP_ShooterAIControllerがポーンされてるか確認する。

DESIGN AND FUTURE SCIENCE.
新規C++クラスを作る 親クラスにAIコントローラーを選ぶ
名前は ShooterAIController
このクラスを使ってブループリントクラスを作る
名前を BP_ShooterAIController
BP_ShooterCharacterを開いて ポーンのAI ContrallerClassにBP_ShooterAIControllerを設定
実行してBP_ShooterAIControllerがポーンされてるか確認する。
    def assetPath_to_HDpath(self,assetPath):
        get_project_file_path=unreal.Paths.get_project_file_path()
        HD_get_project_file_path=os.path.abspath(get_project_file_path)
        project_file_dir=os.path.dirname(HD_get_project_file_path)
        project_file_dir=project_file_dir.replace("\\","/")
        unreal.log_warning("project_file_dir= "+project_file_dir)
        # /Game/
        assetHDPath=project_file_dir+"/Content"+assetPath[5:]
        assetHDPath_without_ext = os.path.splitext(assetHDPath)[0]
        assetHDPath_uasset=assetHDPath_without_ext+".uasset"
        unreal.log_warning("assetHDPath_uasset= "+assetHDPath_uasset)

        #print("")
        return assetHDPath_uasset

    def uasset_textFile_read(self,path):
        file = open(path, 'rb')
        #file = open(path, encoding="utf8", errors='ignore')
        print("1 binary open!!")
        BytesDataBox=b""
        BytesDataStr=u""
        #BytesDataStr = file.read()
        #print("BytesDataStr="+BytesDataStr)
        bytes = file.read(1)
        #print("2 binary valiabled!!")
        while bytes:
            #print(bytes)
            #print("2 printed!!")
            BytesDataBox = BytesDataBox+bytes
            #print("2 BytesDataBox added !!")
            #decoded=bytes.decode("utf-8")
            #print("2 decoded!!")
            #print(decoded)
            #print("2 decoded printed!!")
            #ByteDataBox=ByteDataBox+decoded
            #print("2 ByteDataBox insert!!")
            bytes = file.read(1)
            #print("2 byte = file.read(1)!!")

        print("3 while byte end!!")
        print("BytesDataBox= ")
        #print(BytesDataBox)
        print("4 printed!!")
        print(type(BytesDataBox))
        print("4 class printed!!")
        BytesDataBox=BytesDataBox.strip()
        print("4 striped!!")
        file.close()
        #BytesDataStr = str(BytesDataBox, 'utf-8')
        #BytesDataStr=BytesDataBox.decode(encoding ='utf-8', errors='ignore')
        self.fileWrite_byte(BytesDataBox)
        BytesDataStr=self.fileRead_byte_()
        print("4 decoded!!")


        pattern = r'/Game/.*?\\'

        # findall
        results = re.findall(pattern, BytesDataStr, re.S)
        results_len=len(results)
        print("results_len= "+str(results_len))
        # Type:list
        print(type(results))
        print("4 all hit list printed!!")
        # 抽出
        for result in results:
            result_len=len(result)
            good_result=result[0:result_len-1]
            print("result_len= "+str(result_len)+"     good_result= "+ good_result)

        print("4 for printed!!")

    def fileWrite_byte(self,s):
        ReportFolderPath=self.getMyDir()+"Report"
        self.my_makedirs(ReportFolderPath)
        path_cp=ReportFolderPath+"/bytes_"+".txt"

        fout_utf = codecs.open(path_cp, 'w', encoding='cp932')
        fout_utf.write(s)
    def fileRead_byte_(self):
        ReportFolderPath=self.getMyDir()+"Report"
        self.my_makedirs(ReportFolderPath)
        path_cp=ReportFolderPath+"/bytes_"+".txt"

        fout_utf = codecs.open(path_cp, 'r', encoding='cp932')
        data=fout_utf.read()
        print("4 data!!="+data)
return dataPyside2はpipを使ってインストールするのが基本です。
https://forums.unrealengine.com/t/fyi-ue4-switching-to-python-3-7-7-by-default-4-26/151803
より
C:\Program Files\Epic Games\UE_4.26\Engine\Plugins\Experimental\PythonScriptPlugin\Source\PythonScriptPluginPreload\PythonScriptPluginPreload.Build.csで
// Copyright Epic Games, Inc. All Rights Reserved.
using UnrealBuildTool;

namespace UnrealBuildTool.Rules
{
	public class PythonScriptPluginPreload : ModuleRules
	{
		public PythonScriptPluginPreload(ReadOnlyTargetRules Target) : base(Target)
		{
			PublicDependencyModuleNames.AddRange(
				new string[] {
					"Core",
				}
			);

			if (Target.bBuildEditor)
			{
				PrivateIncludePathModuleNames.AddRange(
					new string[] {
						"Python3",
					}
				);
			}
			else
			{
				PrivateDefinitions.Add("WITH_PYTHON=0");
			}
		}
	}
}
となっているのでPython3を参照しているので
::python.exeへ移動して
cd C:\Program Files\Epic Games\UE_4.26\Engine\Binaries\ThirdParty\Python3\Win64
::pip install Pyside2というかんじで詳細はこのようにインストール
python -m pip install --target="C:\Program Files\Epic Games\UE_4.26\Engine\Binaries\ThirdParty\Python3\Win64\Lib\site-packages" Pyside2
するとローカルではうまく起動しました。
参考URL
https://qiita.com/7CIT/items/a480a84bb9d249544f5f
プラグインを有効にする感じのやり方もあります。
Python Editor¥3,177 これをインストールしてしまえば使えるようです。
https://www.unrealengine.com/marketplace/ja/product/python-editor?sessionInvalidated=true
参照
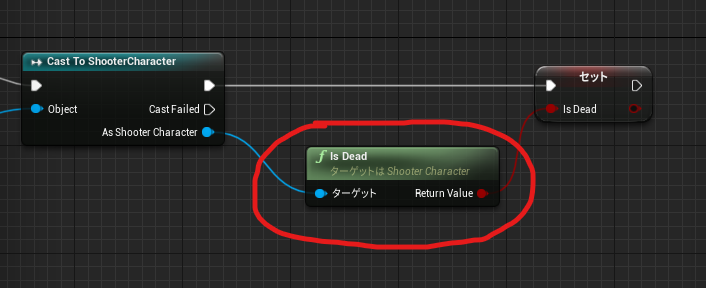
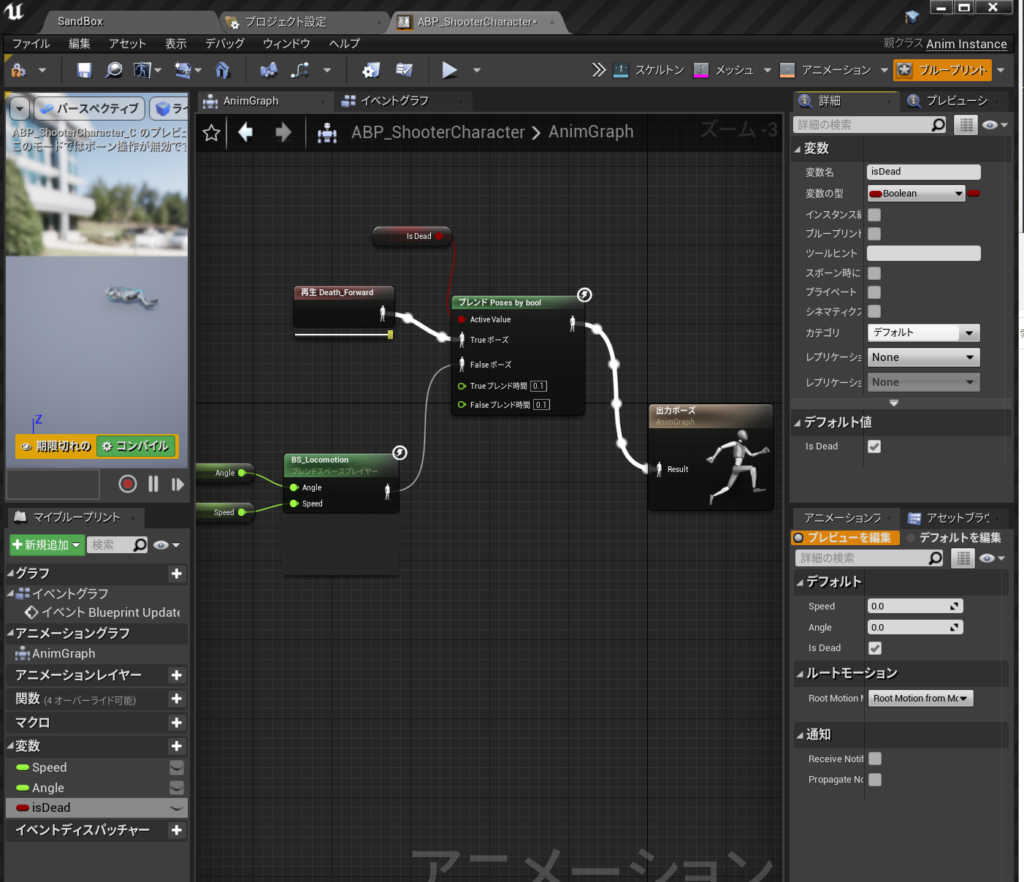
彼が死ぬまでこのキャラクターを撃つことができるようになったので
アニメーションBPのこのブール値をゲームプレイから自動的に設定する必要があります。
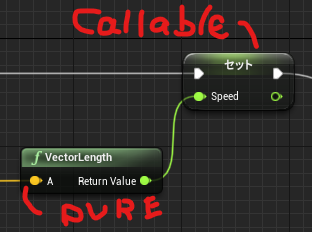
UFUNCTION()マクロ
UFUNCTION(BluePrintCallable)//ブループリント呼び出し可能。
UFUNCTION(BluePrintPure)純粋ノード
それがブループリント呼び出し可能の実行ピンがある関数か、
それがブループリントピュア=純粋ノードで実行ピンが必要ない関数です。
ShooterCharacter.h
public:
	UFUNCTION(BluePrintPure)
	bool IsDead() const;
ShooterCharacter.cpp
bool AShooterCharacter::IsDead() const
{
	return Health <= 0;
}
ブループリントで見てみると IsDead純粋関数としてノードが作られました。
ShooterCharacter.h 全文
// Fill out your copyright notice in the Description page of Project Settings.

#pragma once

#include "CoreMinimal.h"
#include "GameFramework/Character.h"
#include "ShooterCharacter.generated.h"

class AGun;


UCLASS()
class SIMPLESHOOTERCP2_API AShooterCharacter : public ACharacter
{
	GENERATED_BODY()

public:
	// Sets default values for this character's properties
	AShooterCharacter();

protected:
	// Called when the game starts or when spawned
	virtual void BeginPlay() override;

public:
	UFUNCTION(BluePrintPure)
	bool IsDead() const;

	// Called every frame
	virtual void Tick(float DeltaTime) override;

	// Called to bind functionality to input
	virtual void SetupPlayerInputComponent(class UInputComponent* PlayerInputComponent) override;

	virtual float TakeDamage(float DamageAmount, struct FDamageEvent const& DamageEvent, class AController* EventInstigator, AActor* DamageCauser) override;

private:
	void MoveForward(float AxisValue);
	void MoveRight(float AxisValue);
	void LockUpRate(float AxisValue);
	void LockRightRate(float AxisValue);
	void Shoot();

	UPROPERTY(EditAnyWhere)
	float RotationRate = 10;

	UPROPERTY(EditDefaultsOnly)
	float MaxHealth=100;

	UPROPERTY(VisibleAnyWhere)
	float Health;

	UPROPERTY(EditDefaultsOnly)
	TSubclassOf<AGun> GunClass;

	UPROPERTY()
	AGun* Gun;


};
ShooterCharacter.cpp
// Fill out your copyright notice in the Description page of Project Settings.


#include "ShooterCharacter.h"
#include "Gun.h"
//#include "Engine/Engine.h"
// Sets default values
AShooterCharacter::AShooterCharacter()
{
 	// Set this character to call Tick() every frame.  You can turn this off to improve performance if you don't need it.
	PrimaryActorTick.bCanEverTick = true;

}

// Called when the game starts or when spawned
void AShooterCharacter::BeginPlay()
{
	Super::BeginPlay();

	Health = MaxHealth;

	Gun = GetWorld()->SpawnActor<AGun>(GunClass);
	GetMesh()->HideBoneByName(TEXT("weapon_r"),EPhysBodyOp::PBO_None );
	Gun->AttachToComponent(GetMesh(), FAttachmentTransformRules::KeepRelativeTransform, TEXT("weaponSocket"));
	Gun->SetOwner(this);
}
bool AShooterCharacter::IsDead() const
{
	return Health <= 0;
}
// Called every frame
void AShooterCharacter::Tick(float DeltaTime)
{
	Super::Tick(DeltaTime);

}

void AShooterCharacter::Shoot()
{
	Gun->PullTrigger();
}

// Called to bind functionality to input
void AShooterCharacter::SetupPlayerInputComponent(UInputComponent* PlayerInputComponent)
{
	Super::SetupPlayerInputComponent(PlayerInputComponent);

	PlayerInputComponent ->BindAxis(TEXT("MoveForward"),this,&AShooterCharacter::MoveForward);
	PlayerInputComponent ->BindAxis(TEXT("LockUp"),this,&APawn::AddControllerPitchInput);
	PlayerInputComponent ->BindAxis(TEXT("MoveRight"),this,&AShooterCharacter::MoveRight);
	PlayerInputComponent ->BindAxis(TEXT("LockRight"),this,&APawn::AddControllerYawInput);
	PlayerInputComponent ->BindAxis(TEXT("LockUpRate"),this,&AShooterCharacter::LockUpRate);
	PlayerInputComponent ->BindAxis(TEXT("LockRightRate"),this,&AShooterCharacter::LockRightRate);
	PlayerInputComponent ->BindAction(TEXT("Jump"),EInputEvent::IE_Pressed,this,&ACharacter::Jump);
	PlayerInputComponent ->BindAction(TEXT("Shoot"),EInputEvent::IE_Pressed,this,&AShooterCharacter::Shoot);
}

float AShooterCharacter::TakeDamage(float DamageAmount, struct FDamageEvent const& DamageEvent, class AController* EventInstigator, AActor* DamageCauser)
{
	float DamageToApply = Super::TakeDamage(DamageAmount,DamageEvent,EventInstigator,DamageCauser);
	DamageToApply = FMath::Min(Health,DamageToApply);
	Health -= DamageToApply;
	UE_LOG(LogTemp,Display,TEXT("Health Left %F"),Health);
	float TimeToDisplay =5.0f;
	FString Health_str = FString::SanitizeFloat(Health);
	FString TestHUDString =TEXT("Health Left")+	Health_str;
	GEngine->AddOnScreenDebugMessage(-1,TimeToDisplay,FColor::Green,TestHUDString);
	return DamageToApply;
}

void AShooterCharacter::MoveForward(float AxisValue)
{
	AddMovementInput(GetActorForwardVector() * AxisValue);
}
void AShooterCharacter::MoveRight(float AxisValue)
{
	AddMovementInput(GetActorRightVector() * AxisValue);
}

void AShooterCharacter::LockUpRate(float AxisValue)
{
	AddControllerPitchInput(AxisValue * RotationRate * GetWorld()->GetDeltaSeconds());
}
void AShooterCharacter::LockRightRate(float AxisValue)
{
	AddControllerYawInput(AxisValue * RotationRate * GetWorld()->GetDeltaSeconds());
}
// void AShooterCharacter::LockUp(float AxisValue)
// {
// 	AddControllerPitchInput(AxisValue);
// }
できたのがこれ
基本的にはデフォルトのTakeDamageが来た時に処理を追加したいのでオーバーライドします。
UE4/Engine/Sounce/Runtime/Engine/Classes/GameFramework/Actor.h
の
virtual float TakeDamage(float DamageAmount, struct FDamageEvent const& DamageEvent, class AController* EventInstigator, AActor* DamageCauser);
をコピーして
ShooterCharacter.h
にこれをペーストしてoverrideキーワードを追加しました。
virtual float TakeDamage(float DamageAmount, struct FDamageEvent const& DamageEvent, class AController* EventInstigator, AActor* DamageCauser) override;
ShooterCharacter.cppはこうやって元のSuper::TakeDamegeを追加します
float AShooterCharacter::TakeDamage(float DamageAmount, struct FDamageEvent const& DamageEvent, class AController* EventInstigator, AActor* DamageCauser) ;
{
	float DamageApplied = Super::TakeDamage(DamageAmount,DamageEvent,EventInstigator,DamageCauser);

}
次に、ダメージを受けた時のヒットポイントを健康状態のとしてHealth変数を用意します。
ShooterCharacter.h
	UPROPERTY(EditDefaultsOnly)
	float MaxHealth=100;

	UPROPERTY(VisibleAnyWhere)
float Health;ShooterCharacter.cppでBeginPlayにHealth = MaxHealth;追加
void AShooterCharacter::BeginPlay()
{
	Super::BeginPlay();

	Health = MaxHealth;

	Gun = GetWorld()->SpawnActor<AGun>(GunClass);
	GetMesh()->HideBoneByName(TEXT("weapon_r"),EPhysBodyOp::PBO_None );
	Gun->AttachToComponent(GetMesh(), FAttachmentTransformRules::KeepRelativeTransform, TEXT("weaponSocket"));
	Gun->SetOwner(this);
}ShooterCharacter.cppでTakeDamageに以下追加
DamageToApply = FMath::Min(Health,DamageToApply);
Health -= DamageToApply;
UE_LOG(LogTemp,Display,TEXT(“Health Left %F”),Health);
float TimeToDisplay =5.0f;
FString Health_str = FString::SanitizeFloat(Health);
(\UE_4.25\Engine\Source\Runtime\Core\Private\Containers\String.cppにある)
FString TestHUDString =TEXT(“Health Left”)+ Health_str;
GEngine->AddOnScreenDebugMessage(-1,TimeToDisplay,FColor::Green,TestHUDString);
(\UE_4.25\Engine\Source\Runtime\Engine\Private\UnrealEngine.cppにある)
詳細は以下
FString | UnrealEngineのドキュメント
return DamageToApply;
float AShooterCharacter::TakeDamage(float DamageAmount, struct FDamageEvent const& DamageEvent, class AController* EventInstigator, AActor* DamageCauser)
{
	float DamageToApply = Super::TakeDamage(DamageAmount,DamageEvent,EventInstigator,DamageCauser);
	DamageToApply = FMath::Min(Health,DamageToApply);
	Health -= DamageToApply;
	UE_LOG(LogTemp,Display,TEXT("Health Left %F"),Health);
	float TimeToDisplay =5.0;
	FString Health_str = FString::SanitizeFloat(Health);
	FString TestHUDString =TEXT("Health Left")+	Health_str;
	GEngine->AddOnScreenDebugMessage(-1,TimeToDisplay,FColor::Green,TestHUDString);
	return DamageToApply;
}ShooterCharacter.h 全文
// Fill out your copyright notice in the Description page of Project Settings.

#pragma once

#include "CoreMinimal.h"
#include "GameFramework/Character.h"
#include "ShooterCharacter.generated.h"

class AGun;


UCLASS()
class SIMPLESHOOTERCP2_API AShooterCharacter : public ACharacter
{
	GENERATED_BODY()

public:
	// Sets default values for this character's properties
	AShooterCharacter();

protected:
	// Called when the game starts or when spawned
	virtual void BeginPlay() override;

public:
	// Called every frame
	virtual void Tick(float DeltaTime) override;

	// Called to bind functionality to input
	virtual void SetupPlayerInputComponent(class UInputComponent* PlayerInputComponent) override;

	virtual float TakeDamage(float DamageAmount, struct FDamageEvent const& DamageEvent, class AController* EventInstigator, AActor* DamageCauser) override;

private:
	void MoveForward(float AxisValue);
	void MoveRight(float AxisValue);
	void LockUpRate(float AxisValue);
	void LockRightRate(float AxisValue);
	void Shoot();

	UPROPERTY(EditAnyWhere)
	float RotationRate = 10;

	UPROPERTY(EditDefaultsOnly)
	float MaxHealth=100;

	UPROPERTY(VisibleAnyWhere)
	float Health;

	UPROPERTY(EditDefaultsOnly)
	TSubclassOf<AGun> GunClass;

	UPROPERTY()
	AGun* Gun;


};
ShooterCharacter.cpp 全文
// Fill out your copyright notice in the Description page of Project Settings.


#include "ShooterCharacter.h"
#include "Gun.h"
//#include "Engine/Engine.h"
// Sets default values
AShooterCharacter::AShooterCharacter()
{
 	// Set this character to call Tick() every frame.  You can turn this off to improve performance if you don't need it.
	PrimaryActorTick.bCanEverTick = true;

}

// Called when the game starts or when spawned
void AShooterCharacter::BeginPlay()
{
	Super::BeginPlay();

	Health = MaxHealth;

	Gun = GetWorld()->SpawnActor<AGun>(GunClass);
	GetMesh()->HideBoneByName(TEXT("weapon_r"),EPhysBodyOp::PBO_None );
	Gun->AttachToComponent(GetMesh(), FAttachmentTransformRules::KeepRelativeTransform, TEXT("weaponSocket"));
	Gun->SetOwner(this);
}

// Called every frame
void AShooterCharacter::Tick(float DeltaTime)
{
	Super::Tick(DeltaTime);

}

void AShooterCharacter::Shoot()
{
	Gun->PullTrigger();
}

// Called to bind functionality to input
void AShooterCharacter::SetupPlayerInputComponent(UInputComponent* PlayerInputComponent)
{
	Super::SetupPlayerInputComponent(PlayerInputComponent);

	PlayerInputComponent ->BindAxis(TEXT("MoveForward"),this,&AShooterCharacter::MoveForward);
	PlayerInputComponent ->BindAxis(TEXT("LockUp"),this,&APawn::AddControllerPitchInput);
	PlayerInputComponent ->BindAxis(TEXT("MoveRight"),this,&AShooterCharacter::MoveRight);
	PlayerInputComponent ->BindAxis(TEXT("LockRight"),this,&APawn::AddControllerYawInput);
	PlayerInputComponent ->BindAxis(TEXT("LockUpRate"),this,&AShooterCharacter::LockUpRate);
	PlayerInputComponent ->BindAxis(TEXT("LockRightRate"),this,&AShooterCharacter::LockRightRate);
	PlayerInputComponent ->BindAction(TEXT("Jump"),EInputEvent::IE_Pressed,this,&ACharacter::Jump);
	PlayerInputComponent ->BindAction(TEXT("Shoot"),EInputEvent::IE_Pressed,this,&AShooterCharacter::Shoot);
}

float AShooterCharacter::TakeDamage(float DamageAmount, struct FDamageEvent const& DamageEvent, class AController* EventInstigator, AActor* DamageCauser)
{
	float DamageToApply = Super::TakeDamage(DamageAmount,DamageEvent,EventInstigator,DamageCauser);
	DamageToApply = FMath::Min(Health,DamageToApply);
	Health -= DamageToApply;
	UE_LOG(LogTemp,Display,TEXT("Health Left %F"),Health);
	float TimeToDisplay =5.0f;
	FString Health_str = FString::SanitizeFloat(Health);
	FString TestHUDString =TEXT("Health Left")+	Health_str;
	GEngine->AddOnScreenDebugMessage(-1,TimeToDisplay,FColor::Green,TestHUDString);
	return DamageToApply;
}

void AShooterCharacter::MoveForward(float AxisValue)
{
	AddMovementInput(GetActorForwardVector() * AxisValue);
}
void AShooterCharacter::MoveRight(float AxisValue)
{
	AddMovementInput(GetActorRightVector() * AxisValue);
}

void AShooterCharacter::LockUpRate(float AxisValue)
{
	AddControllerPitchInput(AxisValue * RotationRate * GetWorld()->GetDeltaSeconds());
}
void AShooterCharacter::LockRightRate(float AxisValue)
{
	AddControllerYawInput(AxisValue * RotationRate * GetWorld()->GetDeltaSeconds());
}
// void AShooterCharacter::LockUp(float AxisValue)
// {
// 	AddControllerPitchInput(AxisValue);
// }
こうなった。
SourceTreeでクローンしようとしたらこんなエラーが出たのでメモ
コマンド: git -c diff.mnemonicprefix=false -c core.quotepath=false --no-optional-locks ls-remote https://github.com/EpicGames/UnrealEngine.git
出力:
エラー: remote: Support for password authentication was removed on August 13, 2021. Please use a personal access token instead.
remote: Please see https://github.blog/2020-12-15-token-authentication-requirements-for-git-operations/ for more information.
fatal: Authentication failed for 'https://github.com/EpicGames/UnrealEngine.git/'
翻訳すると
コマンド:git -c diff.mnemonicprefix = false -c core.quotepath = false --no-optional-locks ls-remote https://github.com/EpicGames/UnrealEngine.git
段:
エラー:リモート:パスワード認証のサポートは2021年8月13日に削除されました。代わりに、個人用アクセストークンを使用してください。
リモート:詳細については、https://github.blog/2020-12-15-token-authentication-requirements-for-git-operations/を参照してください。
致命的:「https://github.com/EpicGames/UnrealEngine.git/」の認証に失敗しました
調べてみると
GitHubのリポジトリにアクセス時に「remote: Support for password authentication was removed on August 13, 2021.」エラー さんがこんな感じで書いてた
https://note.kiriukun.com/entry/20210904-github-password-authentication-was-removed
GitHubにログインして、右上の自分のアイコンをクリック → 「Settings」をクリック
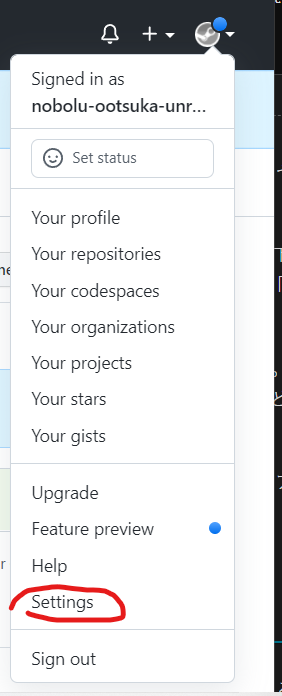
→ 左メニュー下部の「Developer settings」をクリック
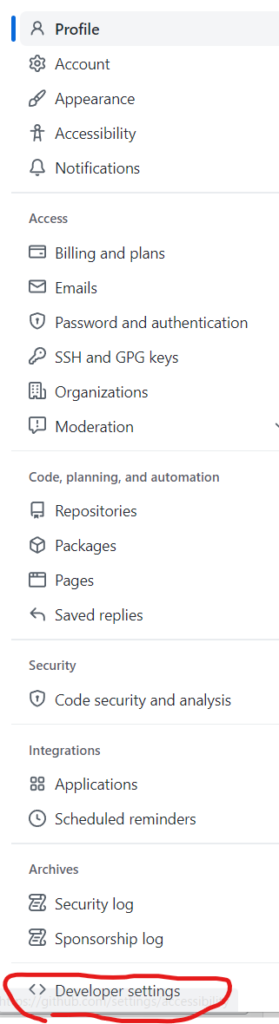
→ 左メニューの「Personal access tokens」をクリック
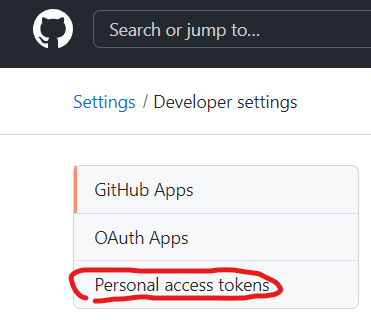
→ 右上の「Generate new token」をクリックしてアクセストークンを作成する。

アクセストークンを作成する時、「Select scopes」は少なくとも「repo」をチェックONにすること。
また、作成したトークンの値を後でもう一度確認することはできないので、作成後はその場ですぐにコピーしてどこかにとっておくこと。
こうして作成したアクセストークンをパスワードの代わりに入力することで、GitHubのリポジトリにアクセスできるようになる。
パスワードの代わりに入力する他では、以下のようにGitリポジトリのURLに付与して使うこともできる。
git clone https://${アクセストークン}@${ユーザー名}/${リポジトリ名}.git具体例
https://ghp_ooooooooooooooooooooooo@github.com/EpicGames/UnrealEngine.gitクローンできた!!!

失敗例はこちら
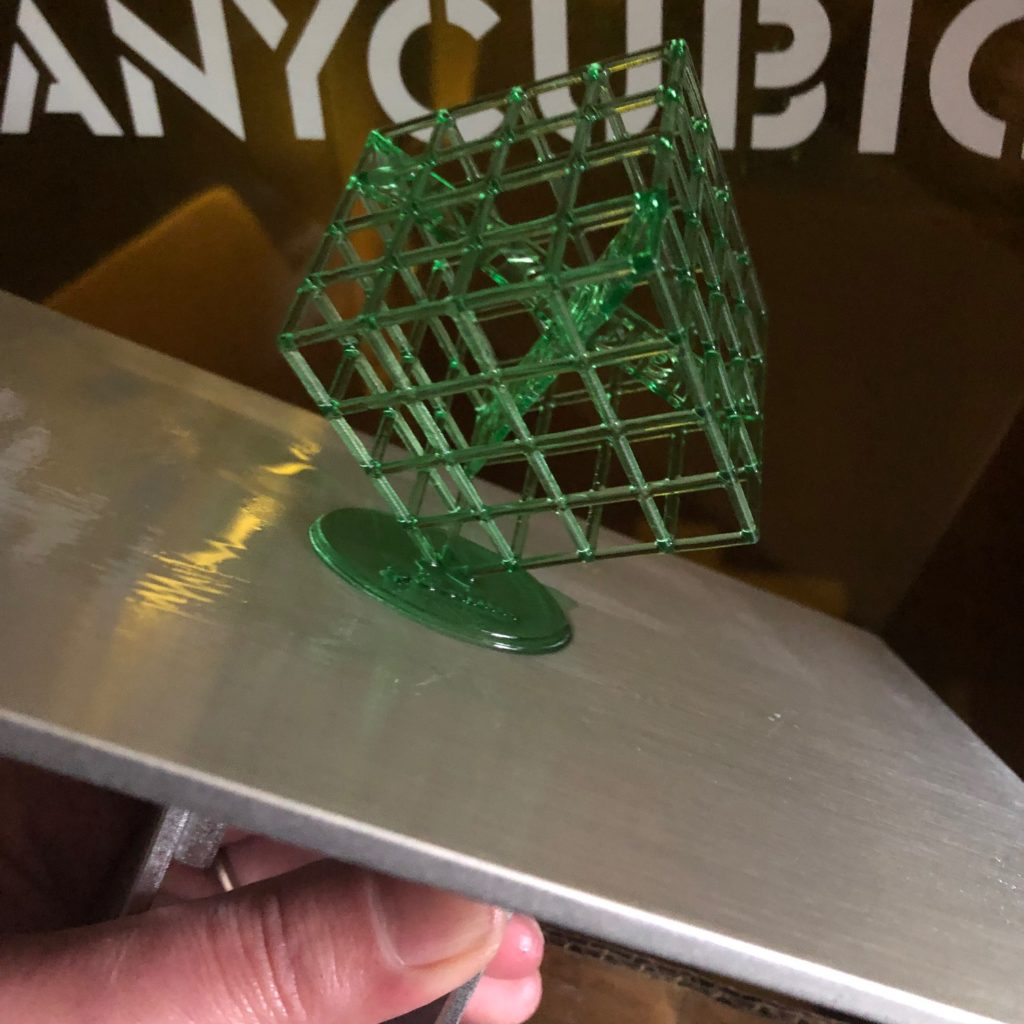
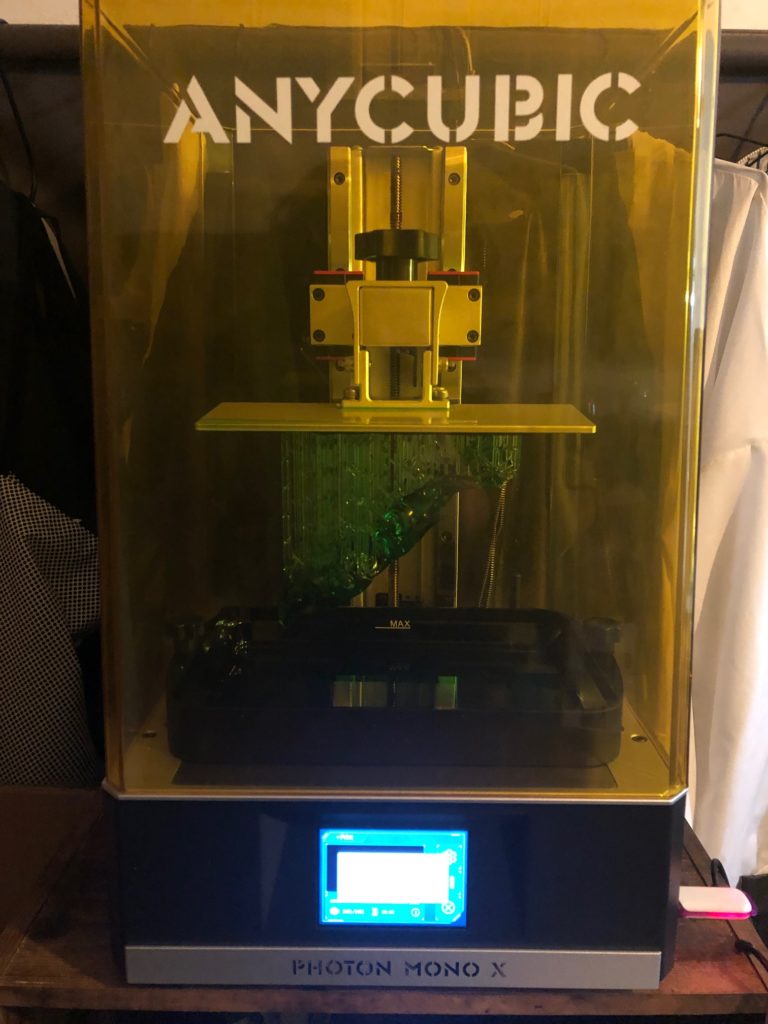
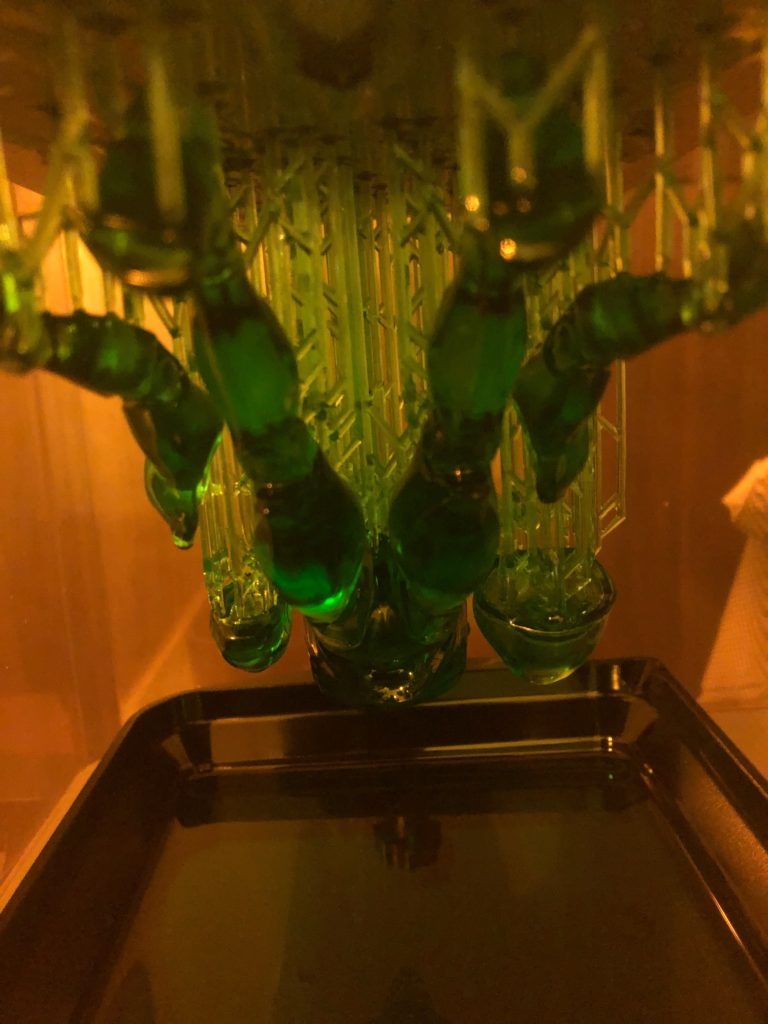
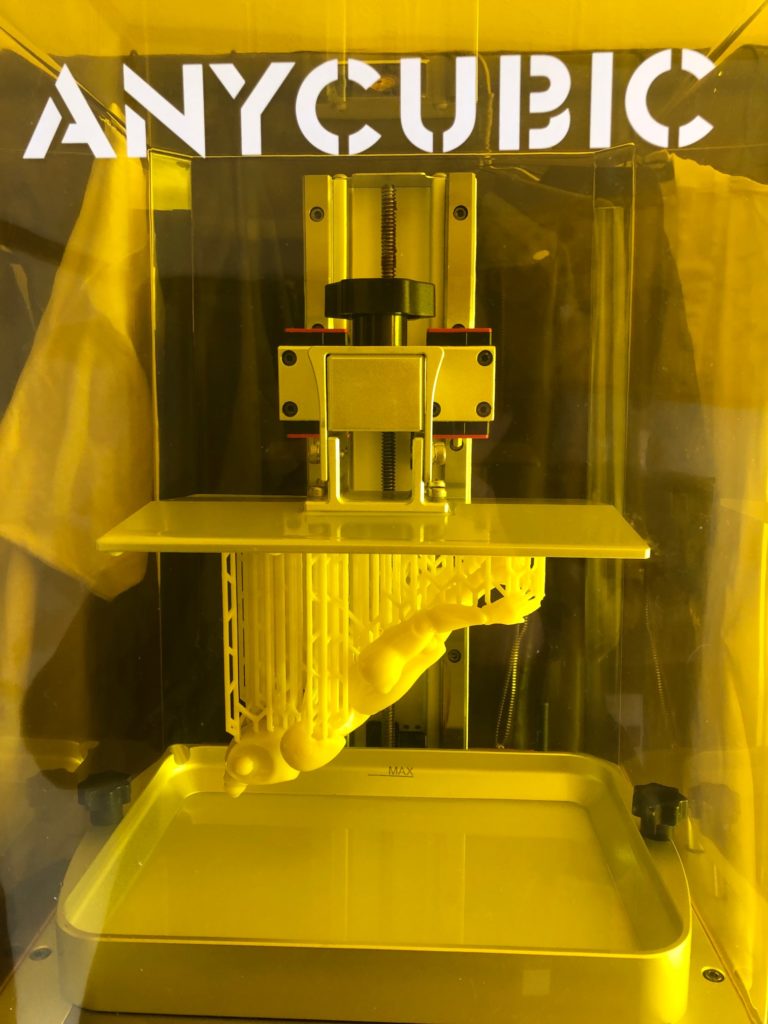
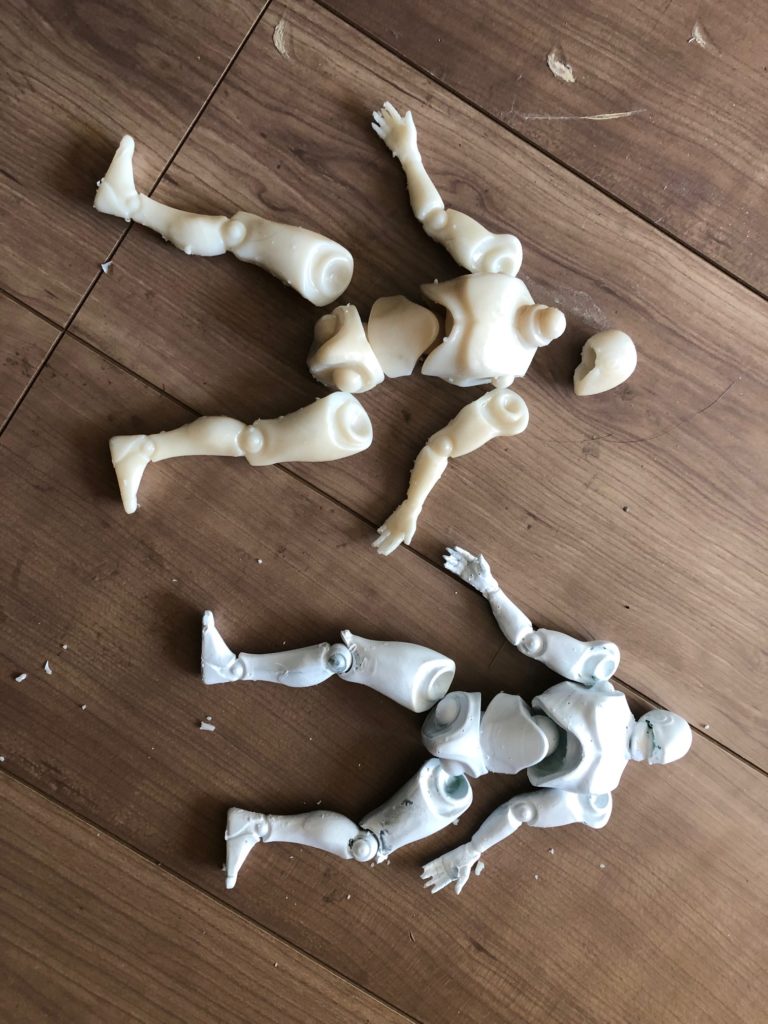
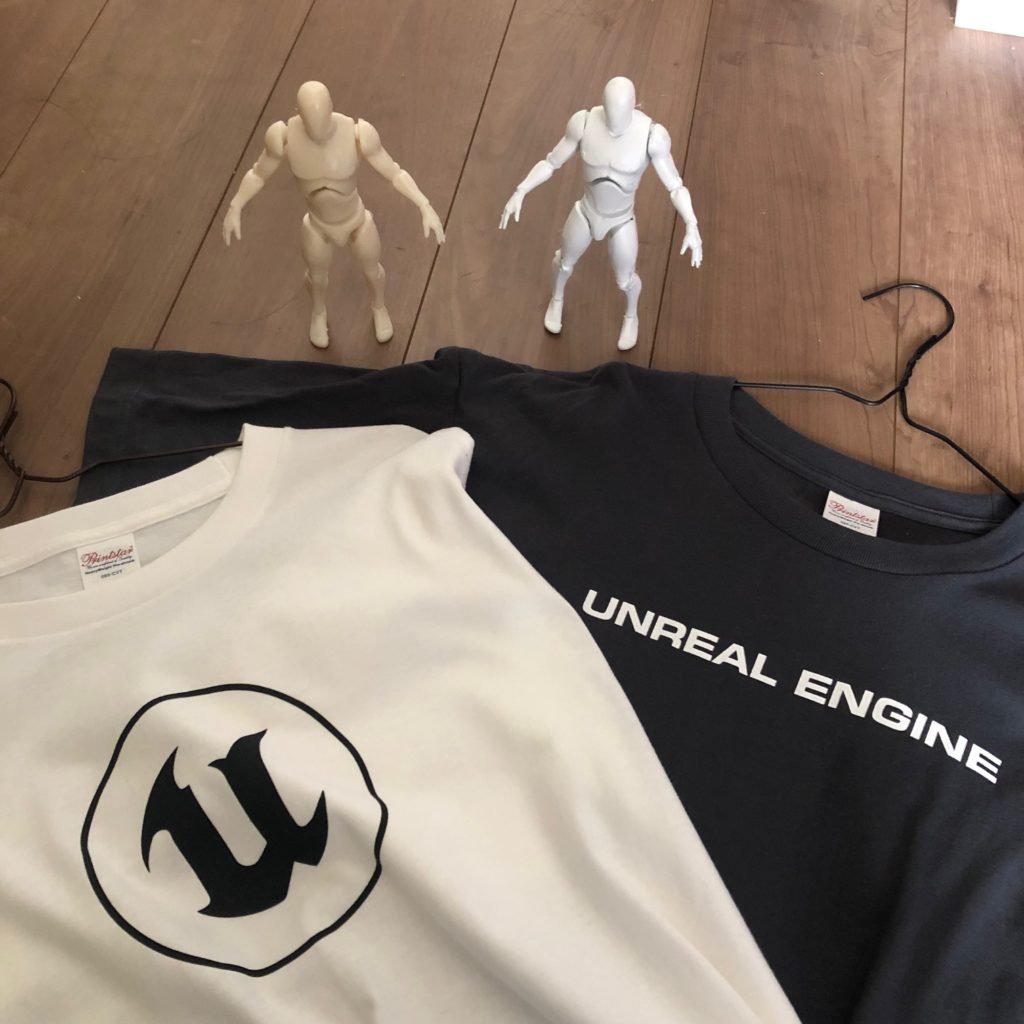
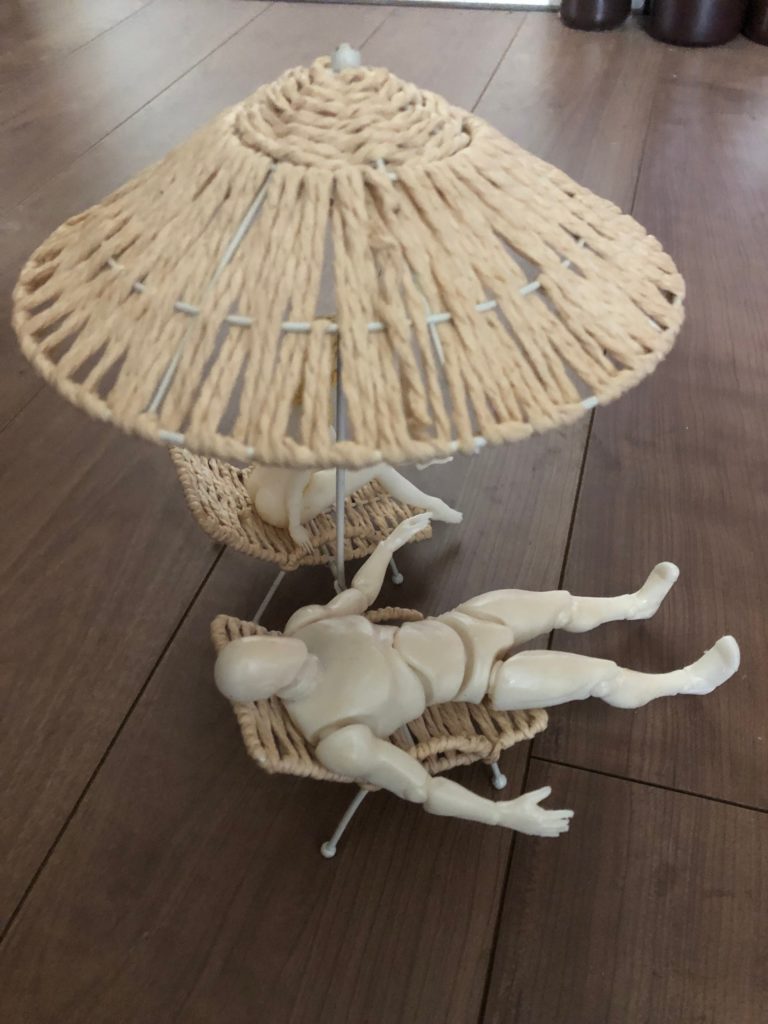
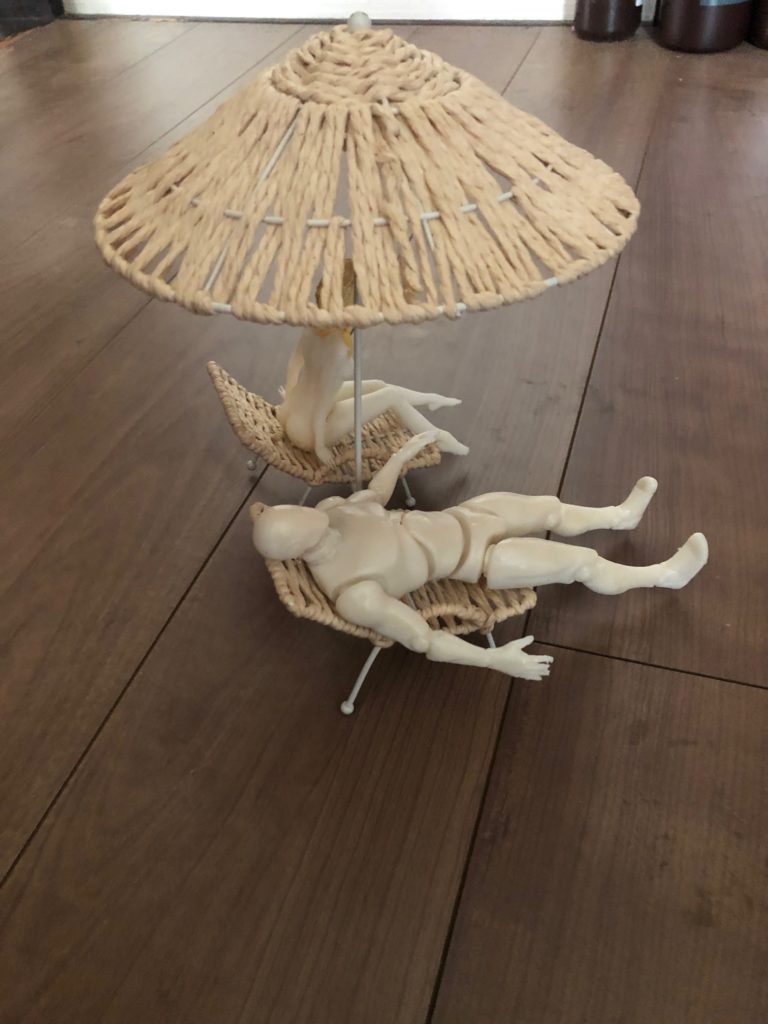
#ue4 リアルグレイマンがフィギュアが欲しくて3dプリンターANYCUBIC Photon Mono X を¥63,999で買ってみました。~失敗から学べ!!ひどい失敗例~ をかきました。
Amazon ANYCUBIC Photon Mono X
アマゾン ANYCUBIC Photon Mono X
はじめにするのはレベリングだよね。。。やったことない。
ANYCUBIC Photon Mono X leveling レベリング
じゃなくて キーワードは
ANYCUBIC Photon Mono X セッティングででてきた。
紙しいた+フィルム貼った状態でレベリングした。(フィルムいらないはず)
動画があったからかんたんだった。むしろ動画が無ければ無理だった笑笑
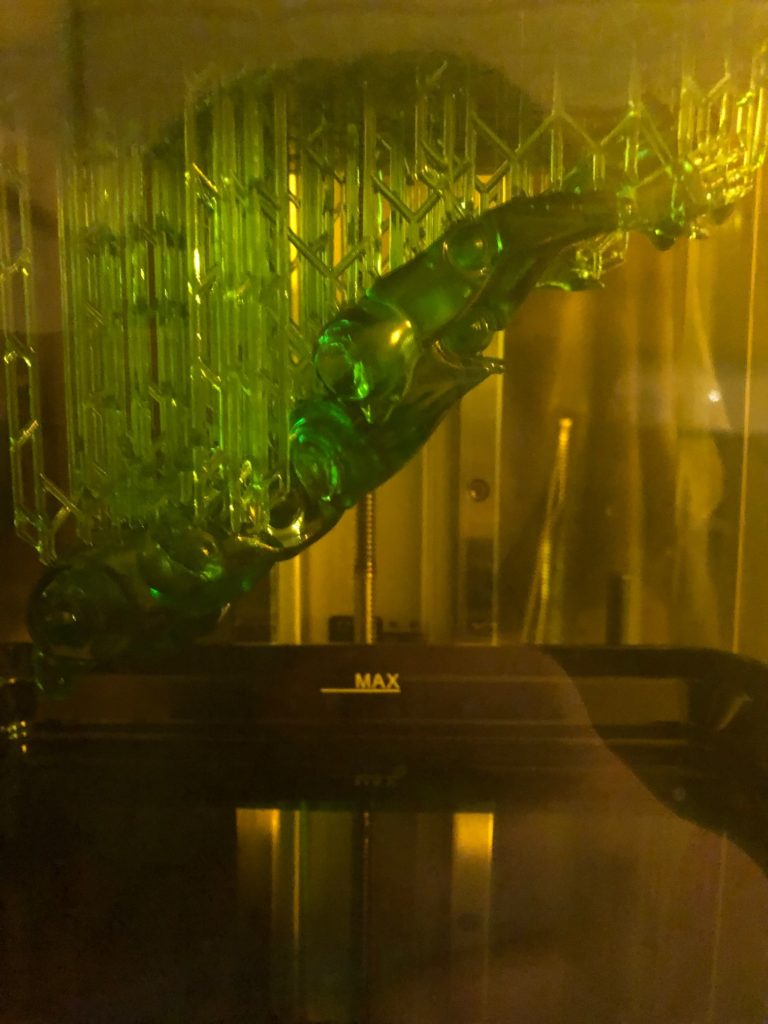
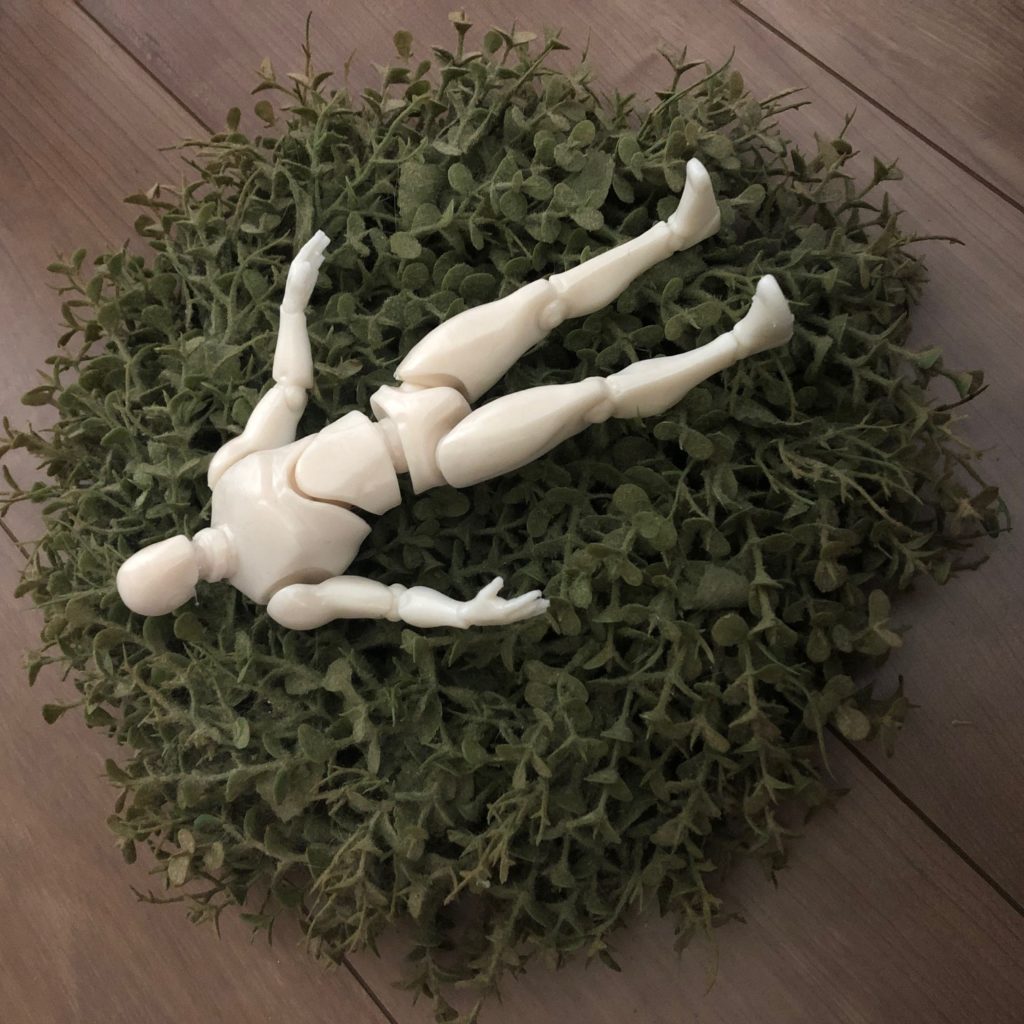
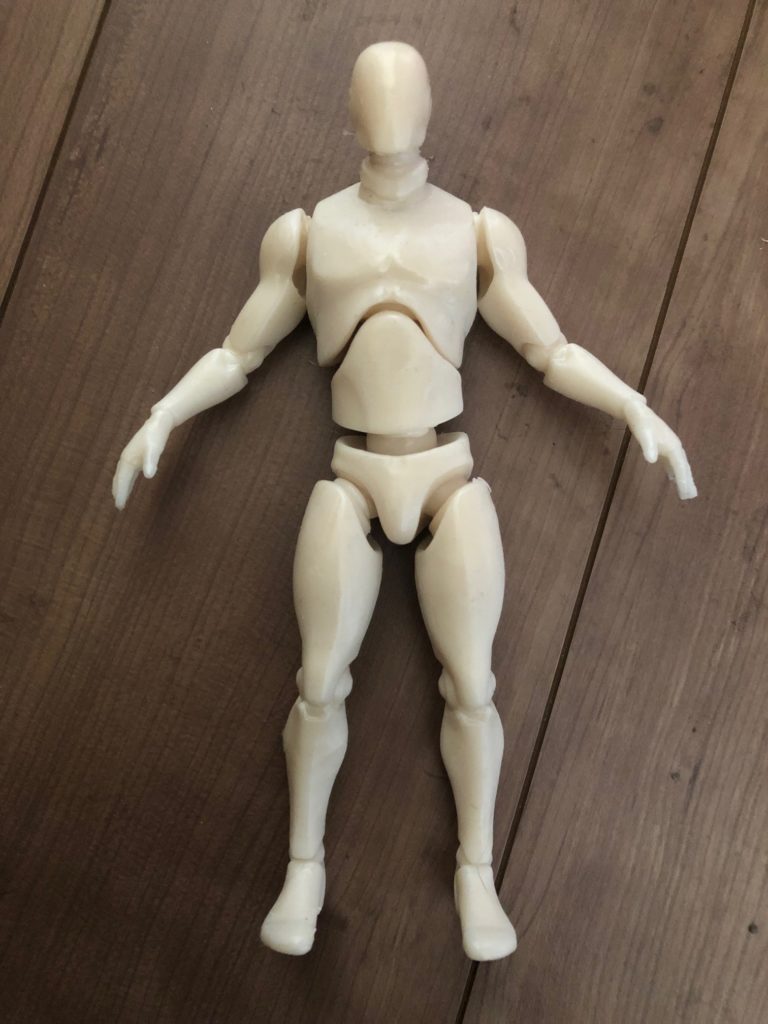
ue4 のグレイマンをfbxエクスポートして
3Dソフトでというかmaya2016でやった。
STLかOBJで保存するとスライスソフトで読み込める
UVレジン
最初のプリントなので純正を使いました。
Amazon | ANYCUBIC 光造形 3dプリンター レジン UV
とりあえず純正レジンで、USBに入っていたこれをテストプリント成功
んですが、
グレイマン3dプリントのモトネタ
アンリアルクエストの商品が届いた~☆#アンリアルクエスト pic.twitter.com/hFHAW8USMB
— take@UNLIMITED GAMES (@prince_ue4) November 18, 2021
の
なんとtake@UNLIMITED GAMES (@prince_ue4) さんに
zbrushでハイポリ化+パーツ分け+斜めに宙吊り化
している
.chituboxのデータを共有していただけることになり
ありがとうございました!そのデータがchitubox形式だった
のでフリーのスライサーのそのchituboxインストールしてみました。
CHITUBOX Basic Version 1.8.0
chitubox アカウントを作る必要があります。
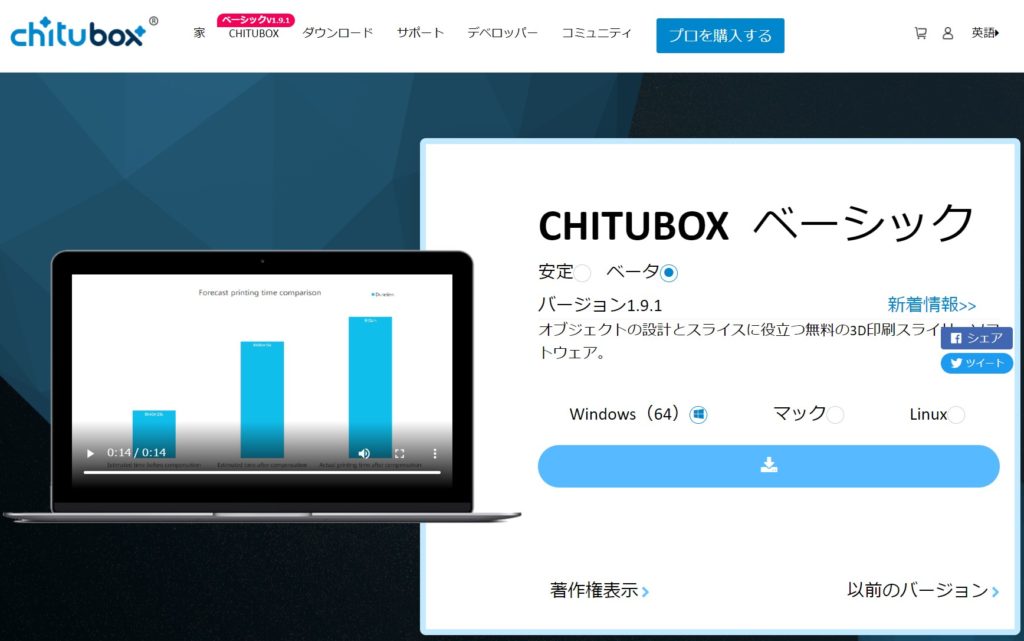
https://www.chitubox.com/en/download/chitubox-free
インストールできて
神にいただいたファイルも開けました。zbrushでハイポリ化+パーツ分け+斜めに宙吊り化
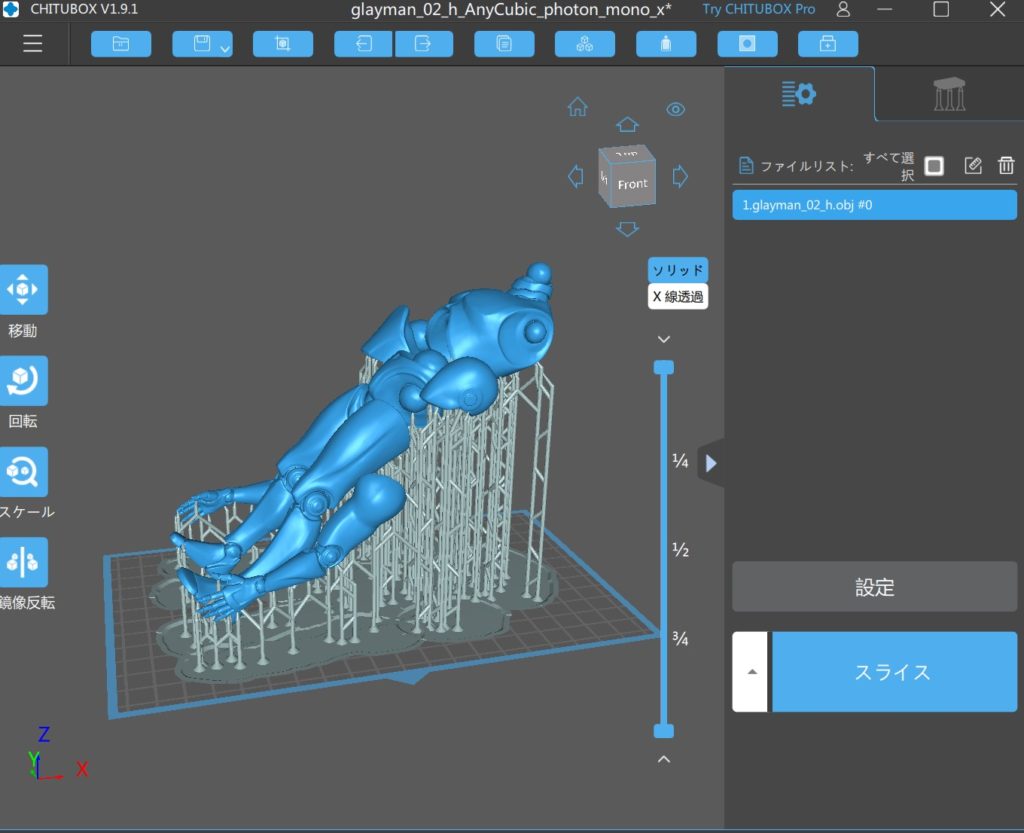
.chitubox から可逆にSTLにも保存できるので、再レイアウトやポリゴン調整もできそうです。
わーいありがとうございます!!!
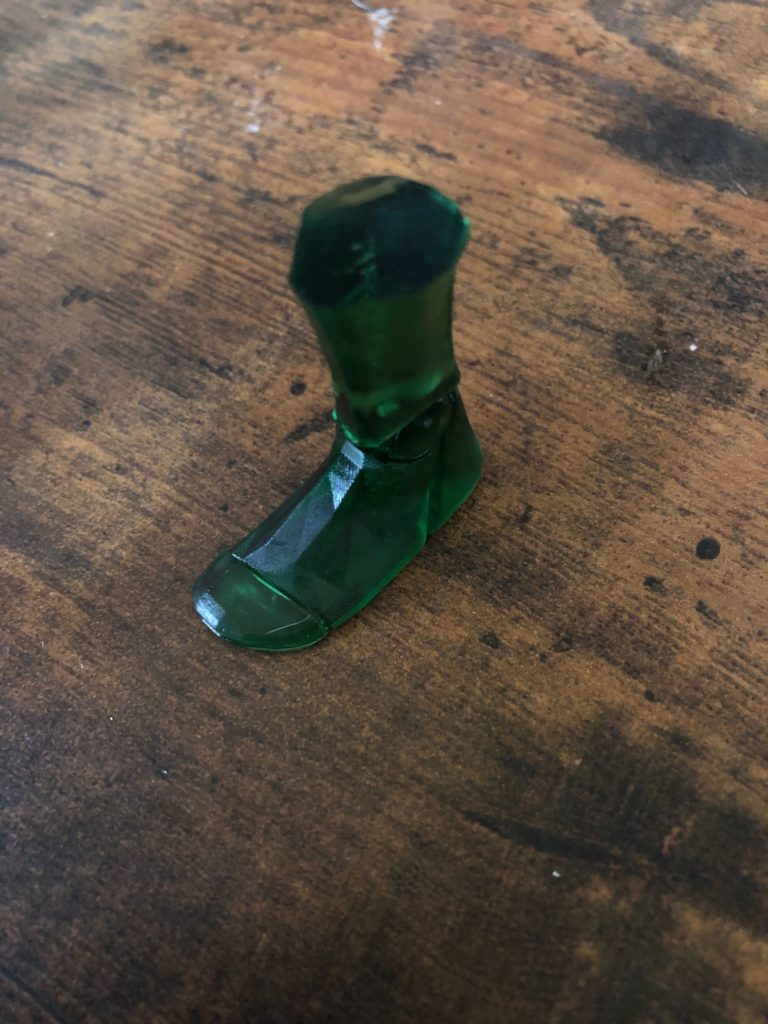
グレイマンのパーツ形状プリントされてます!!!
うれしいので二回言っておきます笑
わーいありがとうございます!!!
take@UNLIMITED GAMES@prince_ue4 さんマジ神です。感謝です。
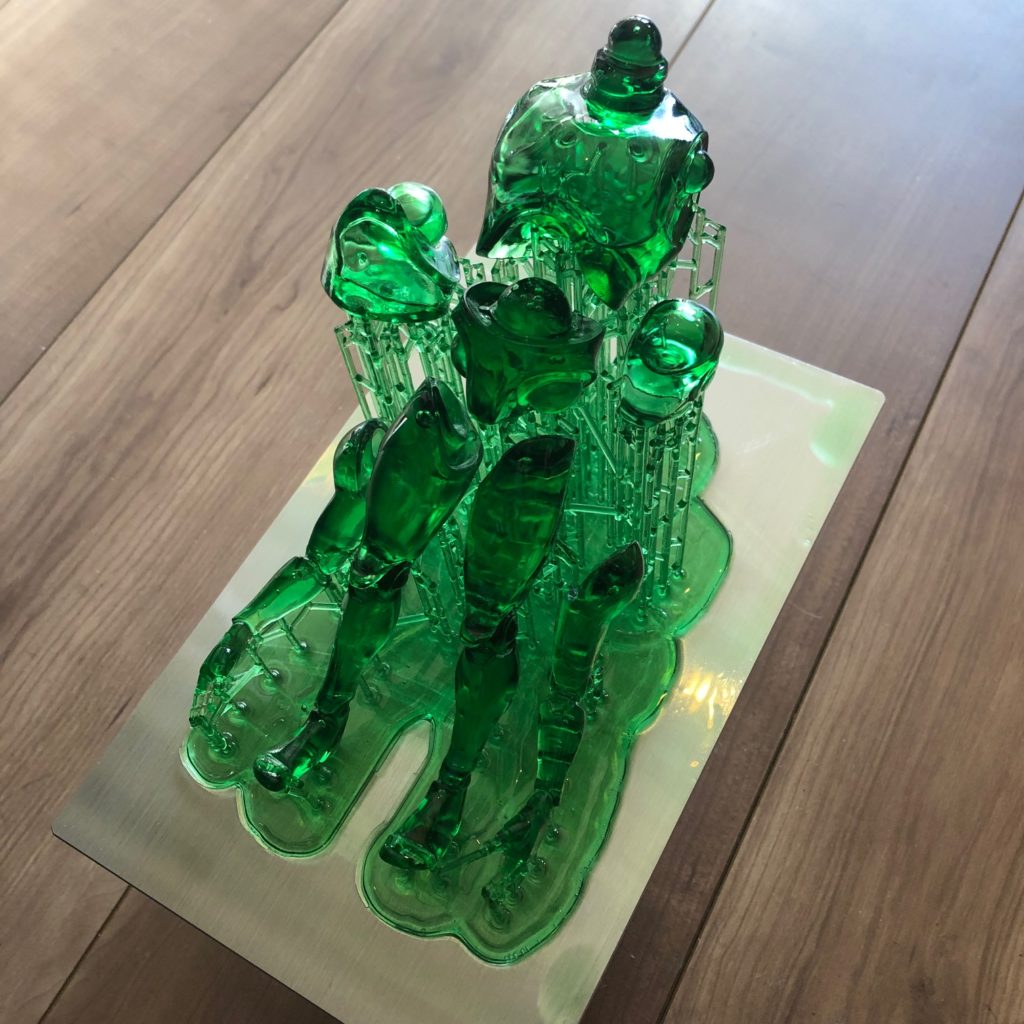
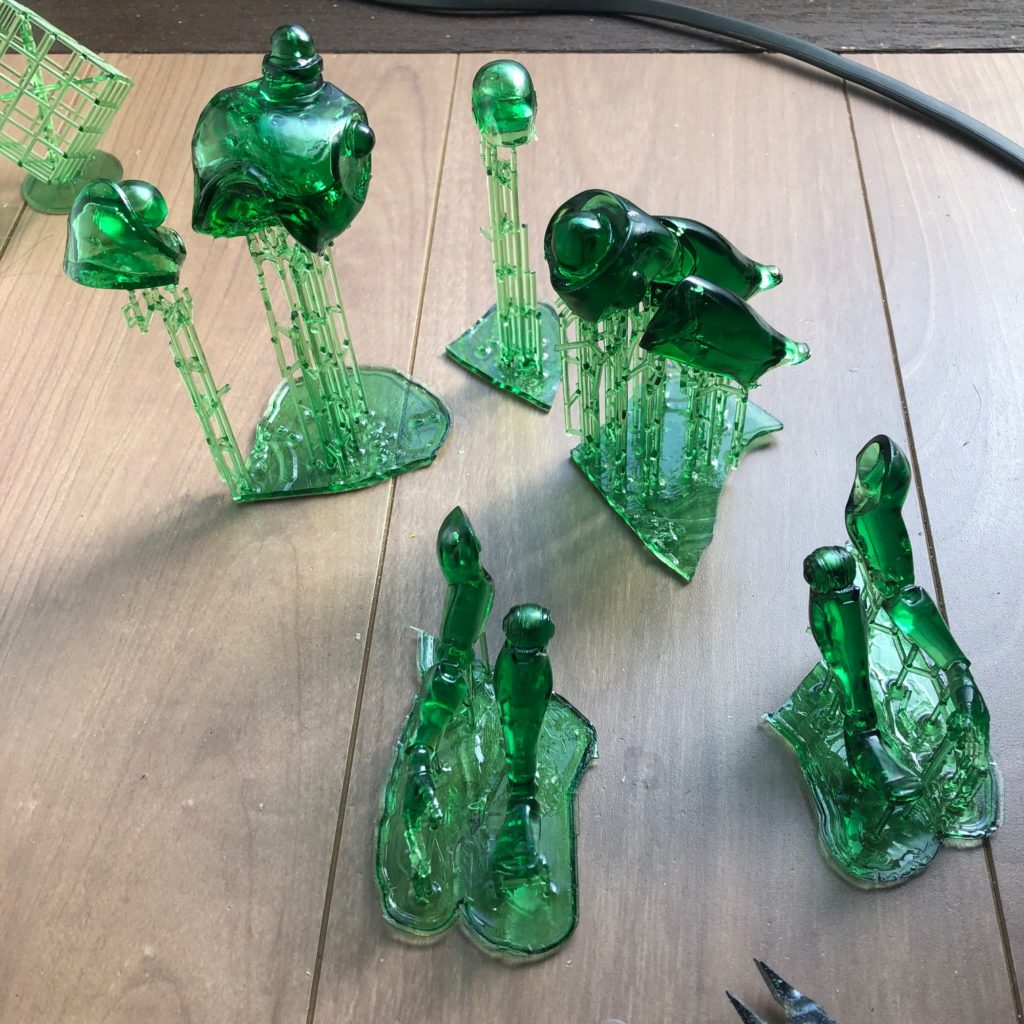
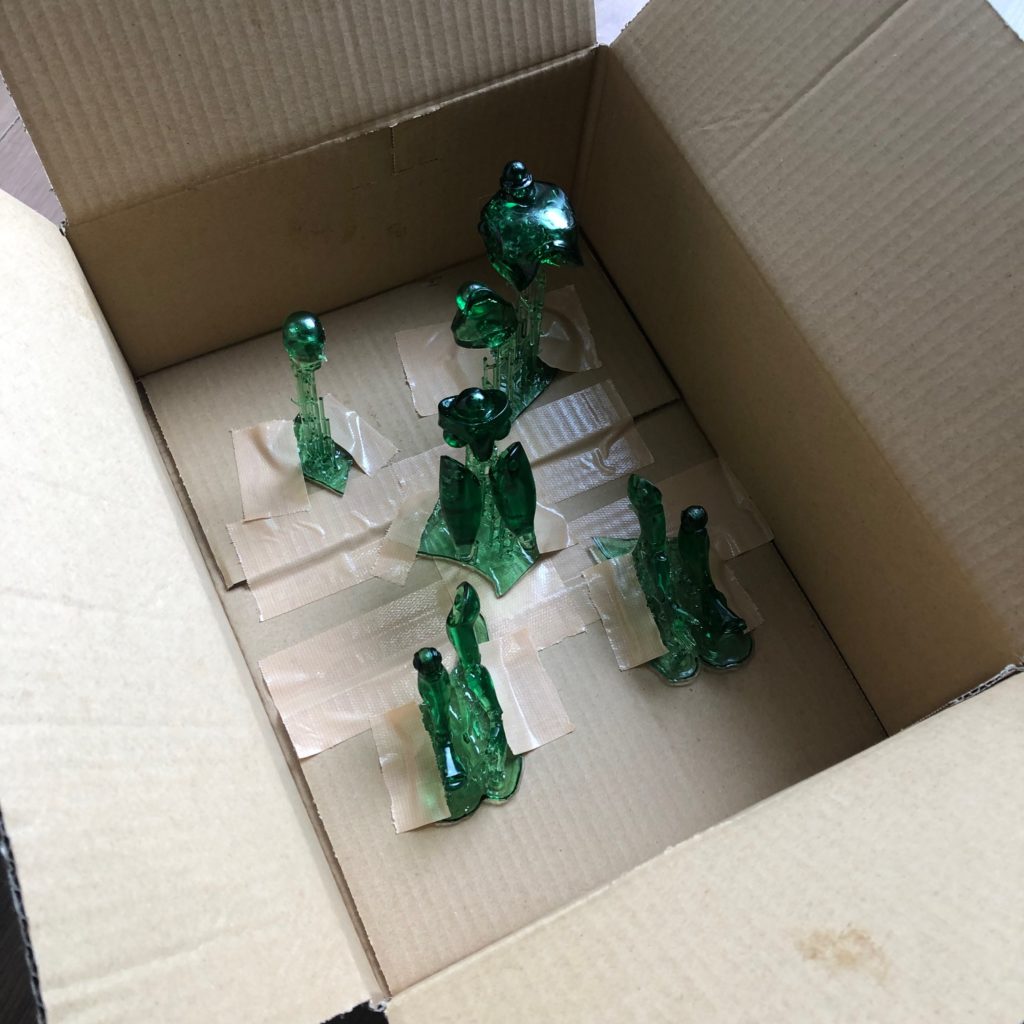
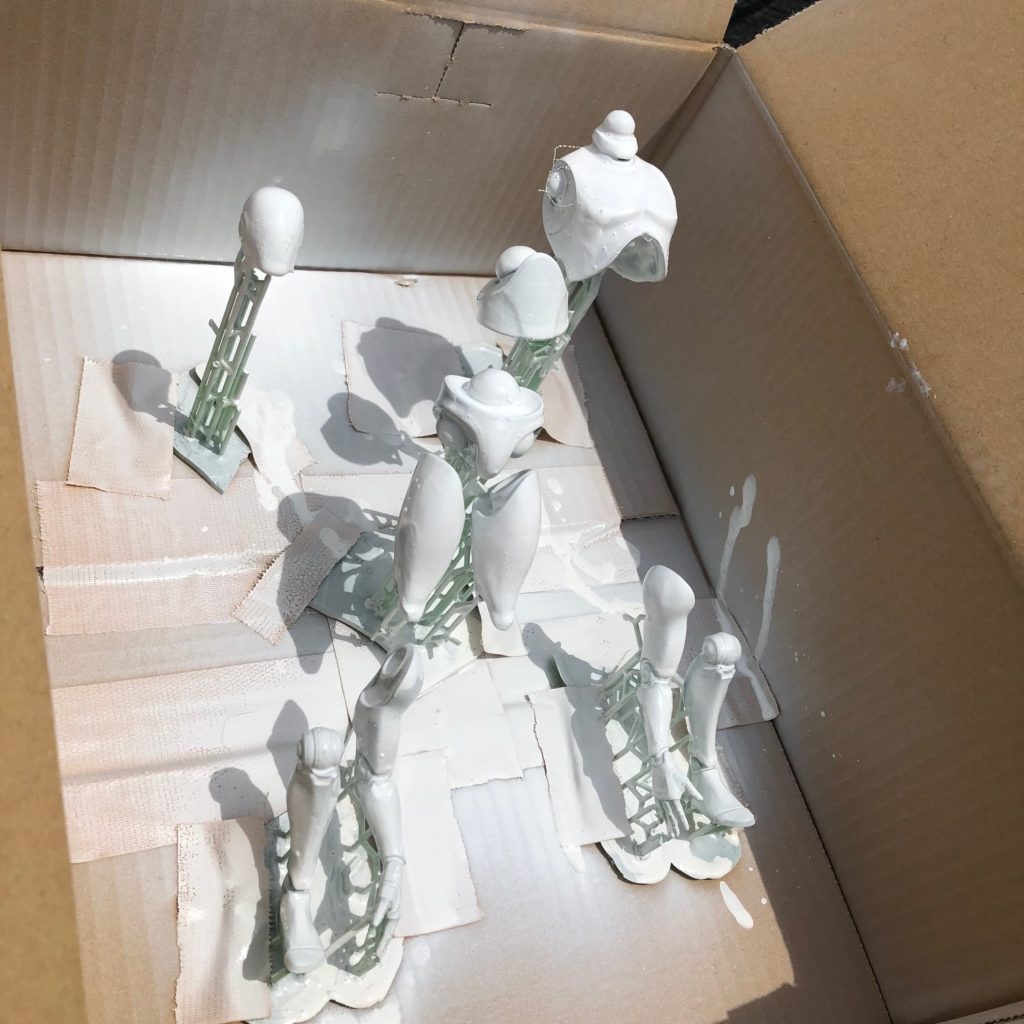
で塗装用に分解しました。
箱に張り付けて
いざ塗装
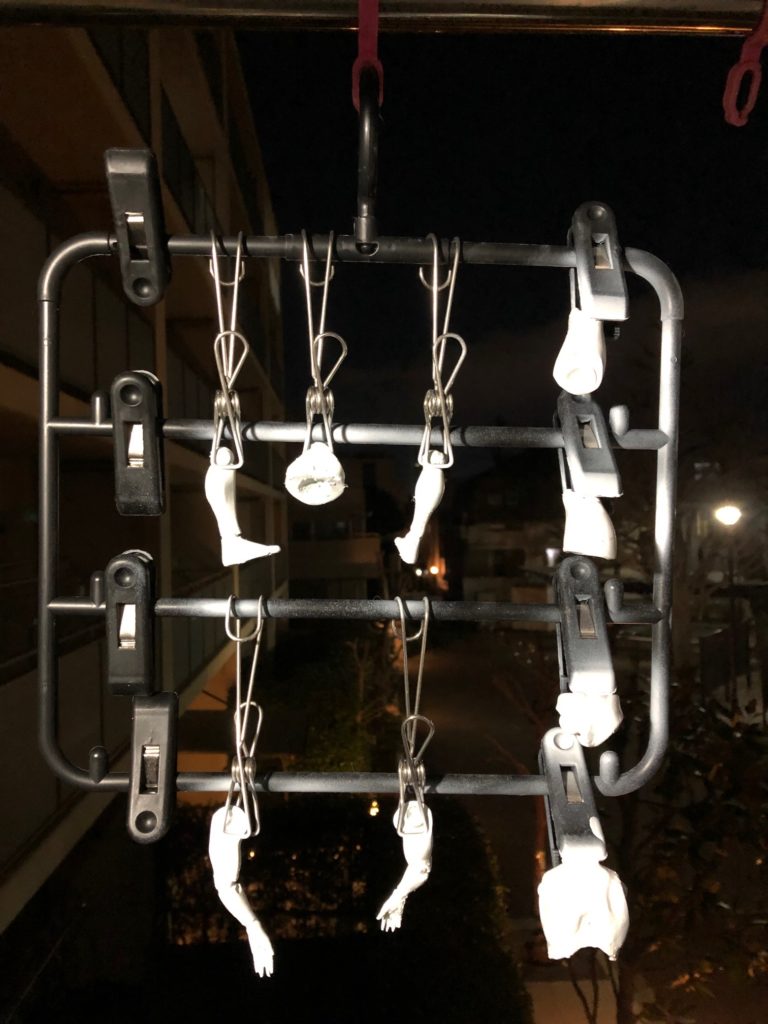
裏側の塗装は100均でハンガー買ってきました。洗濯バサミでいい。
前のnova3dのnovastanが余ってたので使えるらしいー無理かもなーページに書いてないし
NOVA3D レジン 光造形 3Dプリンター用
失敗前提でNovaStanの白にトライ
推奨露出パラメーター:
最下層の露出:40→20〜30秒
通常の露出:2→8秒
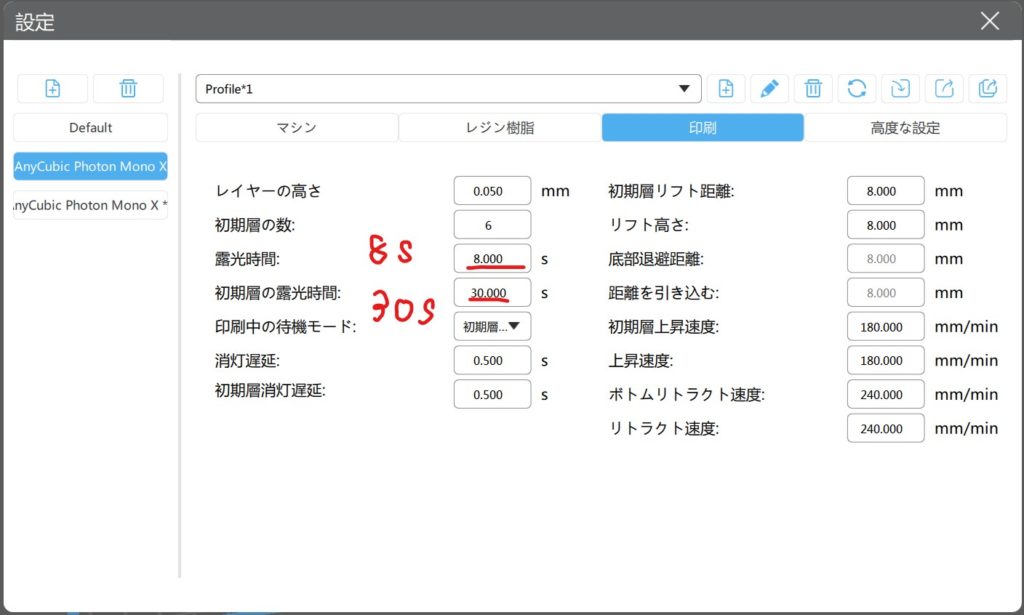
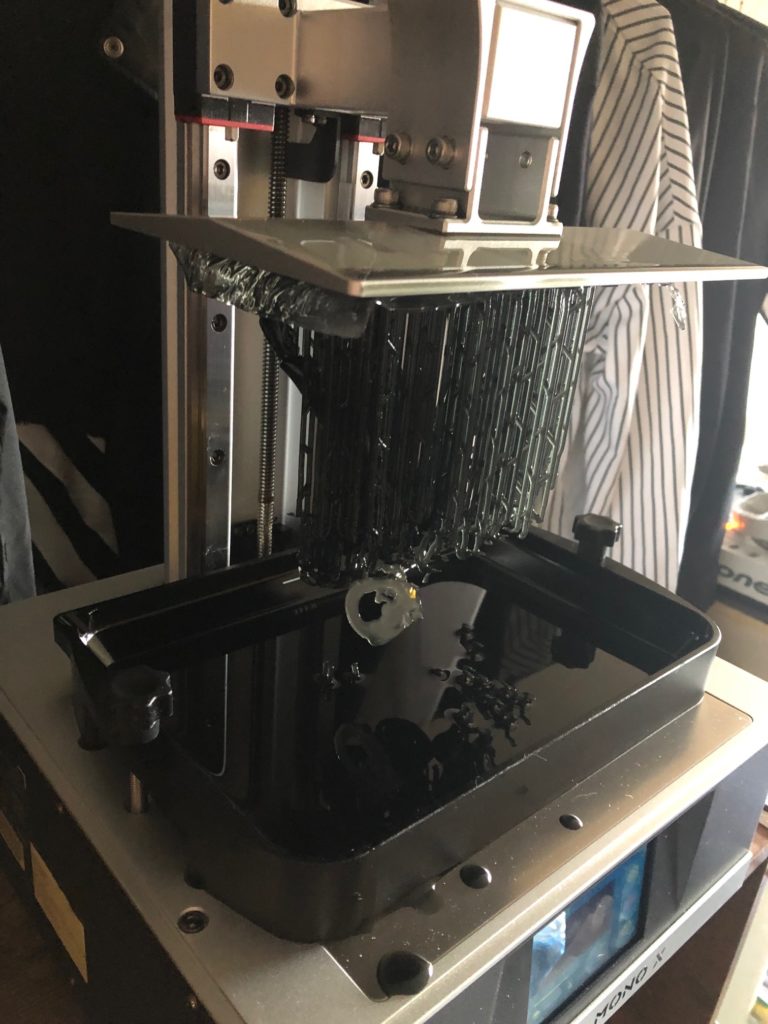
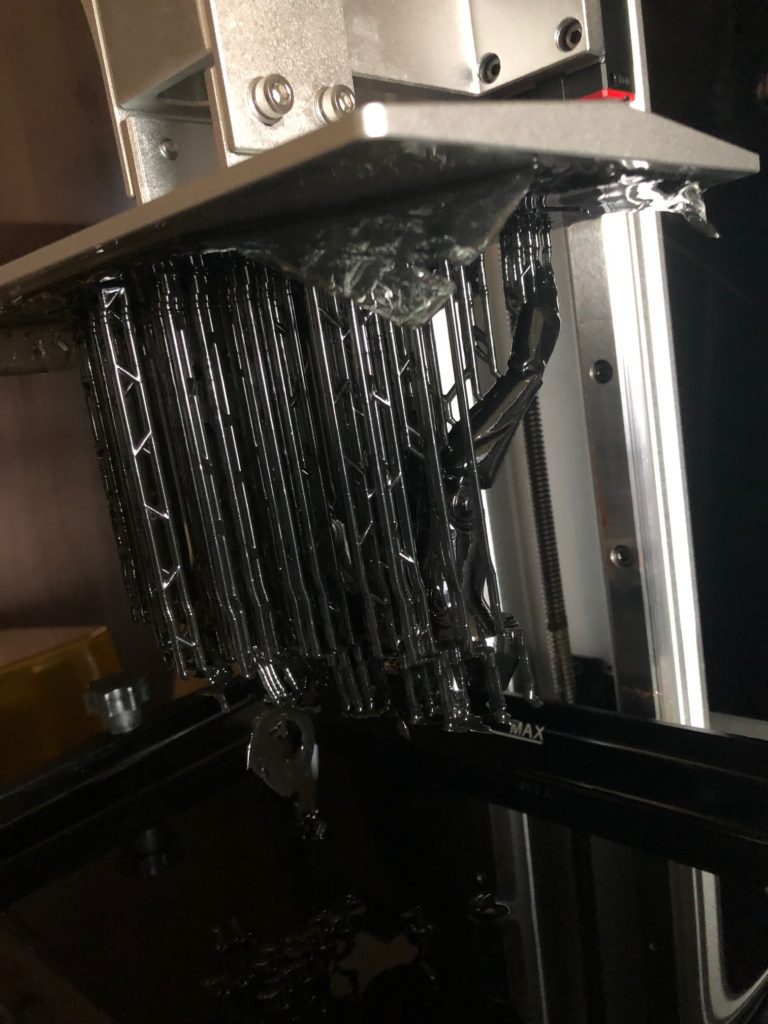
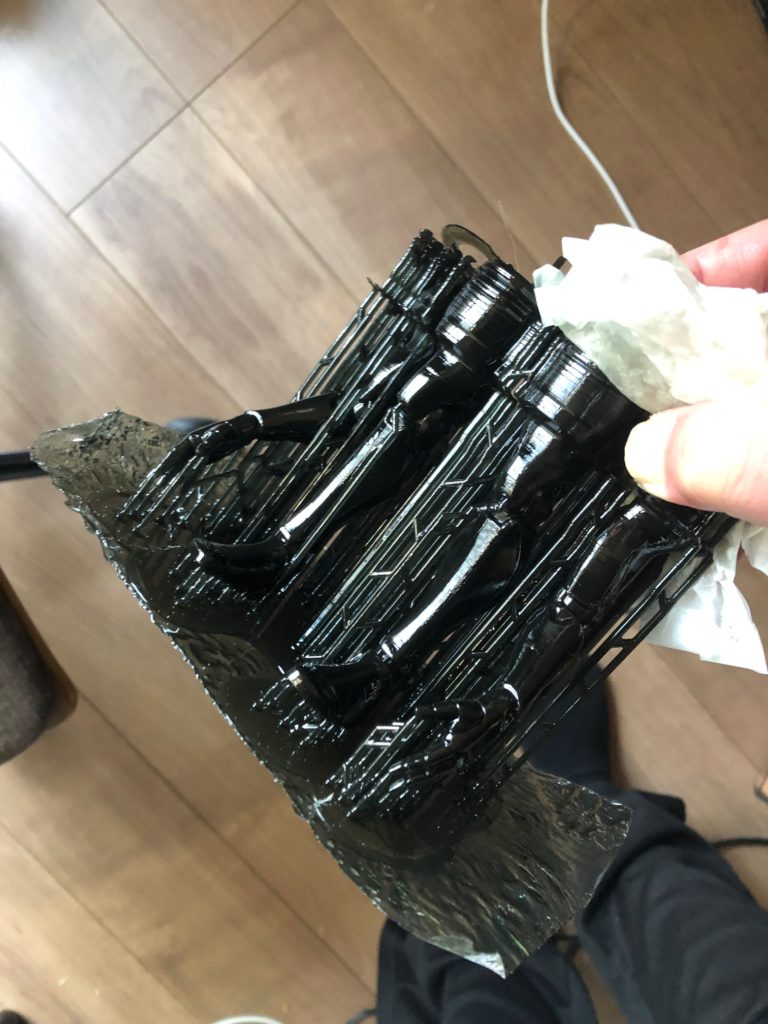
NovaStanで成功した!
サポートを除去、大変だった。ニッパーを入れるたびに顔や部屋のいろんなところに破片が飛んでく
グルーガンで組み立ててみた。

anycubicのスライスソフト
https://www.anycubic.com/blogs/news/all-you-need-to-know-about-photon-mono-series
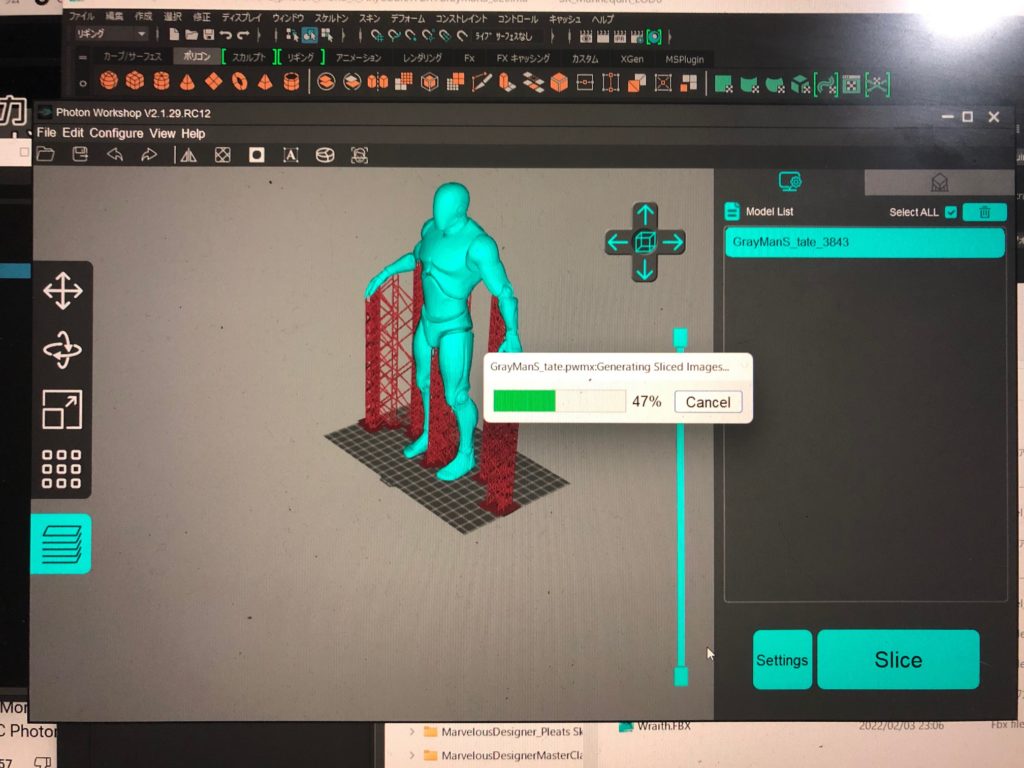
【Latest】Photon_Workshop_V2.1.29×64.exe今回は最新はこれだった。
がmono X側が対応してないのでやめた。
photon mono x でエラーが出ました「failed to open file 」
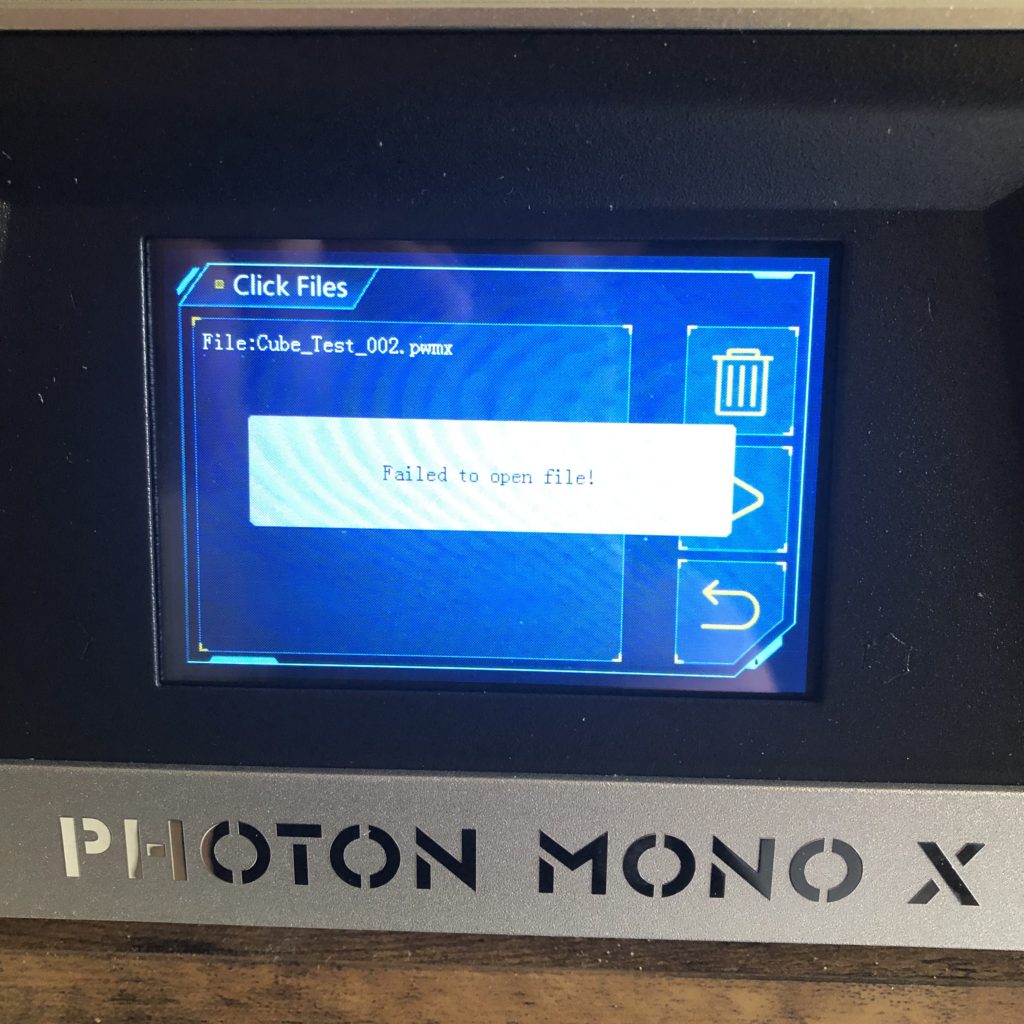
ここによると
古いバージョンのスライサーをDLすればよさそう
Photon_Workshop_V2.1.29×64.exeだったので
Photon_Workshop_V2.1.26×64.exeにしてみた。>>Core OpenGLVersion3.3エラーで起動しない?>>あれ?これでよかったかも
Photon_WorkShop_V2.1.24×64.exeにした。ちょうどPhoton Mono Xが最新の時ぽい。
これならエラーは出なかったが、CHITUBOX Basic Version 1.8.0の方がいい。
こんな置き方もちろんだめよ。
サポートなしでは片足しか出なかった
サポートありでもはい2本目、失敗

角度の問題
ちなみに
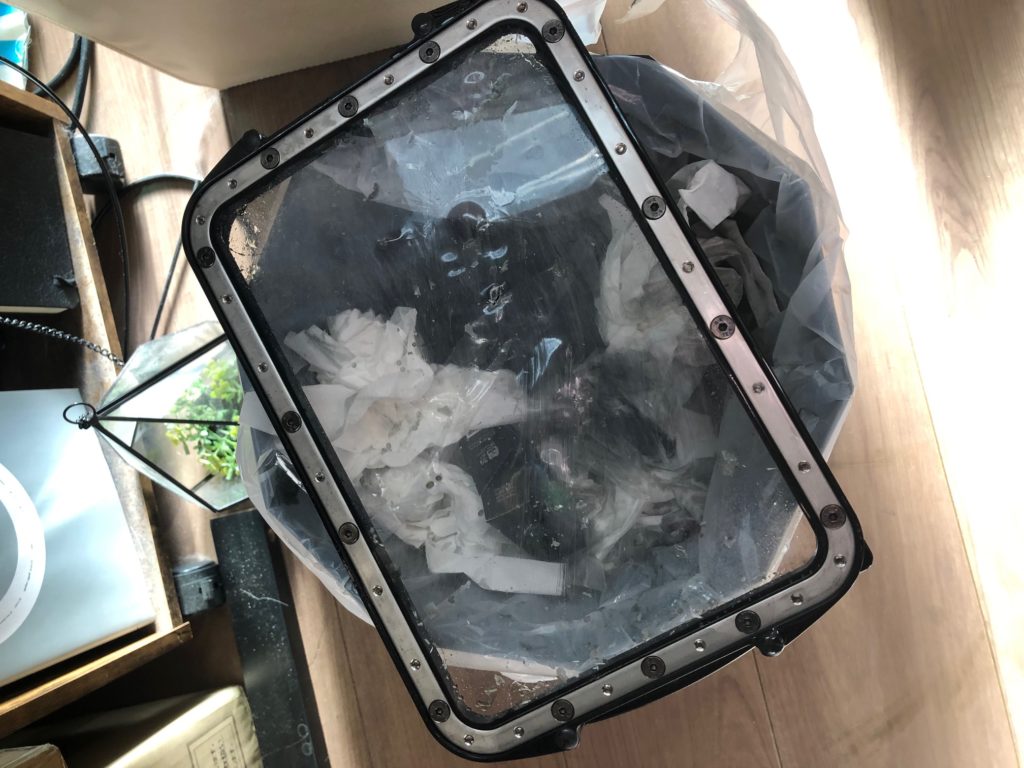
失敗例 印刷できるからって立てちゃだめだった。バットとのくっつきに堪えられずなんと
プラットフォームが本体から取れましたねじ閉めていたのに。。。。。
しかもバットのフィルムにUVレジンがくっついてとれなくて取ろうとしたら穴あいたので、
デカいバットを買いなおした。
UVレジンの時間も守らなきゃダメ!!絶対
神ルールを守らなきゃダメ。「zbrushでハイポリ化」+「パーツ分け」+「斜めに宙吊り化」
どれが欠けてもだめかもしれない。
ふともも部分に何回も照射したせいでバットがくっついちゃったのかなー
UVレジン
動画で紹介してるやつはこれだけど在庫ないみたい
レジンワン
https://www.amazon.co.jp/stores/page/42F0E51E-8AD2-46A7-9267-5345606FAB17
前のnova3dのnovastanが余ってたので使えるらしいー無理かもなーページに書いてないし
露光時間を設定して使ってみるかー
印刷設定を推奨
推奨露出パラメーター:
最下層の露出:40→20〜30秒これそのまま
通常の露出:2→8秒
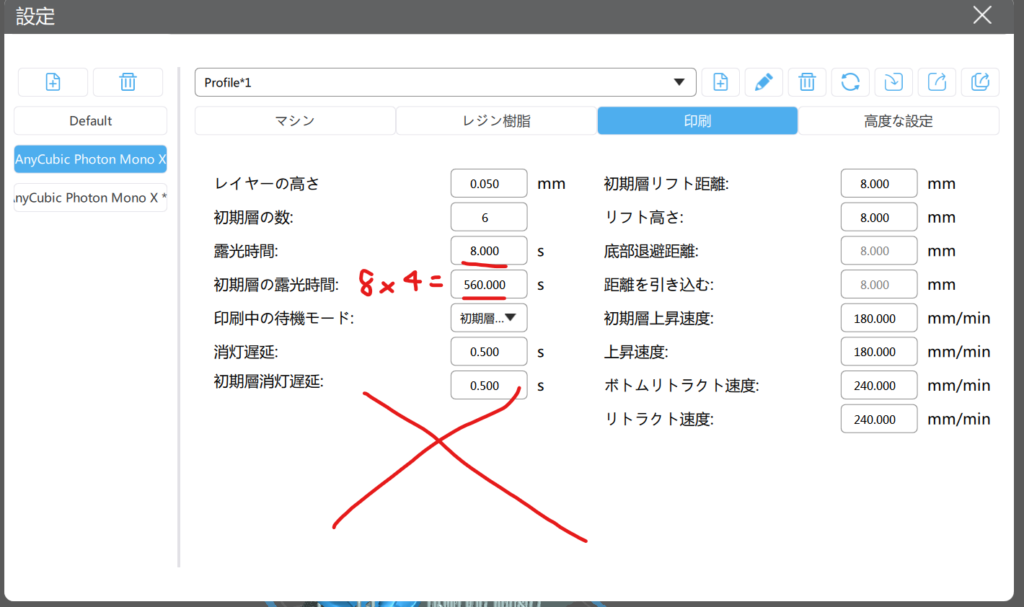
うーん失敗
NovaStanでの初期層の露光時間は、20〜30秒
最下層の露出:40→20〜30秒これそのまま
通常の露出:2→8秒
最下層の露出が強すぎたかバットのフィルムに穴が開いた。失敗
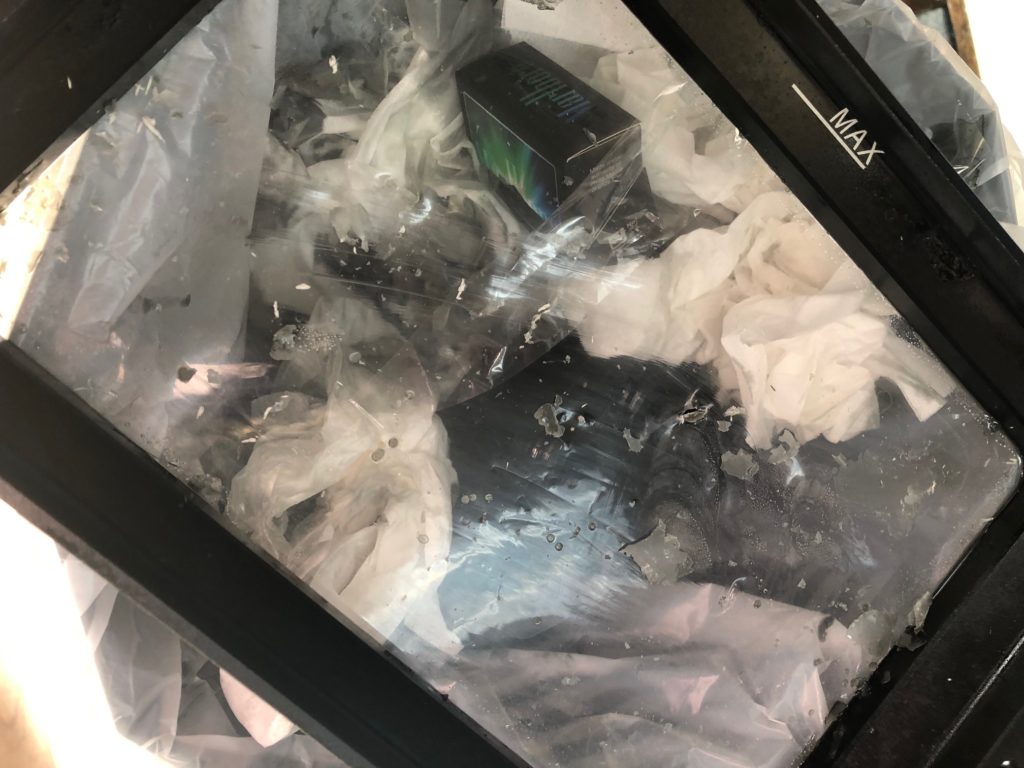
フィルムを張りなおすか、バットを買いなおした6900円
UniTak3D陽極酸化アルミニウム樹脂タンク、Mono X樹脂バット、ANYCUBIC Mono X LCD3Dプリンター用のFEPフィルム付き260x180mmの2個
今度はボトルを振り忘れた。
今回はアクターにダメージを与えるので
UE4/Engine/Source/Runtime/Engine/Classes/GameFramwork/Actor.h
が持っているTakeDamageを使う
/ **
*このアクターにダメージを与えます。
* @see https://www.unrealengine.com/blog/damage-in-ue4
* @paramDamageAmount適用するダメージの量
* @paramDamageEvent受けたダメージを完全に説明するデータパッケージ。
* @paramEventInstigator損傷の原因となったコントローラー。
* @param DamageCauserダメージを直接引き起こしたアクター(爆発した発射物、着地した岩など)
* @ return実際に適用されたダメージの量。
* /
/**
	 * Apply damage to this actor.
	 * @see https://www.unrealengine.com/blog/damage-in-ue4
	 * @param DamageAmount		How much damage to apply
	 * @param DamageEvent		Data package that fully describes the damage received.
	 * @param EventInstigator	The Controller responsible for the damage.
	 * @param DamageCauser		The Actor that directly caused the damage (e.g. the projectile that exploded, the rock that landed on you)
	 * @return					The amount of damage actually applied.
	 */
	virtual float TakeDamage(float DamageAmount, struct FDamageEvent const& DamageEvent, class AController* EventInstigator, AActor* DamageCauser);
で引数にあるDamageEventはたくさん種類あるみたい。
今回は銃なのでFPointDamageEventを使った。
FPointDamageEvent DamageEvent(Damage,Hit,ShotDirection,nullptr);
でアクターにヒットしたときTakeDamageを呼ぶというのはこうなる。
		AActor* HitActor= Hit.GetActor();
		if (HitActor!=nullptr)
		{
			FPointDamageEvent DamageEvent(Damage,Hit,ShotDirection,nullptr);
			HitActor->TakeDamage(Damage,DamageEvent,OwnerController,this);
		}
絵的にはなにもかわりません。