
お客様のチャット
<!-- chat.php -->
<?php
function trace($txt){
//print($txt);
$a="a";
}
class RoomLog
{
public $LOG_FILE_NAME;
public $name;
public $SPLIT_Str;
public $message;
public function get_ip_file_name(){
global $_SERVER;
$ip_Address=$_SERVER['REMOTE_ADDR'];
print("ip_Address= " . $ip_Address . "<br>");
if($ip_Address=="::1"){
$ip_Address="192.168.1.29";
print("テストのためip変数上書きしました。ip_Address= " . $ip_Address . "<br>");
}
$ip_Address_Arr = explode(".", $ip_Address);
$ip_file_name = join('_', $ip_Address_Arr);
$ip_file_name = "log/ip_" . $ip_file_name . "_chatlog.txt";
print("ip_file_name= " . $ip_file_name . "<br>");
return $ip_file_name;
}
public function initLog(){
trace("■ initLog()<br>");
global $LOG_FILE_NAME;
global $name;
global $SPLIT_Str;
global $message;
$ip_file_name=$this->get_ip_file_name();
// データを書き込むファイルの名前
//$LOG_FILE_NAME = "chat_class_txt_log.txt";
$LOG_FILE_NAME = $ip_file_name;
// 区切りのための文字列
$SPLIT_Str = "|-|";
// 名前を格納する変数
$name = "お客様";
// メッセージを格納する変数
$message = "";
$this->LOG_FILE_NAME=$LOG_FILE_NAME;
$this->name=$name;
$this->SPLIT_Str=$SPLIT_Str;
$this->message=$message;
/*
trace("<br>");
trace("this->LOG_FILE_NAME= " . $this->LOG_FILE_NAME . "<br>");
trace("this->name= " . $this->name . "<br>");
trace("this->SPLIT_Str= " . $this->SPLIT_Str . "<br>");
trace("this->message= " . $this->message . "<br>");
*/
}
public function startMain(){
trace("■ startMain()<br>");
$this->initLog();
$this->CheckFormPostData();
$this->LogShow();
}
public function CheckFormPostData(){
trace("■ CheckFormPostData()<br>");
global $_POST;
$name = $this->name;
$SPLIT_Str = $this->SPLIT_Str;
$message = $this->message;
// 送信されたデータ
$_POST_string = join(', ', $_POST);
trace("_POST_string2= " . $_POST_string . "<br>");
if (empty($_POST)) {
trace("The form is empty.");
} else {
trace("Form data is present.");
}
// 送信された名前とメッセージを変数に代入
if (isset($_POST['name'])) {
$name = $_POST['name'];
if (strpos($name, $SPLIT_Str) !== false) {
// 名前に区切り文字が含まれている場合の処理
echo "使用できない文字列「|-|」が含まれています。";
return;
}
if ($name == "") {
$name = "お客様";
}
}
if (isset($_POST['message'])) {
$message = $_POST['message'];
if (strpos($message, $SPLIT_Str) !== false) {
// メッセージに区切り文字が含まれている場合の処理
echo "使用できない文字列「|-|」が含まれています。";
return;
}
//$this->LOG_FILE_NAME=$LOG_FILE_NAME;
$this->name=$name;
//$this->SPLIT_Str=$SPLIT_Str;
$this->message=$message;
$this->LogWrite();
}
}
public function LogWrite(){
trace("■ LogWrite()<br>");
$LOG_FILE_NAME = $this->LOG_FILE_NAME;
$name = $this->name;
$SPLIT_Str = $this->SPLIT_Str;
$message = $this->message;
//書き込みモードでファイルを開く
$fp = fopen($LOG_FILE_NAME, "a") or exit($LOG_FILE_NAME . "が開けません");
// | を区切り文字として2つのデータを繋げて書き込む
fwrite($fp, $name . $SPLIT_Str . $message . "\n");
// リダイレクトのためのHTTPヘッダーを送信
//header("Location: " . $_SERVER['PHP_SELF'], true, 303);
fclose($fp);
}
function LogShow(){
trace("■ LogShow()<br>");
//global $LOG_FILE_NAME;
global $linesNum;
global $lines;
$LOG_FILE_NAME = $this->LOG_FILE_NAME;
//$name = $this->name;
//$SPLIT_Str = $this->SPLIT_Str;
//$message = $this->message;
if (!file_exists($LOG_FILE_NAME)) {
// ファイルがない場合
echo "書き込みはありません。";
$linesNum = 0;
} else {
// ファイルの全行を読み取る
$lines = file($LOG_FILE_NAME);
// 読み込んだ行数
$linesNum = count($lines);
}
}
}
$RoomLog_ins = new RoomLog();
$RoomLog_ins->startMain();
?>
<!DOCTYPE html>
<html lang="ja">
<head>
<meta charset="utf-8">
<title>1行メッセージ</title>
</head>
<body>
<h1>お問い合わせ内容</h1>
<section>
<?php
// 一行ずつ表示する処理
for ($i = 0; $i < $linesNum; $i++) {
// 区切り文字でデータを区切って配列に格納
$array = explode($SPLIT_Str, $lines[$i]);
// 区切り文字の前の部分は名前
$name = htmlspecialchars($array[0]);
// 区切り文字の後の部分はメッセージ
$array_length = count($array);
if ($array_length == 2) {
$message = htmlspecialchars($array[1]);
}
// 名前とメッセージを表示
echo '<p>' . $name . "「" . str_replace(PHP_EOL, "", $message) . '」</p>';
}
?>
</section>
<form method="post" action="chat_class_txt.php">
<div>
<!--<b>おなまえ</b>-->
<!--<input name="name" type="text" size="20" maxlength="10">-->
<input name="name" type="hidden" size="20" maxlength="10">
</div>
<div>
<!--<b>ご入力</b>-->
<input name="message" type="text" size="50" maxlength="50" required>
<button name="submit" type="submit">送信</button>
</div>
</form>
</body>
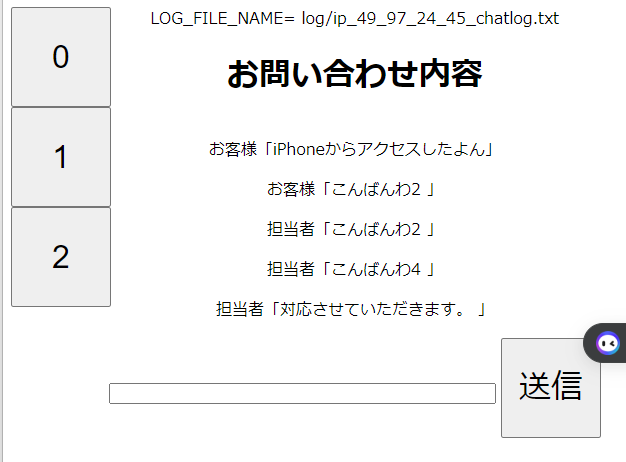
</html>担当者のチャット画面
<!DOCTYPE html>
<html lang="ja">
<head>
  <meta charset="utf-8">
  <title>1行メッセージ</title>
</head>

<body>
<!-- chat.php -->

<style>
.base {
  display: flex;
  flex-direction: row;
  width: 100vw;
  height: 90vh;
}
.class1 {
  width: 10%;
}

.class2 {
  display: flex;
  flex-direction: column;
  width: 90%;
}

</style>
<style>
  div {
    text-align: center;
    /* background-color: #aaaaaa; 16進数のカラーコードを使用する例 */
  }
  button{
      font-size: 200%;
      width:100px;
      height:100px;
  }
</style>
  <div class="base">
    <div class="class1">

<?php
//$dir = "log";
//$files = scandir($dir);
$files = glob("log/*");
$counter=0;
foreach ($files as $file) {
    //echo("<h2>" . $file . "</h2><br>");
    $url='log_frame.php';
    //echo('<a href="'.$url.'"><h1><div >' . $counter . '</div></h1></a><br>');

    $htmlStr='';
    $htmlStr=$htmlStr.'<form method="post" action="chat_class_txt_admin.php">';
    $htmlStr=$htmlStr.'<input type="hidden" name="LOG_FILE_NAME" value="' . $file . '">';
    $htmlStr=$htmlStr.'<button name="submit" type="submit">' . $counter . '</button>';
    $htmlStr=$htmlStr.'</form>';
    echo($htmlStr);

    $counter=$counter+1;
}

?>

</div>
<div class="class2">
<?php
function trace($txt){
    //print($txt);
    $a="a";
}
class RoomLog
{

    public $LOG_FILE_NAME;
    public $LOG_FILE_NAME_Opened;
    public $name;
    public $SPLIT_Str;
    public $message;
    public function get_ip_file_name(){
        global $_SERVER;
        $ip_Address=$_SERVER['REMOTE_ADDR'];
        trace("ip_Address= " . $ip_Address . "<br>");
        if($ip_Address=="::1"){
            $ip_Address="192.168.1.29";
            trace("テストのためip変数上書きしました。ip_Address= " . $ip_Address . "<br>");
        }
        $ip_Address_Arr = explode(".", $ip_Address);
        $ip_file_name = join('_', $ip_Address_Arr);
        $ip_file_name = "log/ip_" . $ip_file_name . "_chatlog.txt";
        trace("ip_file_name= " . $ip_file_name . "<br>");
        return $ip_file_name;
    }

    public function CheckFormPostData_Admin(){
        trace("■ CheckFormPostData_Admin()<br>");
        global $_POST;

        // 送信されたデータ
        $_POST_string = join(', ', $_POST);
        trace("_POST_string1= " . $_POST_string . "<br>");

        if (empty($_POST)) {
            trace("The form is empty.<br>");
        } else {
            trace("Form data is OK present.<br>");
        }
        if (isset($_POST['LOG_FILE_NAME'])) {
          $LOG_FILE_NAME = $_POST['LOG_FILE_NAME'];
          $this->LOG_FILE_NAME=$LOG_FILE_NAME;
          print("LOG_FILE_NAME= " . $LOG_FILE_NAME . "<br>");
        }
        /*
        // 送信された名前とメッセージを変数に代入
        if (isset($_POST['name'])) {
          $name = $_POST['name'];

          if (strpos($name, $SPLIT_Str) !== false) {
            // 名前に区切り文字が含まれている場合の処理
            echo "使用できない文字列「|-|」が含まれています。";
            return;
          }

          if ($name == "") {
            $name = "お客様";
          }
        }
        if (isset($_POST['message'])) {
          $message = $_POST['message'];

          if (strpos($message, $SPLIT_Str) !== false) {
            // メッセージに区切り文字が含まれている場合の処理
            echo "使用できない文字列「|-|」が含まれています。";
            return;
          }

          //$this->LOG_FILE_NAME=$LOG_FILE_NAME;
          $this->name=$name;
          //$this->SPLIT_Str=$SPLIT_Str;
          $this->message=$message;
          $this->LogWrite();
        }
        */
        return $LOG_FILE_NAME;
    }

    public function initLog(){
        trace("■ initLog()<br>");
        global $LOG_FILE_NAME;
        global $name;
        global $SPLIT_Str;
        global $message;

        $ip_file_name=$this->CheckFormPostData_Admin();

        // データを書き込むファイルの名前
        //$LOG_FILE_NAME = "chat_class_txt_log.txt";
        $LOG_FILE_NAME = $ip_file_name;

        // 区切りのための文字列
        $SPLIT_Str = "|-|";

        // 名前を格納する変数
        $name = "担当者";
        // メッセージを格納する変数
        $message = "";

        $this->LOG_FILE_NAME=$LOG_FILE_NAME;
        $this->name=$name;
        $this->SPLIT_Str=$SPLIT_Str;
        $this->message=$message;
        /*
        trace("<br>");
        trace("this->LOG_FILE_NAME= " . $this->LOG_FILE_NAME . "<br>");
        trace("this->name= " . $this->name . "<br>");
        trace("this->SPLIT_Str= " . $this->SPLIT_Str . "<br>");
        trace("this->message= " . $this->message . "<br>");
        */
    }

    public function startMain(){
        trace("■ startMain()<br>");
        $this->initLog();
        $this->CheckFormPostData();
        $this->LogShow();
    }


    public function CheckFormPostData(){
        trace("■ CheckFormPostData()<br>");
        global $_POST;

        $name = $this->name;
        $SPLIT_Str = $this->SPLIT_Str;
        $message = $this->message;


        // 送信されたデータ
        $_POST_string = join(', ', $_POST);
        //trace("_POST_string2= " . $_POST_string . "<br>");

        if (empty($_POST)) {
            trace("The form is empty.<br>");
        } else {
            trace("Form data is present.<br>");
        }

        // 送信された名前とメッセージを変数に代入
        if (isset($_POST['name'])) {
          $name = $_POST['name'];

          if (strpos($name, $SPLIT_Str) !== false) {
            // 名前に区切り文字が含まれている場合の処理
            echo "使用できない文字列「|-|」が含まれています。<br>";
            return;
          }

          if ($name == "") {
            $name = "担当者";
          }
        }
        if (isset($_POST['message'])) {
          $message = $_POST['message'];

          if (strpos($message, $SPLIT_Str) !== false) {
            // メッセージに区切り文字が含まれている場合の処理
            echo "使用できない文字列「|-|」が含まれています。<br>";
            return;
          }

          //$this->LOG_FILE_NAME=$LOG_FILE_NAME;
          $this->name=$name;
          //$this->SPLIT_Str=$SPLIT_Str;
          $this->message=$message;
          $this->LogWrite();
        }
    }


    public function LogWrite(){
      trace("■ LogWrite()<br>");
      $LOG_FILE_NAME = $this->LOG_FILE_NAME;
      $name = $this->name;
      $SPLIT_Str = $this->SPLIT_Str;
      $message = $this->message;

      //書き込みモードでファイルを開く
      $fp = fopen($LOG_FILE_NAME, "a") or exit($LOG_FILE_NAME . "が開けません<br>");

      // | を区切り文字として2つのデータを繋げて書き込む
      fwrite($fp, $name . $SPLIT_Str . $message . "\n");


      // リダイレクトのためのHTTPヘッダーを送信
      //header("Location: " . $_SERVER['PHP_SELF'], true, 303);

      fclose($fp);
    }

    function LogShow(){
        trace("■ LogShow()<br>");
        //global $LOG_FILE_NAME;
        global $linesNum;
        global $lines;
        $LOG_FILE_NAME = $this->LOG_FILE_NAME;
        //$name = $this->name;
        //$SPLIT_Str = $this->SPLIT_Str;
        //$message = $this->message;

        if (!file_exists($LOG_FILE_NAME)) {
          // ファイルがない場合
          echo "書き込みはありません。<br>";

          $linesNum = 0;
        } else {

          // ファイルの全行を読み取る
          $lines = file($LOG_FILE_NAME);

          // 読み込んだ行数
          $linesNum = count($lines);
        }
    }

}

$RoomLog_ins = new RoomLog();
$RoomLog_ins->startMain();

?>


<h1>お問い合わせ内容</h1>

  <section>
    <?php

      // 一行ずつ表示する処理
      for ($i = 0; $i < $linesNum; $i++) {

         // 区切り文字でデータを区切って配列に格納
         $array = explode($SPLIT_Str, $lines[$i]);

         // 区切り文字の前の部分は名前
         $name = htmlspecialchars($array[0]);


         // 区切り文字の後の部分はメッセージ

         $array_length = count($array);
         if ($array_length == 2) {
           $message = htmlspecialchars($array[1]);
         }
         // 名前とメッセージを表示
         echo '<p>' . $name . "「" . str_replace(PHP_EOL, "", $message) . '」</p>';
      }
    ?>
  </section>


  <form method="post" action="chat_class_txt_admin.php">
    <div>
      <!--<b>おなまえ</b>-->
      <!--<input name="name" type="text" size="20" maxlength="10">-->
      <input name="name" type="hidden" size="20" maxlength="10">
    </div>
    <div>
      <!--<b>ご入力</b>-->
      <?php
      echo('<input type="hidden" name="LOG_FILE_NAME" value="' . $LOG_FILE_NAME . '">');
      ?>
      <input name="message" type="text" size="50" maxlength="50" required>
      <button name="submit" type="submit">送信</button>
    </div>

  </form>


    </div><!--div class="class2"-->
  </div><!--div class="base"-->
</body>
</html>
こちらのサイトを参考にしました。
PHPで作るチャット(7) クロスサイトスクリプティング(XSS)の修正
このPHPをクラスベースで書き直しました。

