やっとできた
参考にしたビデオ
できたもの
NiagaraEmitter
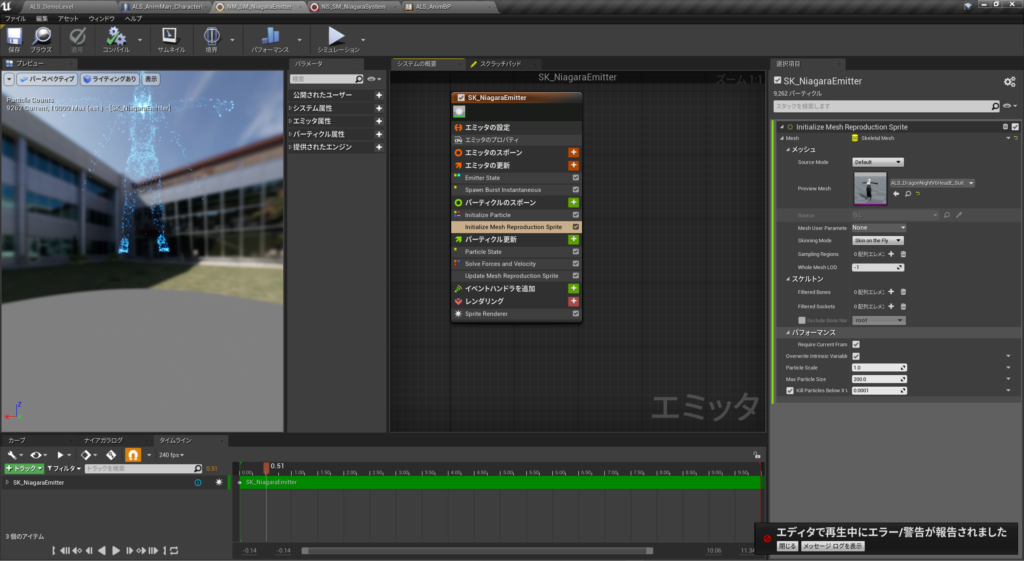
Niagara System
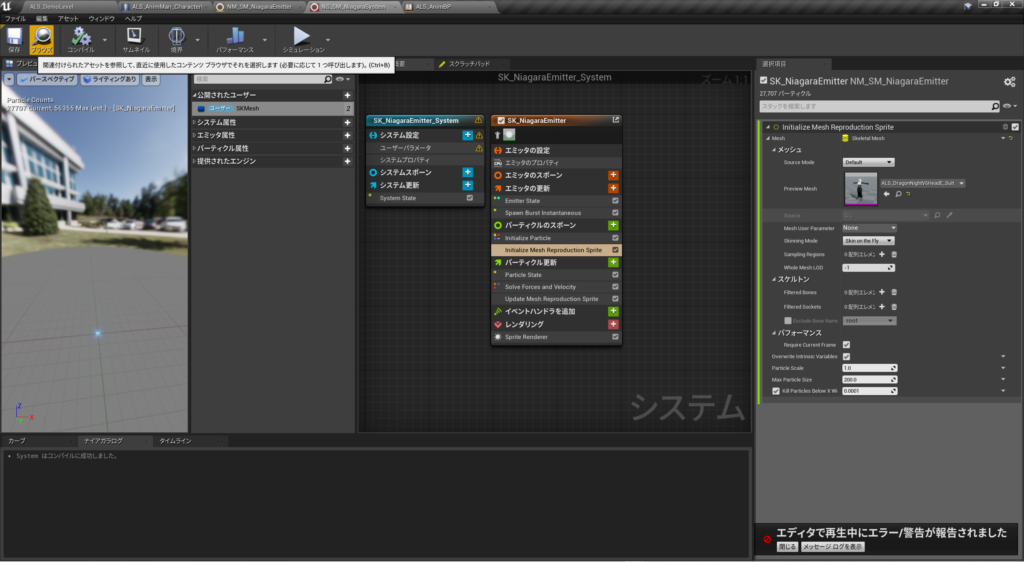
2枚重ねて片方のメッシュUPDATEをきると こんな幻想的になった。

DESIGN AND FUTURE SCIENCE.
やっとできた
参考にしたビデオ
できたもの
NiagaraEmitter
Niagara System
2枚重ねて片方のメッシュUPDATEをきると こんな幻想的になった。
結局、無理なポーズはmayaに読み込んでそのポーズでスキニング調整しないとだめだった。
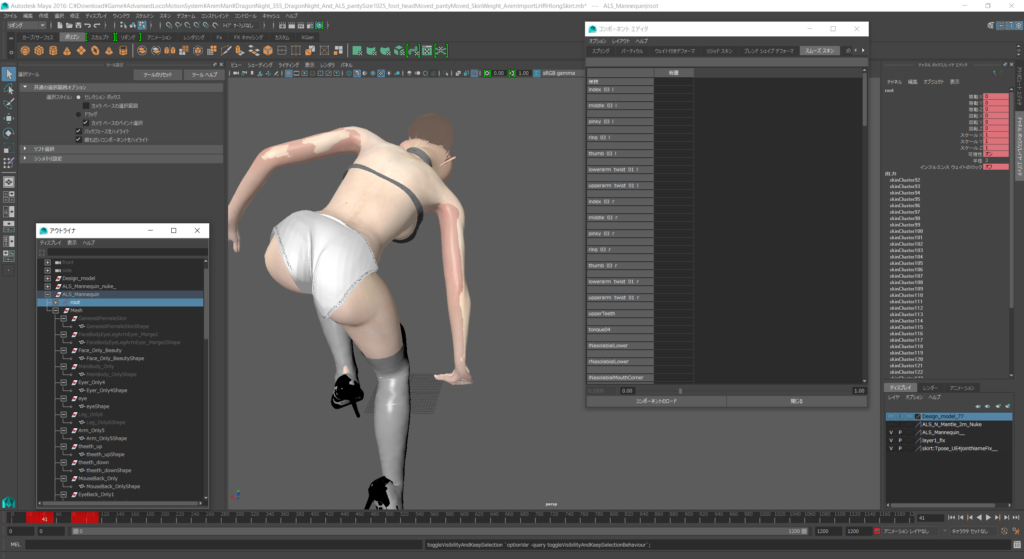
これでもできてるほうでもっとぐちゃぐちゃになってたので。
パンツの方のスキニングやらサイズやら調整したが、
からだのお尻のスキニングがぐちゃぐちゃだったからどうやってもだめだった。
お尻らへんの頂点を選択してスキンウェイトハンマーしたら変な形状を保とうとしなくなって
そのスキニングをパンツへコピーしたらできた。
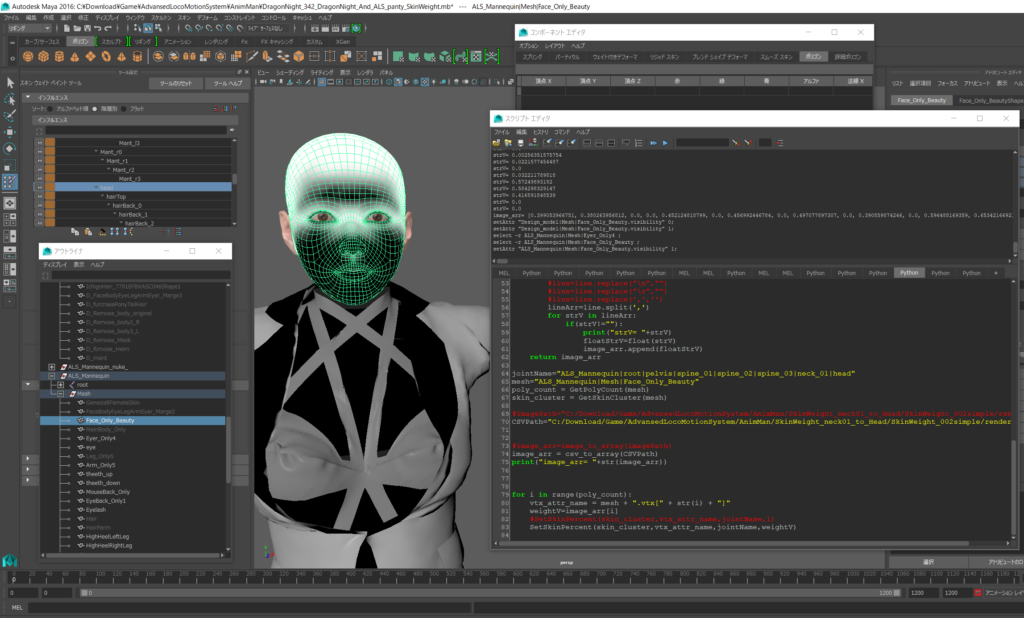
SkinWeight Mapが画像じゃ精度がでないのでCSVにしたらうまくいった。
SkinWeight Map export
def GetSkinCluster(mesh):
history = cmds.listHistory(mesh)
for h in history:
if cmds.objectType(h, isType='skinCluster'):
return h
return None
def GetSkinPercent(SkinCluster,vtx,mJoint):
# vtx[100] の joint1 の weight を取得
skinWeightV=cmds.skinPercent( SkinCluster, vtx, t= mJoint, query=True, value=True)
return skinWeightV
def GetPolyCount(mesh):
return cmds.polyEvaluate(mesh, v=True)
from PySide.QtCore import QByteArray, QBuffer, QIODevice, QFile
from PySide import QtGui
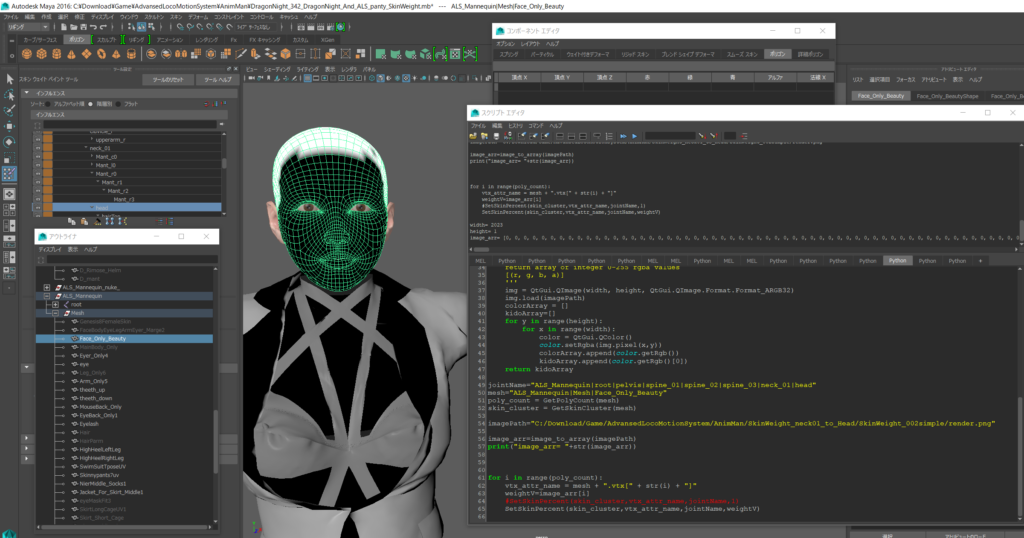
jointName="neckUpper|head"
mesh="Design_model|Mesh|Face_Only_Beauty"
poly_count = GetPolyCount(mesh)
skin_cluster = GetSkinCluster(mesh)
imagePath="C:/Download/Game/AdvansedLocoMotionSystem/AnimMan/SkinWeight_neck01_to_Head/SkinWeight_002simple/render.png"
WeightArray=[]
for i in range(poly_count):
vtx_attr_name = mesh + ".vtx[" + str(i) + "]"
weightV=GetSkinPercent(skin_cluster,vtx_attr_name,jointName)
WeightArray.append(weightV)
print("WeightArray="+str(WeightArray))
lenWeightArr=len(WeightArray)
print("lenWeightArr= "+str(lenWeightArr))
width=lenWeightArr
height=1
"""
#buffer = QImage(pageSize, QImage.Format_ARGB32)
buffer = QtGui.QImage(width,height,QtGui.QImage.Format_ARGB32_Premultiplied)
def setDrowPixels(MyImage,WeightArray,width,height):
for x in range(0, width ):
for y in range(0, height ):
gValue=0
if(y==0):
gValue = WeightArray[x]
else:
gValue = WeightArray[x*y]
print("x= "+str(x)+" y= "+str(y)+" gValue= "+str(gValue))
MyImage.setPixel( x, y, QtGui.QColor( gValue, gValue, gValue ).rgb() )
return MyImage
buffer=setDrowPixels(buffer,WeightArray,width,height)
buffer.save(imagePath)
"""
CSVPath="C:/Download/Game/AdvansedLocoMotionSystem/AnimMan/SkinWeight_neck01_to_Head/SkinWeight_002simple/render.csv"
import codecs
fout = codecs.open(CSVPath, 'w', 'utf_8')
for i in range(poly_count):
line = str(WeightArray[i])+","
fout.write(line)
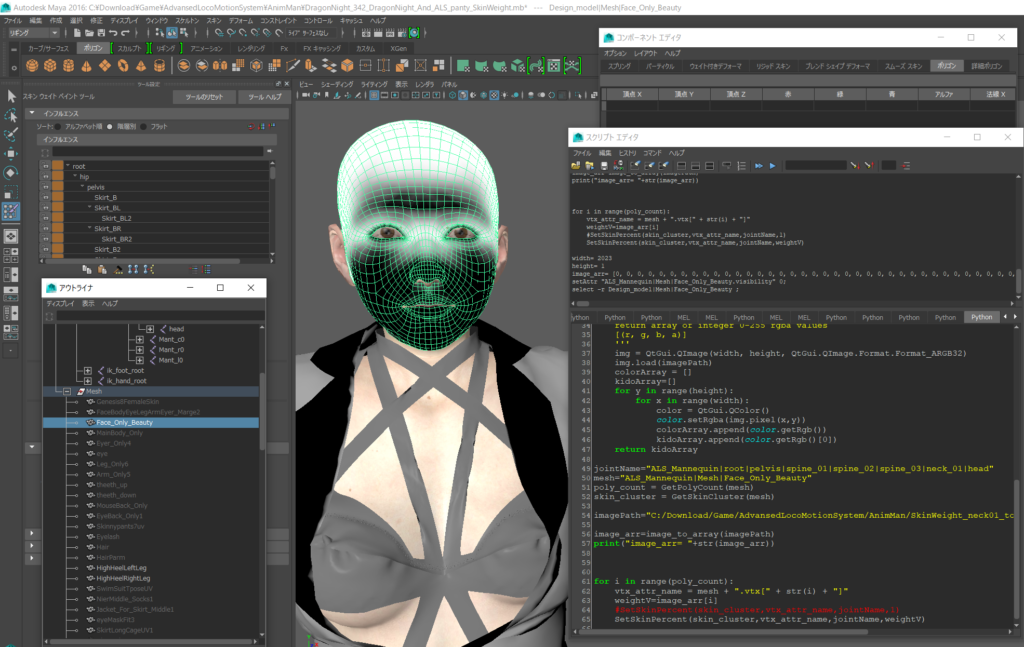
SkinWeight Map import
def GetSkinCluster(mesh):
	history = cmds.listHistory(mesh)
	for h in history:
		if cmds.objectType(h, isType='skinCluster'):
			return h
	return None
def GetSkinPercent(SkinCluster,vtx,mJoint):
    # vtx[100] の joint1 の weight を取得
    skinWeightV=cmds.skinPercent( SkinCluster, vtx, t= mJoint, query=True, value=True)
    return skinWeightV

def SetSkinPercent(SkinCluster,vtx,mJoint,skinWeightV):
    # vtx[100] の weight を. joint を指定して設定
    cmds.skinPercent( SkinCluster, vtx, transformValue=[(mJoint, skinWeightV)])


def GetPolyCount(mesh):
	return cmds.polyEvaluate(mesh, v=True)


from PySide.QtCore import QByteArray, QBuffer, QIODevice, QFile
from PySide import QtGui
"""
def image_to_array(imagePath):
    source = QtGui.QImage(imagePath)

    # バイナリとメタデータを読み込み
    #bits = source.constBits()
    width = source.width()
    height = source.height()
    print("width= "+str(width))
    print("height= "+str(height))
    '''
    return array of integer 0-255 rgba values
    [(r, g, b, a)]
    '''
    img = QtGui.QImage(width, height, QtGui.QImage.Format.Format_ARGB32)
    img.load(imagePath)
    colorArray = []
    kidoArray=[]
    for y in range(height):
        for x in range(width):
            color = QtGui.QColor()
            color.setRgba(img.pixel(x,y))
            colorArray.append(color.getRgb())
            kidoArray.append(color.getRgb()[0])
    return kidoArray
"""
def csv_to_array(CSVPath):
    import codecs
    fin  = codecs.open(CSVPath, 'r', 'utf_8')
    image_arr=[]
    for line in fin:
        #line=line.replace("\n","")
        #line=line.replace("\r","")
        #line=line.replace(',','')
        lineArr=line.split(',')
        for strV in lineArr:
            if(strV!=""):
                print("strV= "+strV)
                floatStrV=float(strV)
                image_arr.append(floatStrV)
    return image_arr

jointName="ALS_Mannequin|root|pelvis|spine_01|spine_02|spine_03|neck_01|head"
mesh="ALS_Mannequin|Mesh|Face_Only_Beauty"
poly_count = GetPolyCount(mesh)
skin_cluster = GetSkinCluster(mesh)

#imagePath="C:/Download/Game/AdvansedLocoMotionSystem/AnimMan/SkinWeight_neck01_to_Head/SkinWeight_002simple/render.png"
CSVPath="C:/Download/Game/AdvansedLocoMotionSystem/AnimMan/SkinWeight_neck01_to_Head/SkinWeight_002simple/render.csv"


#image_arr=image_to_array(imagePath)
image_arr = csv_to_array(CSVPath)
print("image_arr= "+str(image_arr))


ArrLeng=len(image_arr)
for i in range(ArrLeng):
    vtx_attr_name = mesh + ".vtx[" + str(i) + "]"
    weightV=image_arr[i]
    #SetSkinPercent(skin_cluster,vtx_attr_name,jointName,1)
    SetSkinPercent(skin_cluster,vtx_attr_name,jointName,weightV)
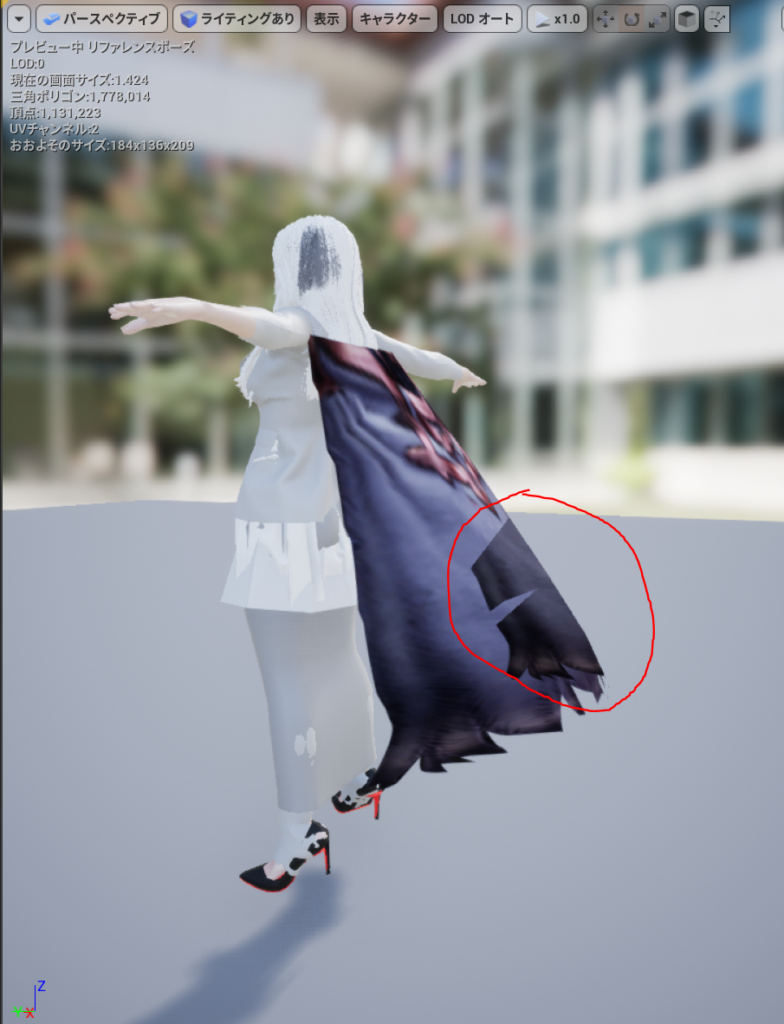
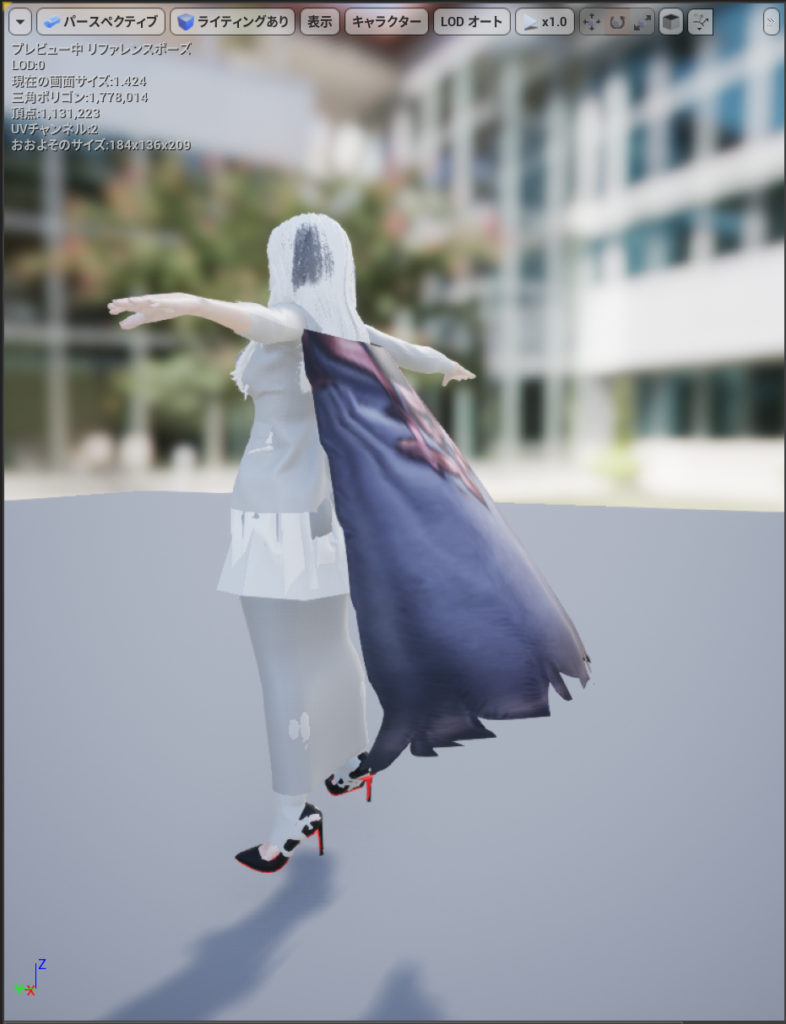
元がこう

結果がこれ
ふーばっちりうまくいった様子。やったね!
Maya2016でSkinWhight Mapのインポートが壊れているので
SkinWeight Mapのエクスポートとインポートを自作してみた。ほんとテスト段階
SkinWeight Map export
def GetSkinCluster(mesh):
	history = cmds.listHistory(mesh)
	for h in history:
		if cmds.objectType(h, isType='skinCluster'):
			return h
	return None
def GetSkinPercent(SkinCluster,vtx,mJoint):
    # vtx[100] の joint1 の weight を取得
    skinWeightV=cmds.skinPercent( SkinCluster, vtx, t= mJoint, query=True, value=True)
    return skinWeightV


def GetPolyCount(mesh):
	return cmds.polyEvaluate(mesh, v=True)


from PySide.QtCore import QByteArray, QBuffer, QIODevice, QFile
from PySide import QtGui


jointName="neckUpper|head"
mesh="Design_model|Mesh|Face_Only_Beauty"
poly_count = GetPolyCount(mesh)
skin_cluster = GetSkinCluster(mesh)

imagePath="C:/Download/Game/AdvansedLocoMotionSystem/AnimMan/SkinWeight_neck01_to_Head/SkinWeight_002simple/render.png"


WeightArray=[]
for i in range(poly_count):
    vtx_attr_name = mesh + ".vtx[" + str(i) + "]"
    weightV=image_arr[i]

    weightV=GetSkinPercent(skin_cluster,vtx_attr_name,jointName)
    WeightArray.append(weightV)


print("WeightArray="+str(WeightArray))
lenWeightArr=len(WeightArray)
print("lenWeightArr= "+str(lenWeightArr))

width=lenWeightArr
height=1

#buffer = QImage(pageSize, QImage.Format_ARGB32)
buffer = QtGui.QImage(width,height,QtGui.QImage.Format_ARGB32_Premultiplied)
def setDrowPixels(MyImage,WeightArray,width,height):
    for x in range(0, width ):
        for y in range(0, height ):
            gValue=0
            if(y==0):
                gValue = WeightArray[x]
            else:
                gValue = WeightArray[x*y]
            print("x= "+str(x)+" y= "+str(y)+" gValue= "+str(gValue))
            MyImage.setPixel( x, y, QtGui.QColor( gValue, gValue, gValue ).rgb() )
    return MyImage
buffer=setDrowPixels(buffer,WeightArray,width,height)
buffer.save(imagePath)
skinWeight Map import
def GetSkinCluster(mesh):
	history = cmds.listHistory(mesh)
	for h in history:
		if cmds.objectType(h, isType='skinCluster'):
			return h
	return None
def GetSkinPercent(SkinCluster,vtx,mJoint):
    # vtx[100] の joint1 の weight を取得
    skinWeightV=cmds.skinPercent( SkinCluster, vtx, t= mJoint, query=True, value=True)
    return skinWeightV

def SetSkinPercent(SkinCluster,vtx,mJoint,skinWeightV):
    # vtx[100] の weight を. joint を指定して設定
    cmds.skinPercent( SkinCluster, vtx, transformValue=[(mJoint, skinWeightV)])


def GetPolyCount(mesh):
	return cmds.polyEvaluate(mesh, v=True)


from PySide.QtCore import QByteArray, QBuffer, QIODevice, QFile
from PySide import QtGui

def image_to_array(imagePath):
    source = QtGui.QImage(imagePath)

    # バイナリとメタデータを読み込み
    #bits = source.constBits()
    width = source.width()
    height = source.height()
    print("width= "+str(width))
    print("height= "+str(height))
    '''
    return array of integer 0-255 rgba values
    [(r, g, b, a)]
    '''
    img = QtGui.QImage(width, height, QtGui.QImage.Format.Format_ARGB32)
    img.load(imagePath)
    colorArray = []
    kidoArray=[]
    for y in range(height):
        for x in range(width):
            color = QtGui.QColor()
            color.setRgba(img.pixel(x,y))
            colorArray.append(color.getRgb())
            kidoArray.append(color.getRgb()[0])
    return kidoArray

jointName="ALS_Mannequin|root|pelvis|spine_01|spine_02|spine_03|neck_01|head"
mesh="ALS_Mannequin|Mesh|Face_Only_Beauty"
poly_count = GetPolyCount(mesh)
skin_cluster = GetSkinCluster(mesh)

imagePath="C:/Download/Game/AdvansedLocoMotionSystem/AnimMan/SkinWeight_neck01_to_Head/SkinWeight_002simple/render.png"

image_arr=image_to_array(imagePath)
print("image_arr= "+str(image_arr))


for i in range(poly_count):
    vtx_attr_name = mesh + ".vtx[" + str(i) + "]"
    weightV=image_arr[i]
    #SetSkinPercent(skin_cluster,vtx_attr_name,jointName,1)
    SetSkinPercent(skin_cluster,vtx_attr_name,jointName,weightV)
元がこれ
結果がこれ 値が飛んじゃってる気がする。 CSVとかのほうがいいかも
なんだかスムージング処理がいるのかもしれない。
■参考にさせてもらった記事
Maya python で, 特定の mesh 頂点の 特定の joint の skin weight の値を取得, 設定する – Qiita
https://qiita.com/syoyo/items/5252ac7244b4f40b2cac
Python API 2.0 MImage
https://forums.autodesk.com/t5/maya-programming/python-api-2-0-mimage/td-p/6340749
Python QImage.fill Examples
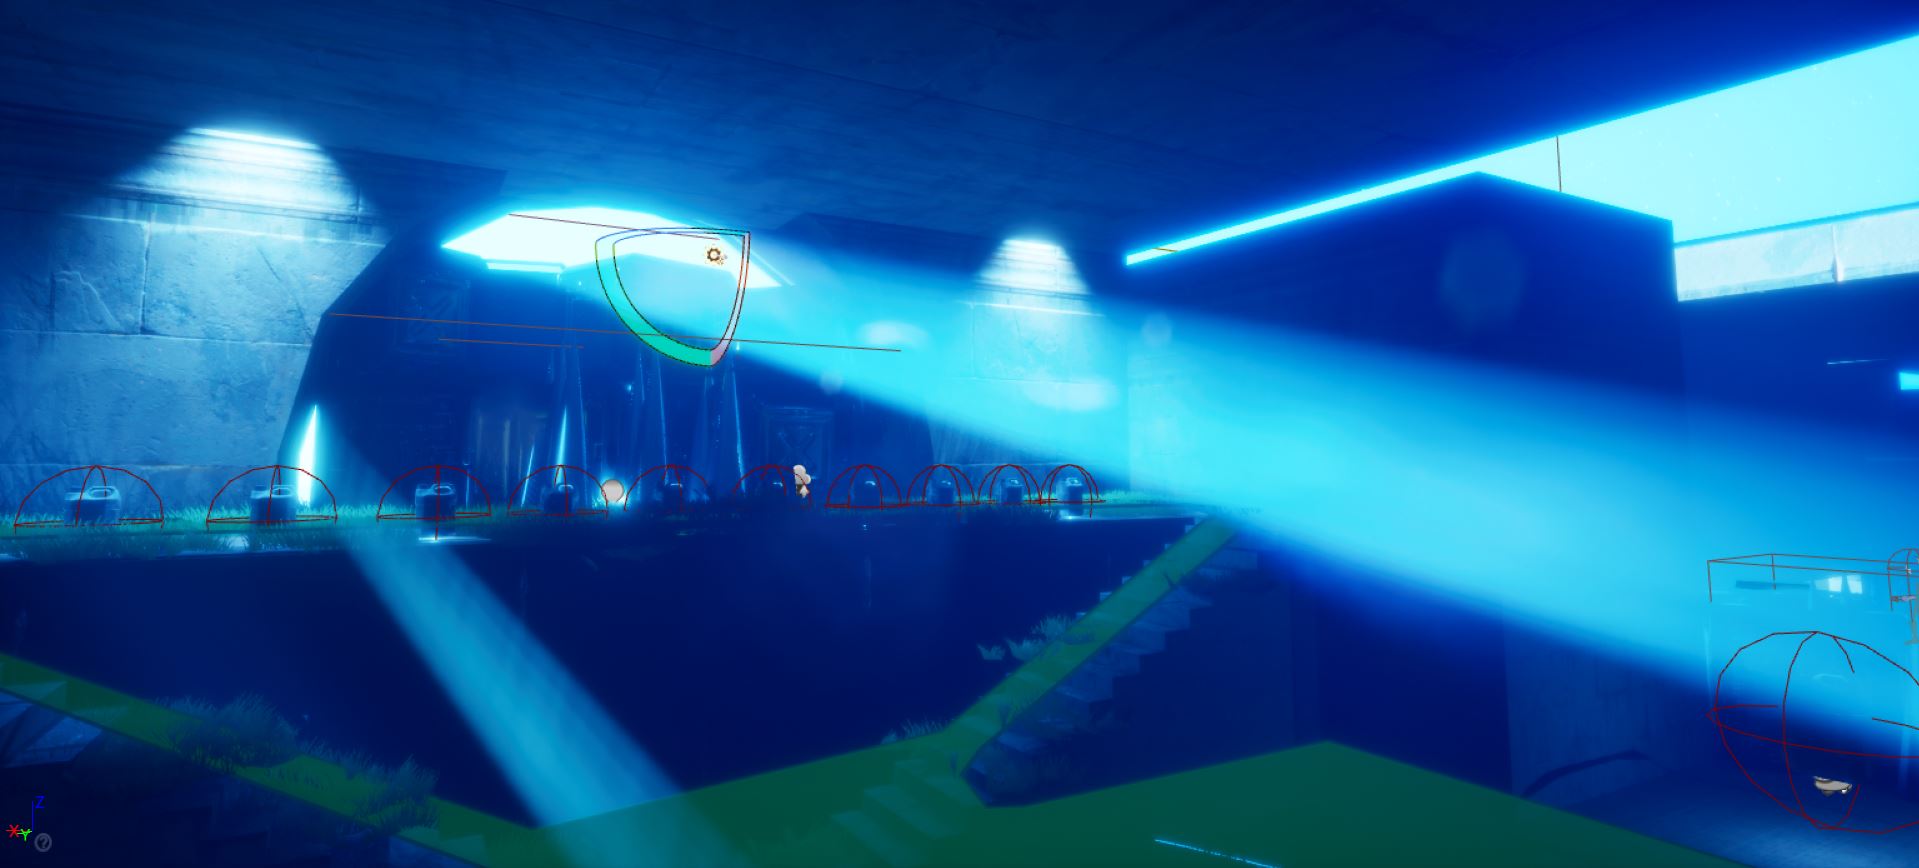
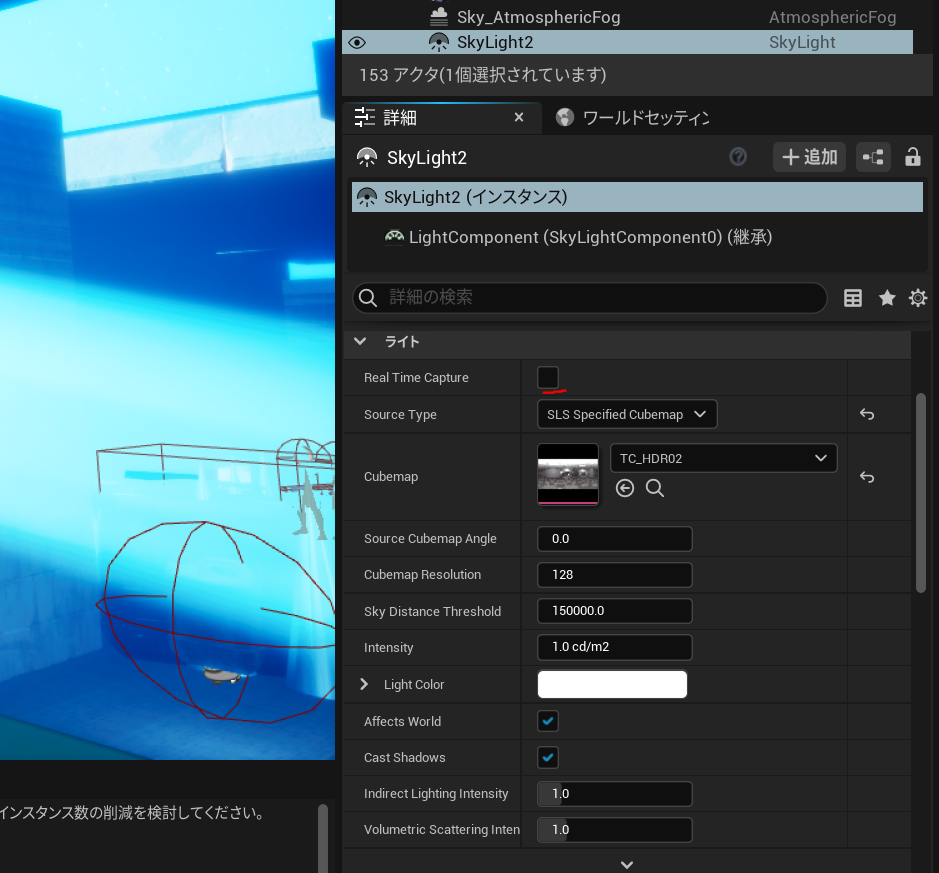
1,暗い穴の中にいることが重要
2,DriectionalLightの光が差し込む角度が重要
3,DrirectionalLightの強さのIntensityが42ぐらいじゃないと出ない
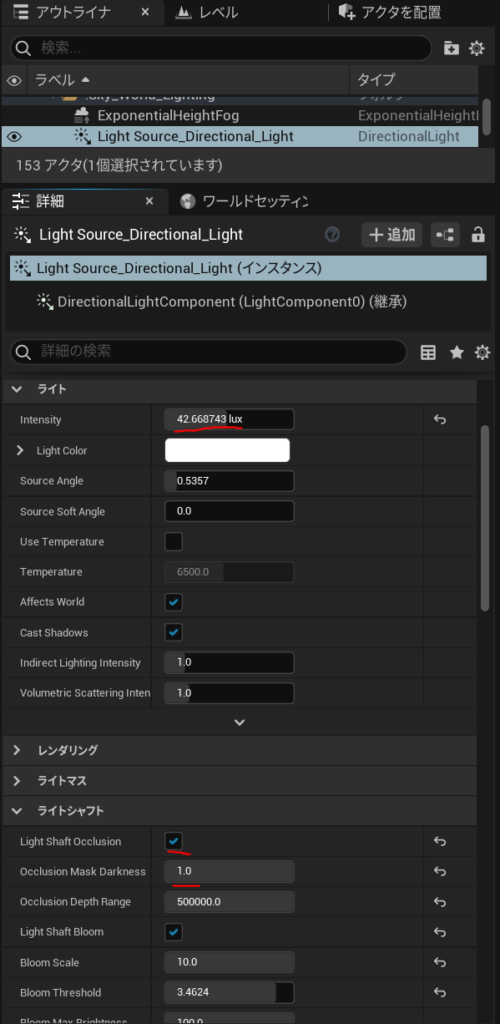
Light Shaft Occlusionのチェックは外しても出る
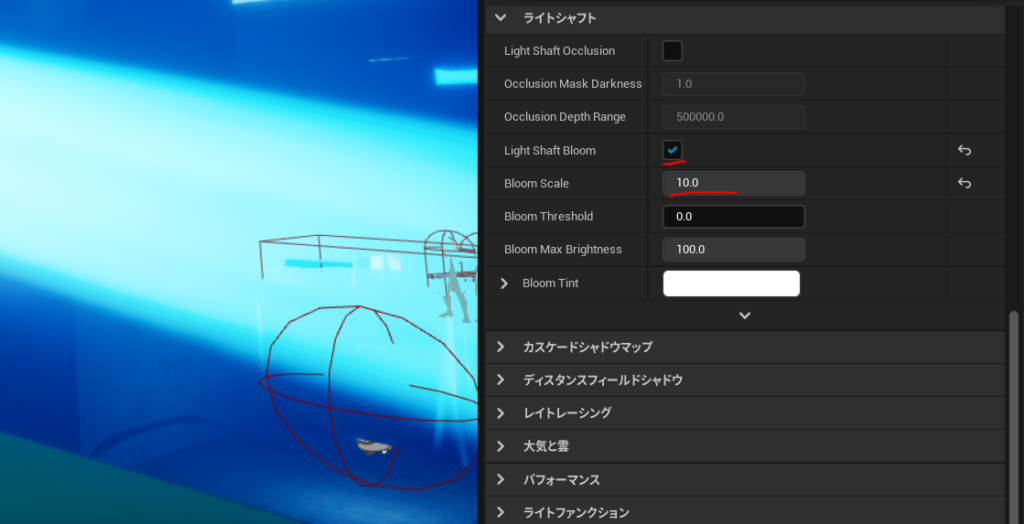
Light Shaft Bloom にチェックを入れ
Bloom Scale を10の状態で DirectionalLightの角度を調整したら出てきた。
おまけ。
A Sky light with real-time capture enable is the scene. it requires at least a SkyAtmosphere component, A volumetricCloud component or mesh with a material tagged as isSky. Otherwise it will black
リアルタイムキャプチャが有効なスカイライトがシーンです。 少なくともSkyAtmosphereコンポーネント、volumetricCloudコンポーネント、またはisSkyとしてタグ付けされたマテリアルを持つメッシュが必要です。 それ以外の場合は黒くなります
のエラーがでてるので
RealTime Captureのチェックを外したら消えた。
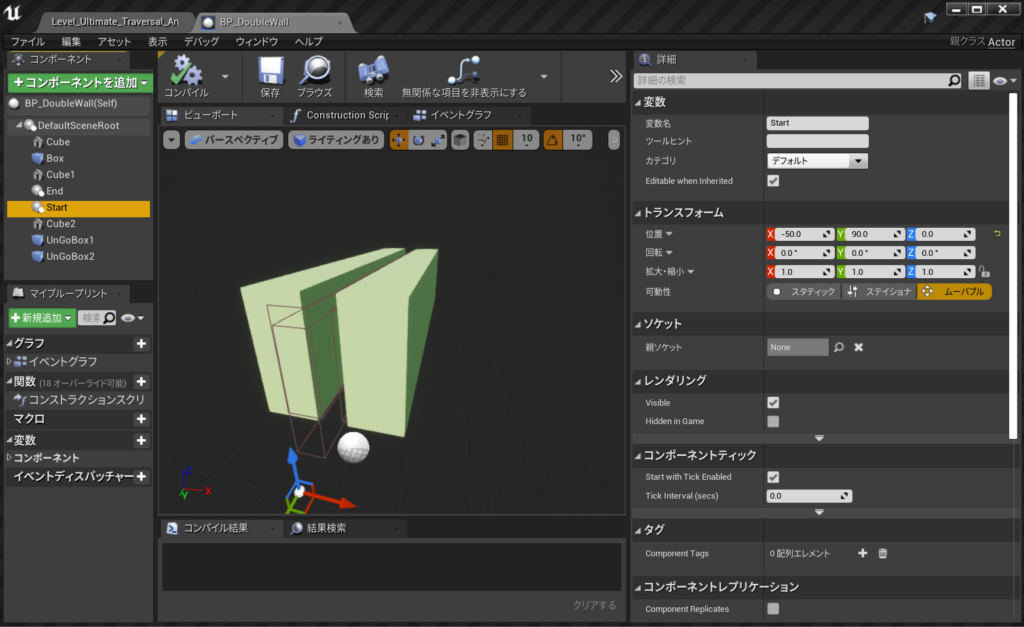
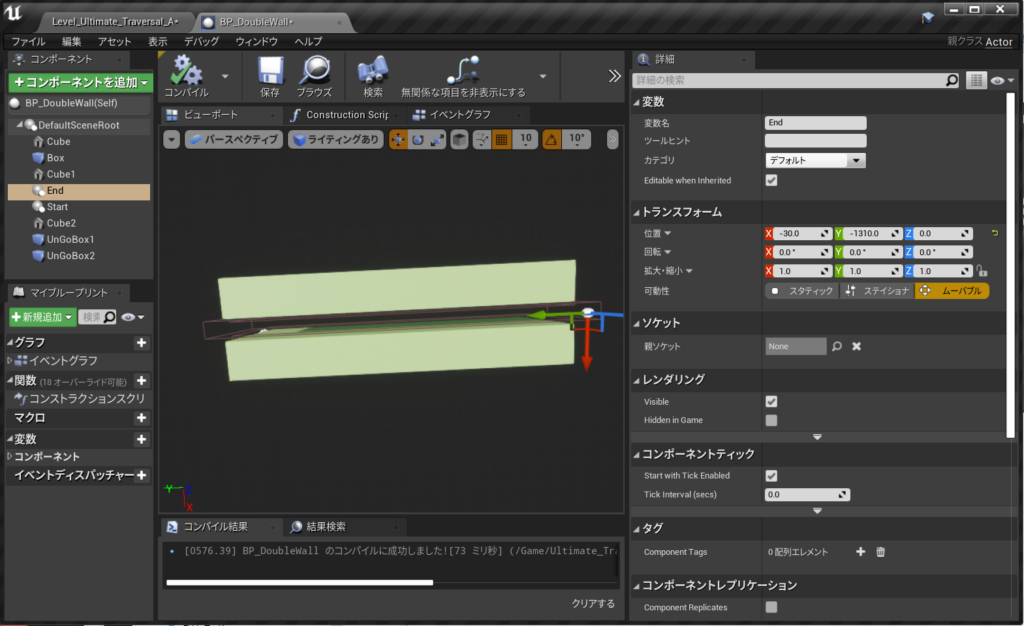
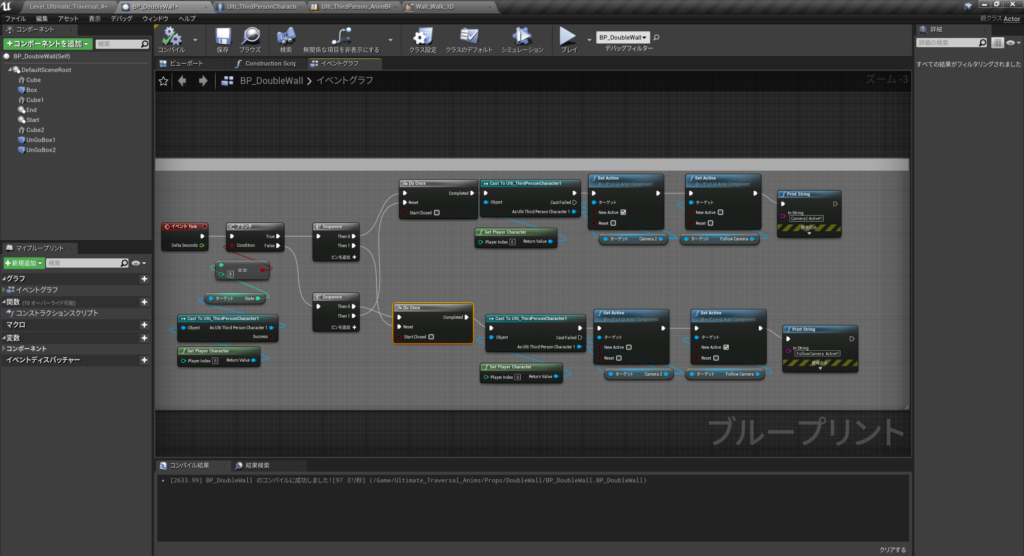
まずは新規ブループリントでActor
壁を作るCube1
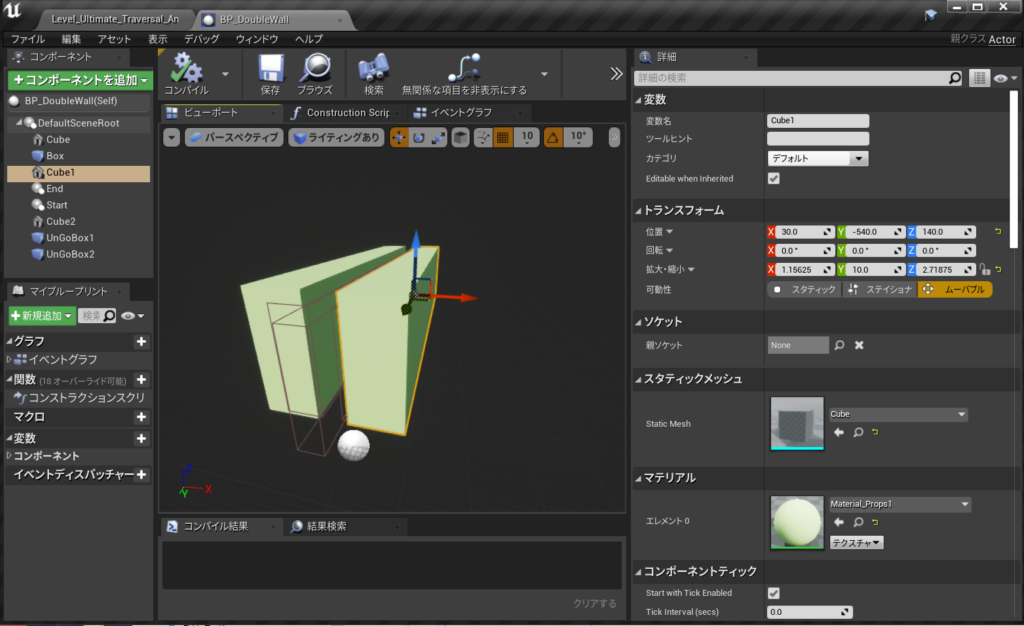
とCubeを複製してCube2
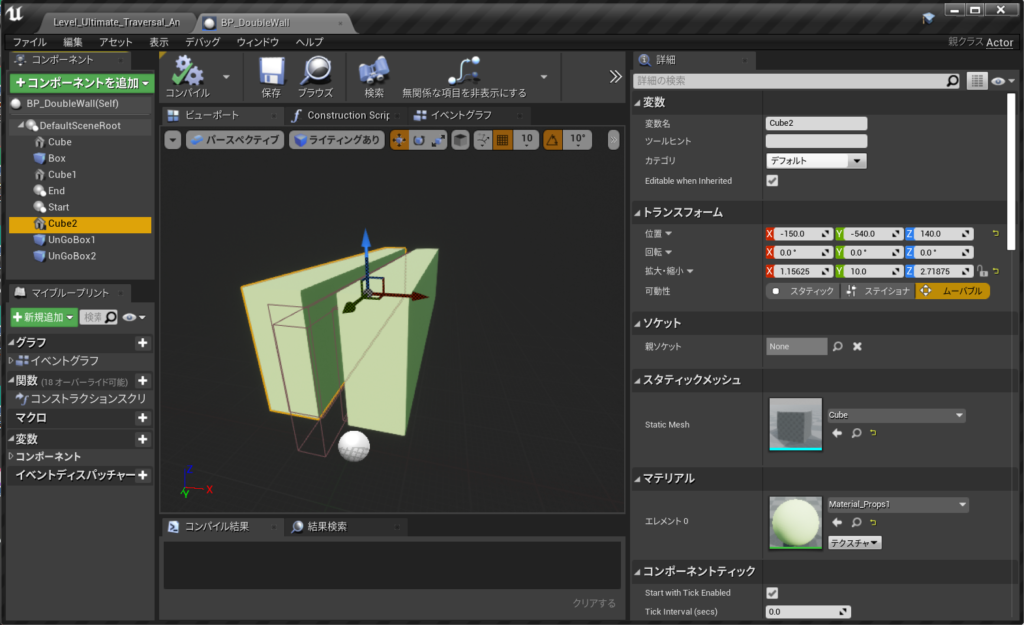
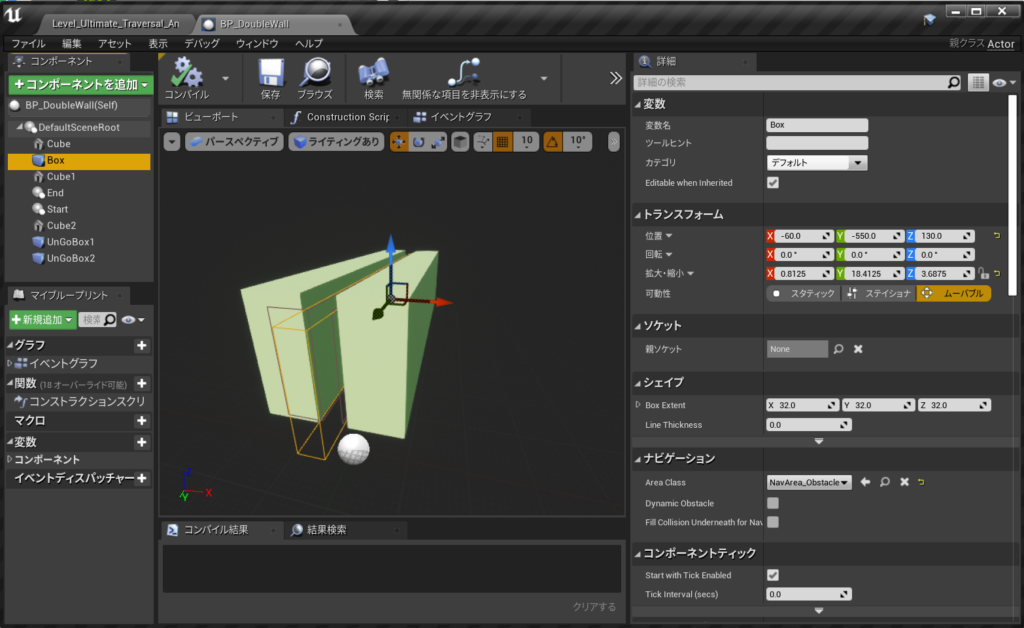
SceneObjectでStartとEndを作った
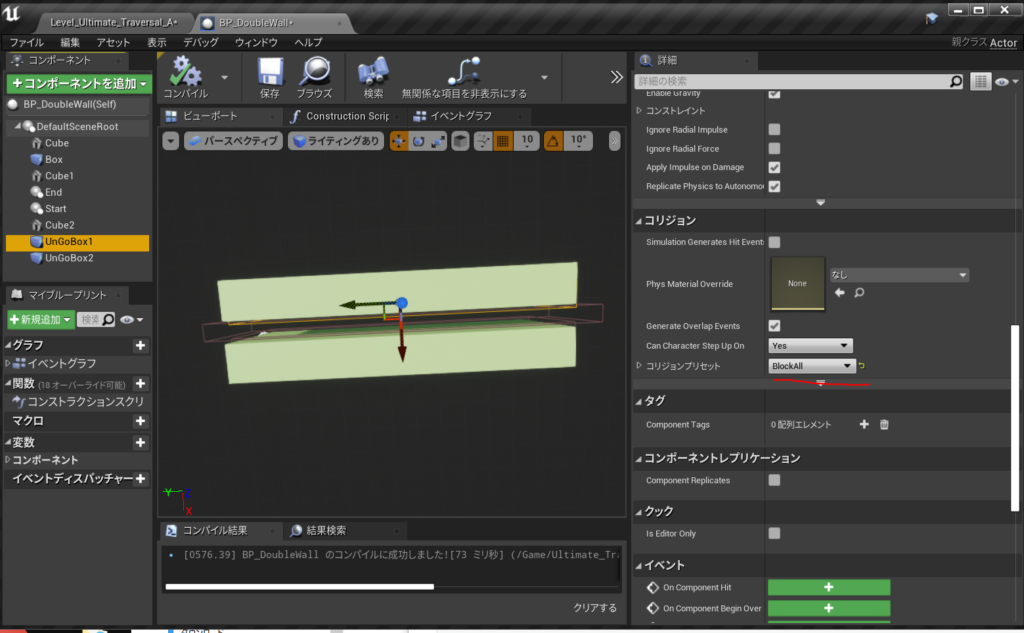
UnGoBox1をいけない場所におく
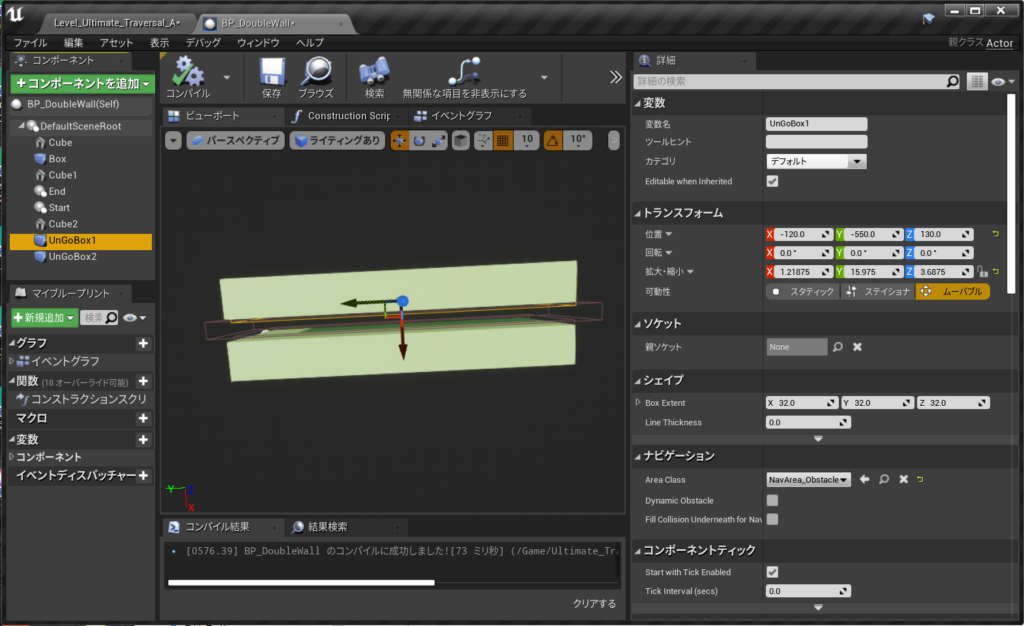
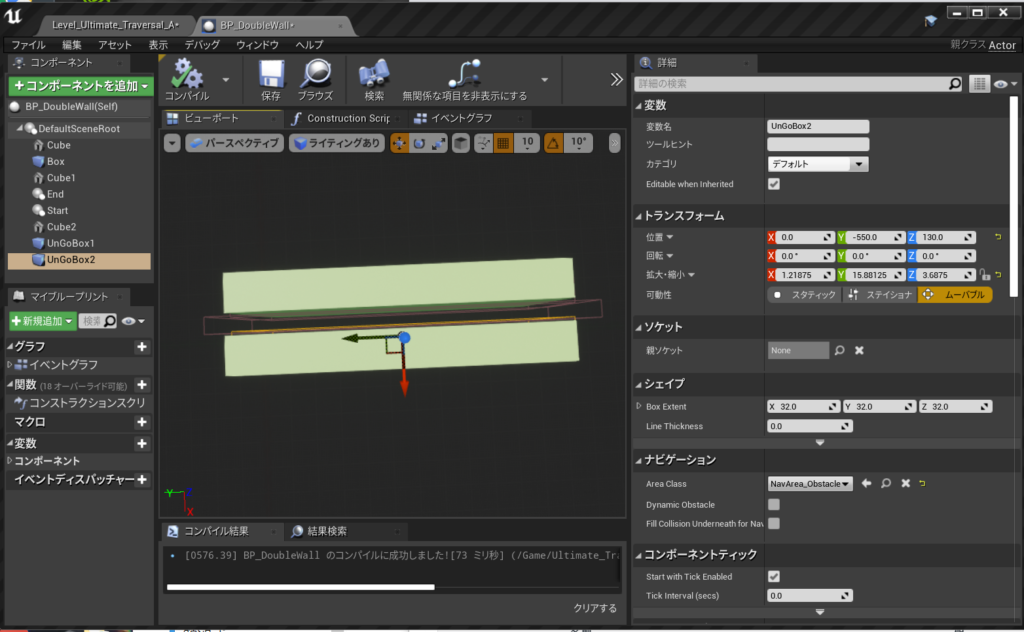
コリジョンプリセットは2つともBlockAll
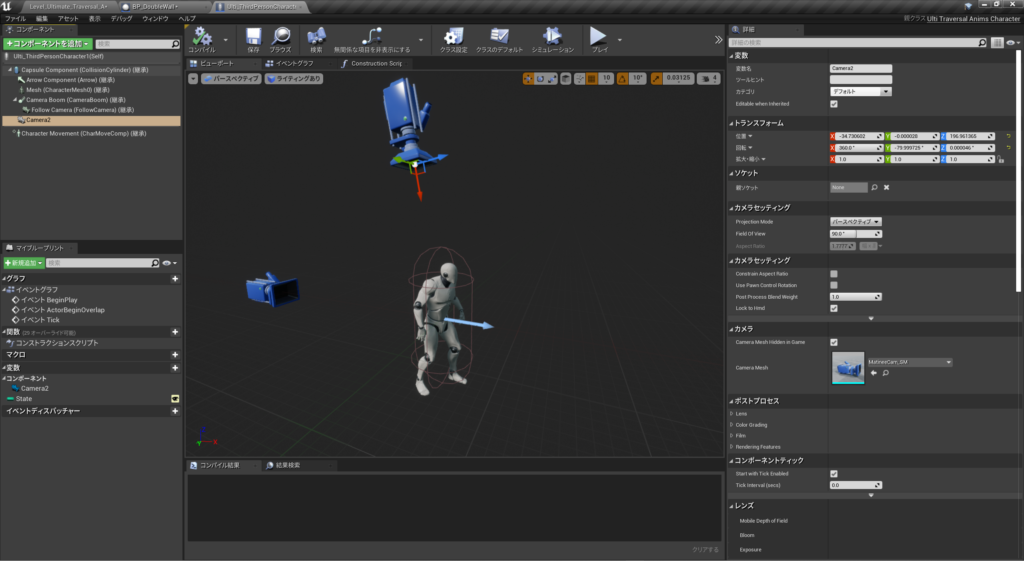
ThirdPersonCharactorにはCamera2を設置する
BoxのBeginOverlapとEndOverlapにつないでいく
BP_DoubleWallについてはblueprintue.のサービスでコピペできるようにしてみた。
https://blueprintue.com/render/9i99qwr-/
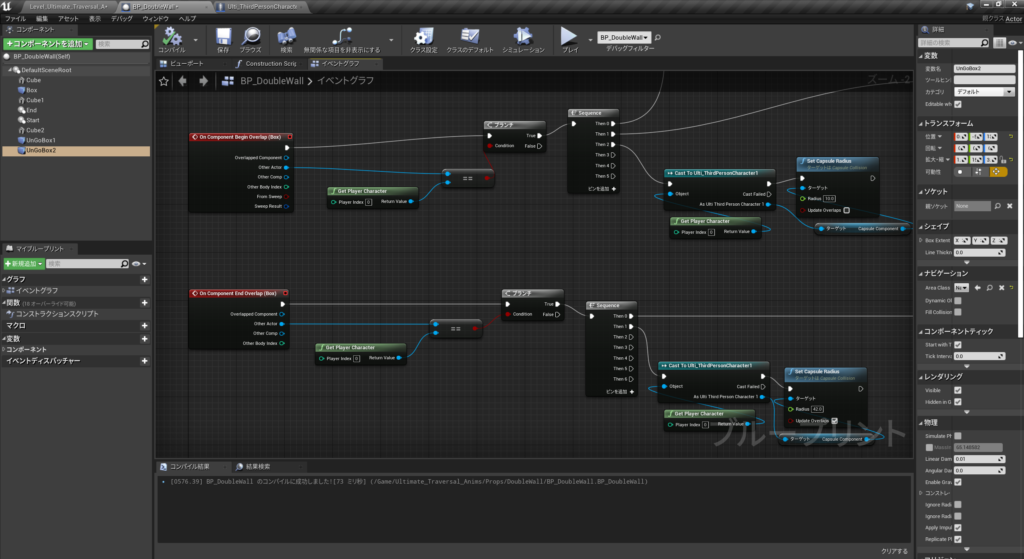
Stateという変数をCharactorに用意してそれを8になったら壁のあいだに入ったようにした
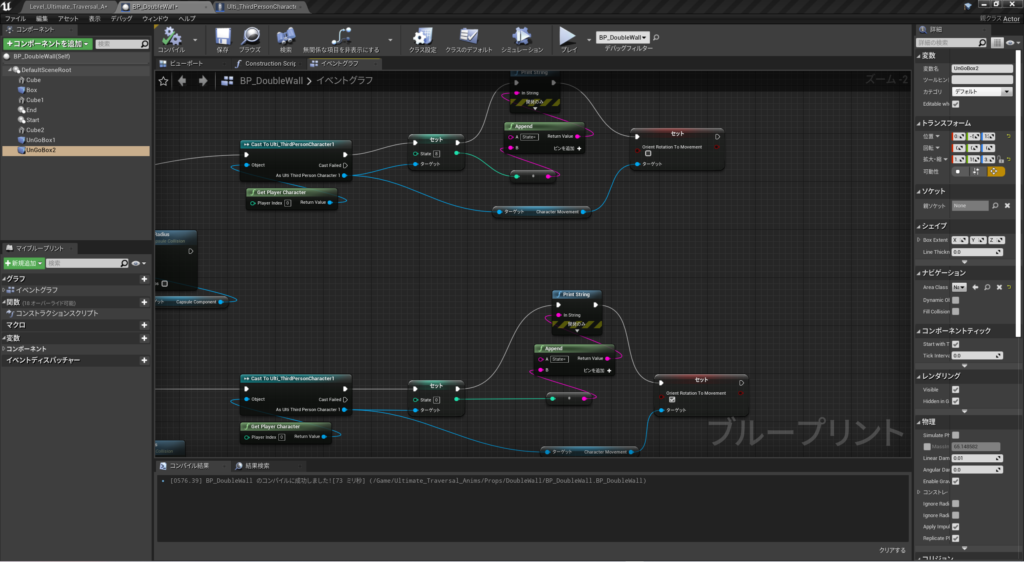
壁と壁の間にフィットするための関数(いらないかもしれない笑)
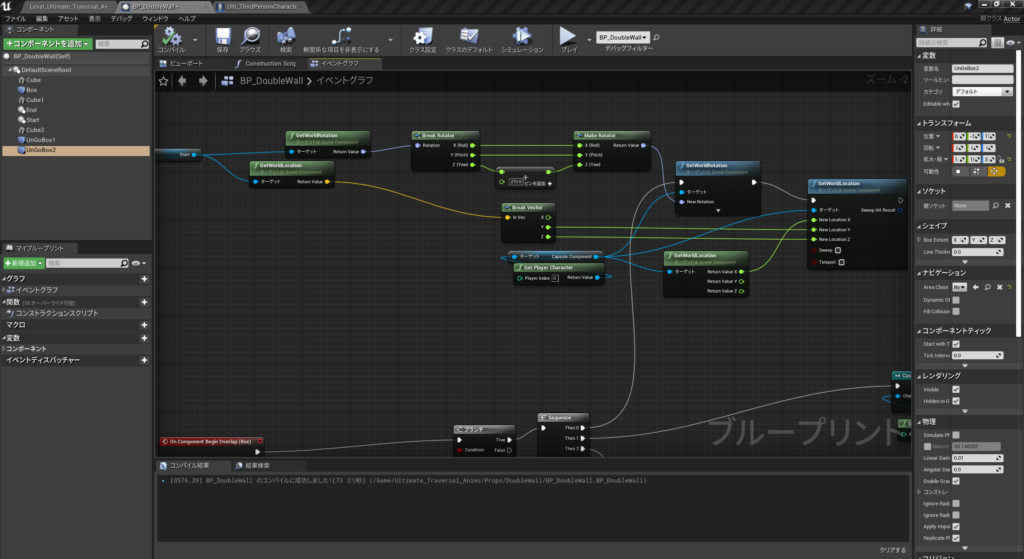
壁の間を抜ける歩きと止まりポーズはここ
https://drive.google.com/file/d/1VlIzmBagQsq6Dp7ok3UYMHUzP5nqn_Gc/view?usp=sharing
これをリターゲットして使ったが ジョイント構造はThirdPersonと変わらないと思うので
UE4_Mannequin_Skeletonへ読み込むでもいいはずだが
リターゲットはこれを見た
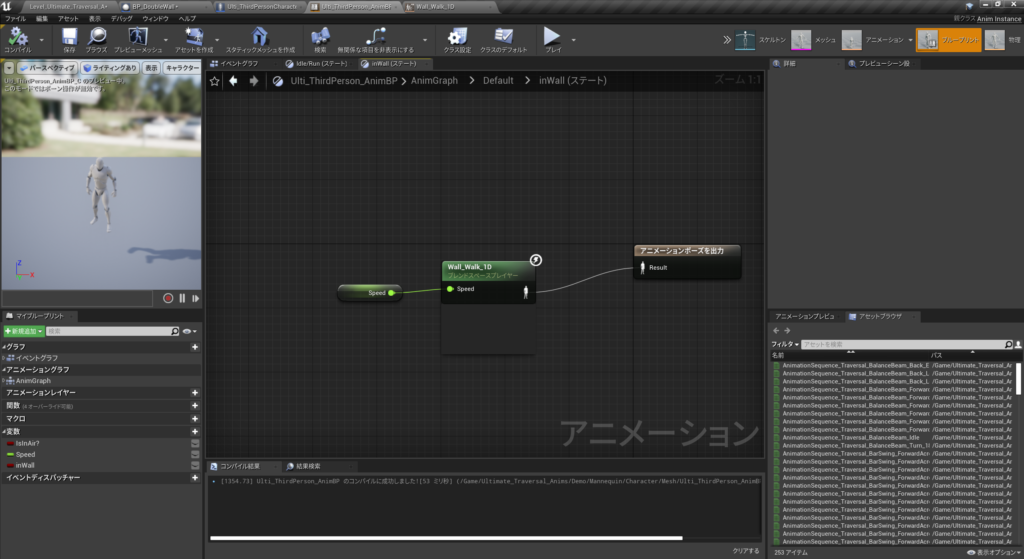
2つのポーズから
ブレンドスペース1Dを作成
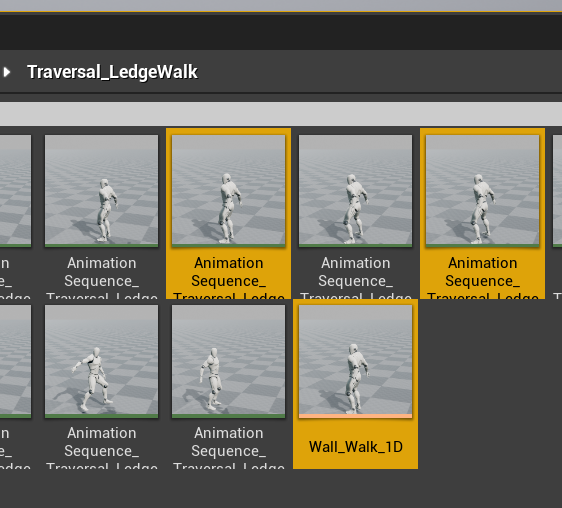
水平軸にSpeedと入れ、0にIdle 1にloopを設定した。
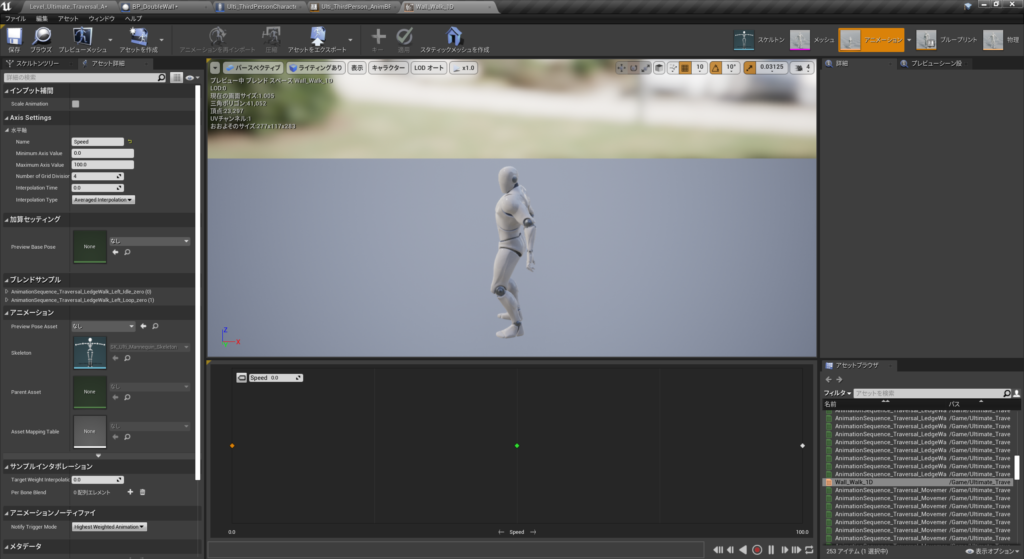
アニムブループリントにステートを作って
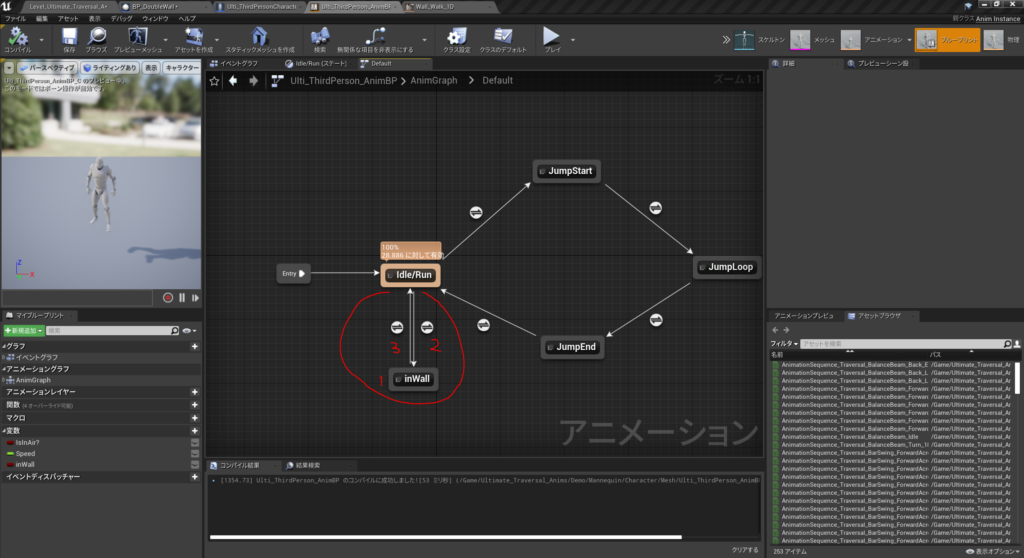
ブレンドスペース1Dを配置
InWallブールを作成して配置した
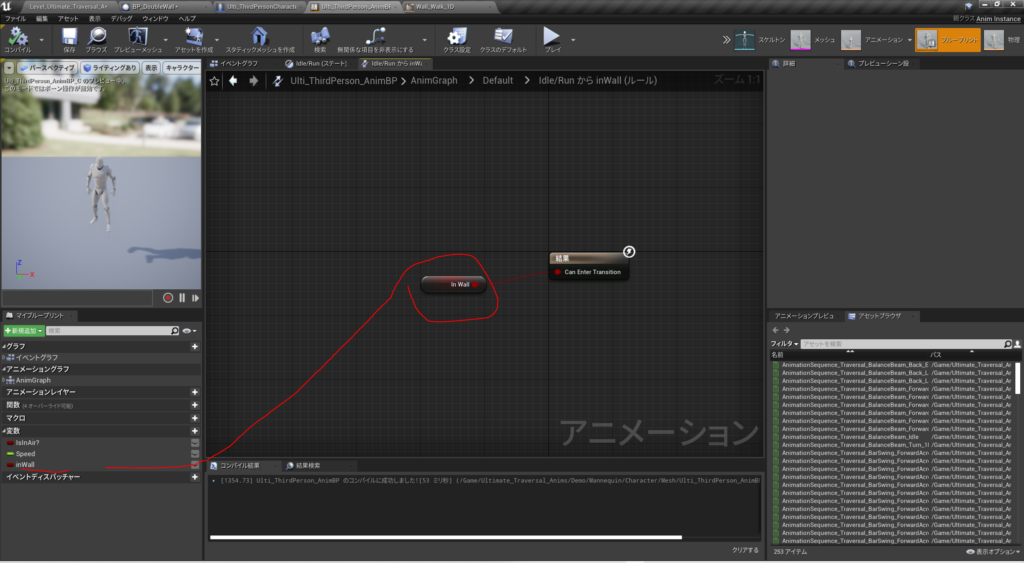
逆もしかり

イベントグラフでStateが8になったらInWallブールを切り替えた
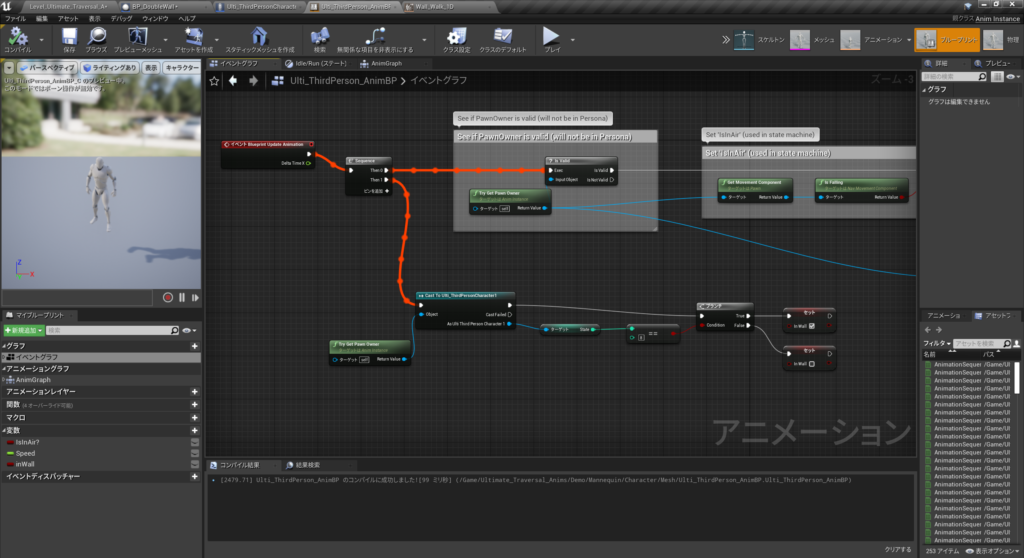
最後にstateが8になったらカメラを上面図にする
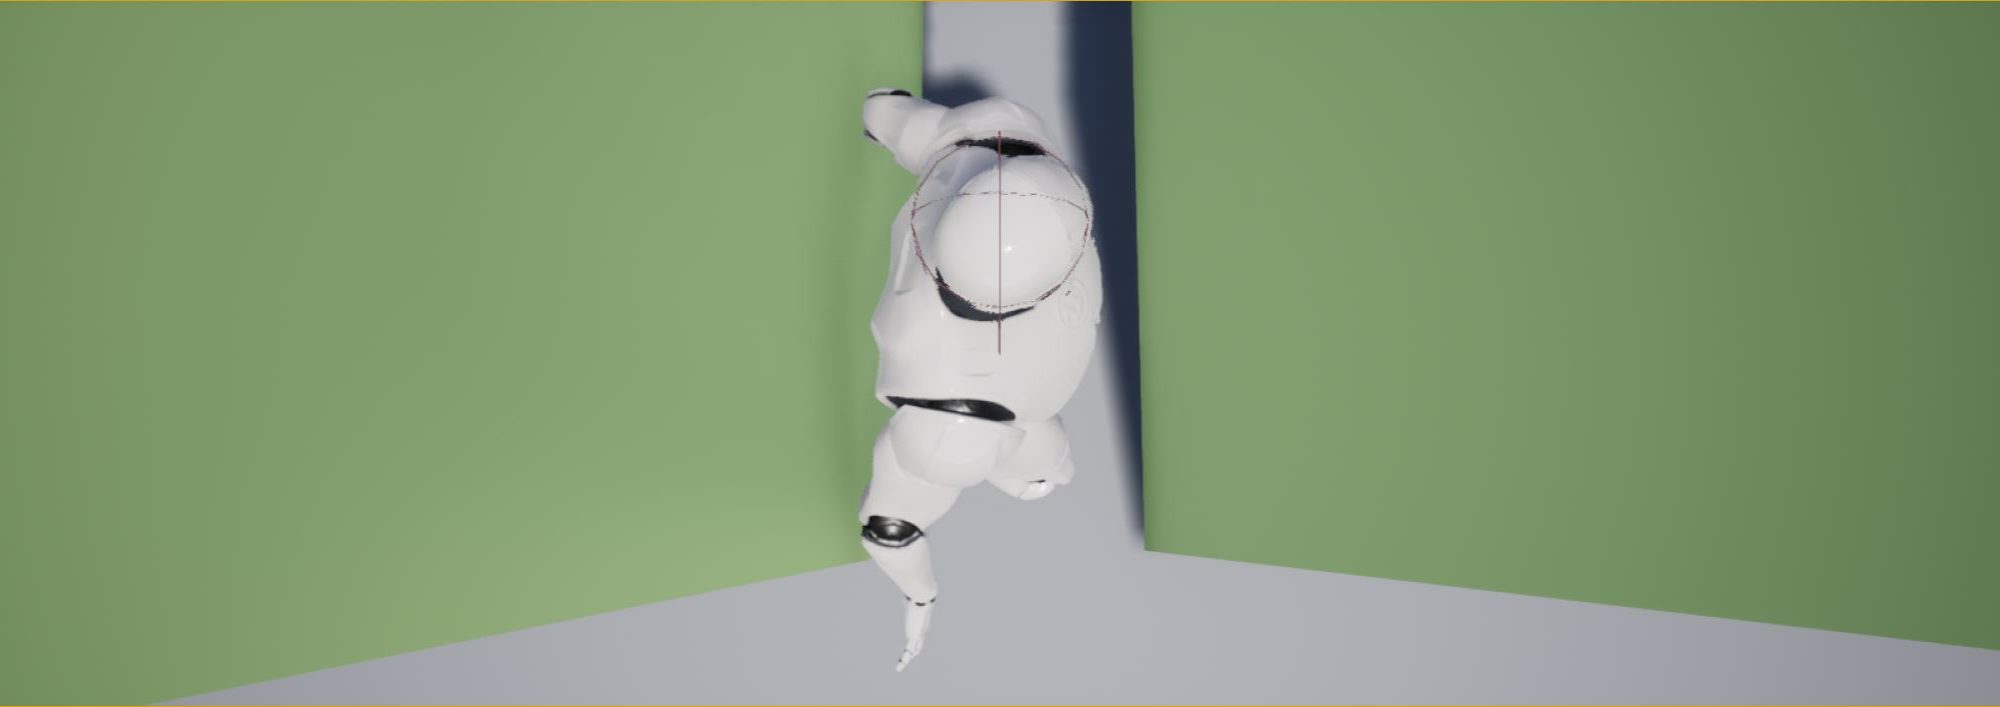
これが全部成立させることができればこうなる。
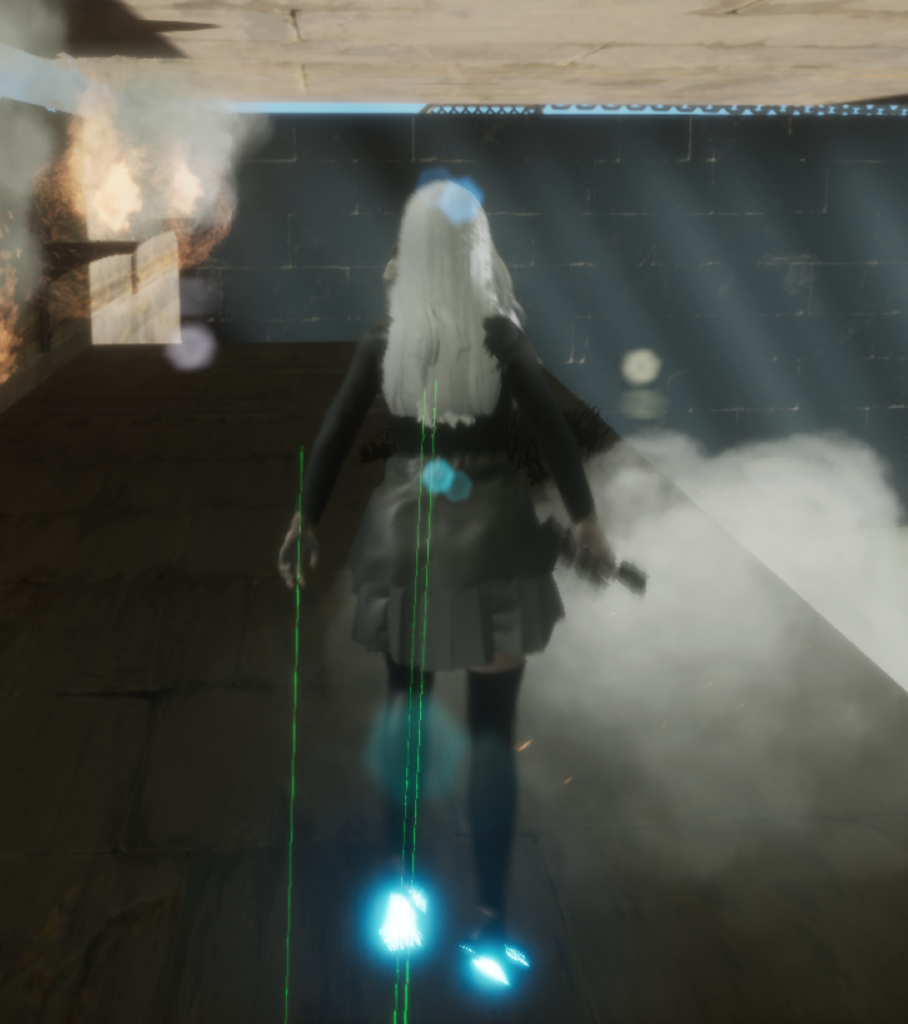
LineTraceByChannel ノードのDrawDebugTypeをFor Durationにしたら表示された!
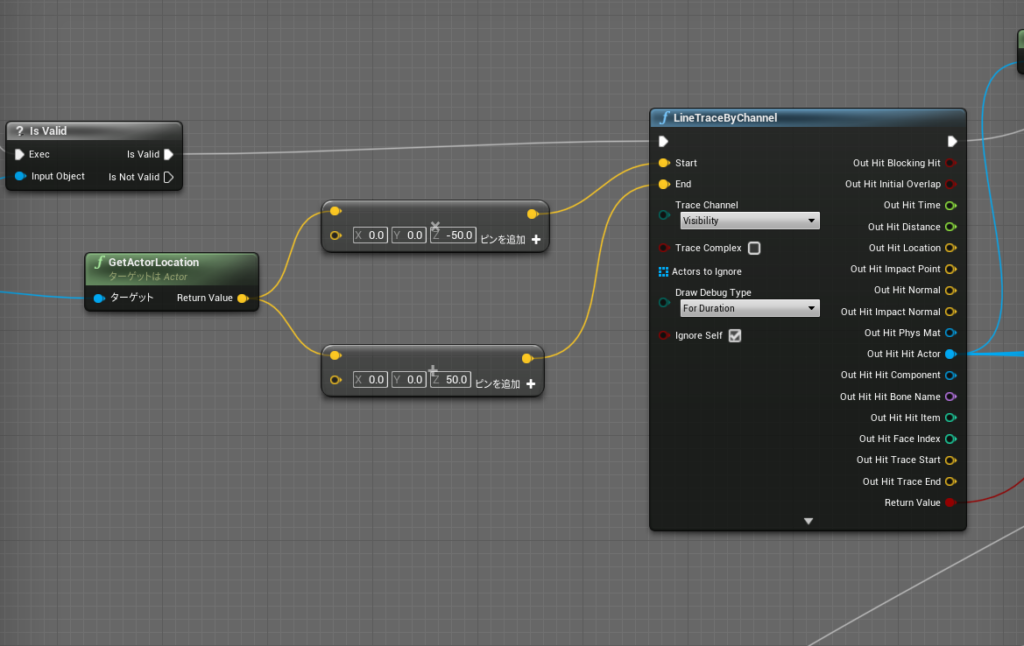

ミドリのラインが表示された
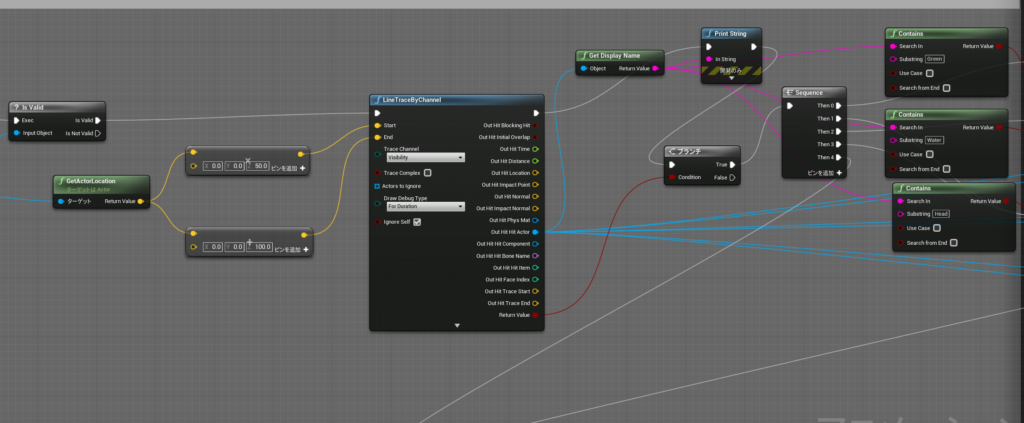
なんかいろいろ間違ってたのを修正したバージョンは以下リンク
https://blueprintue.com/render/pu6ypieo/
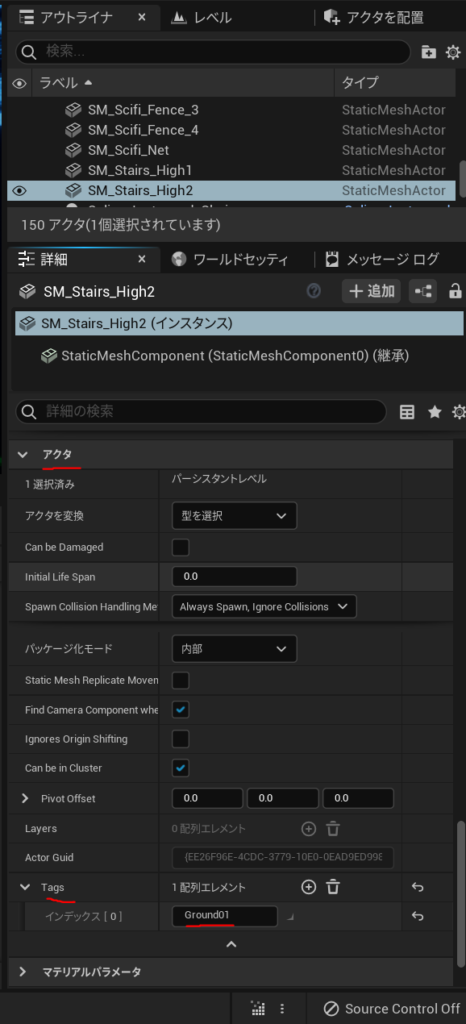
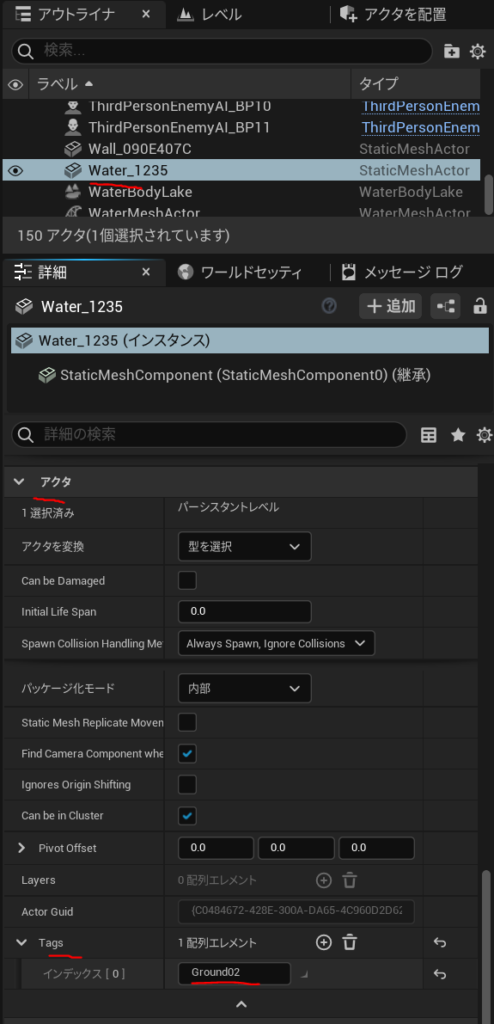
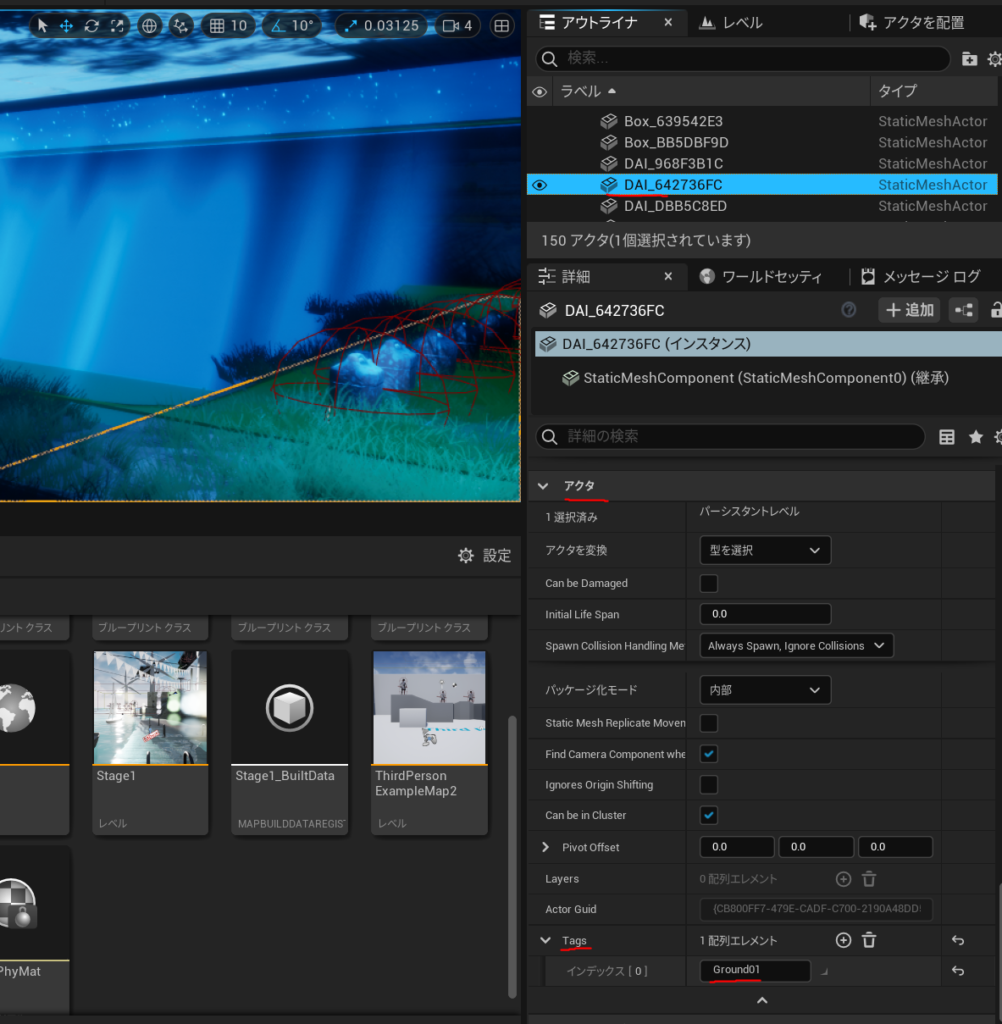
地面側にこれも設定する必要がある
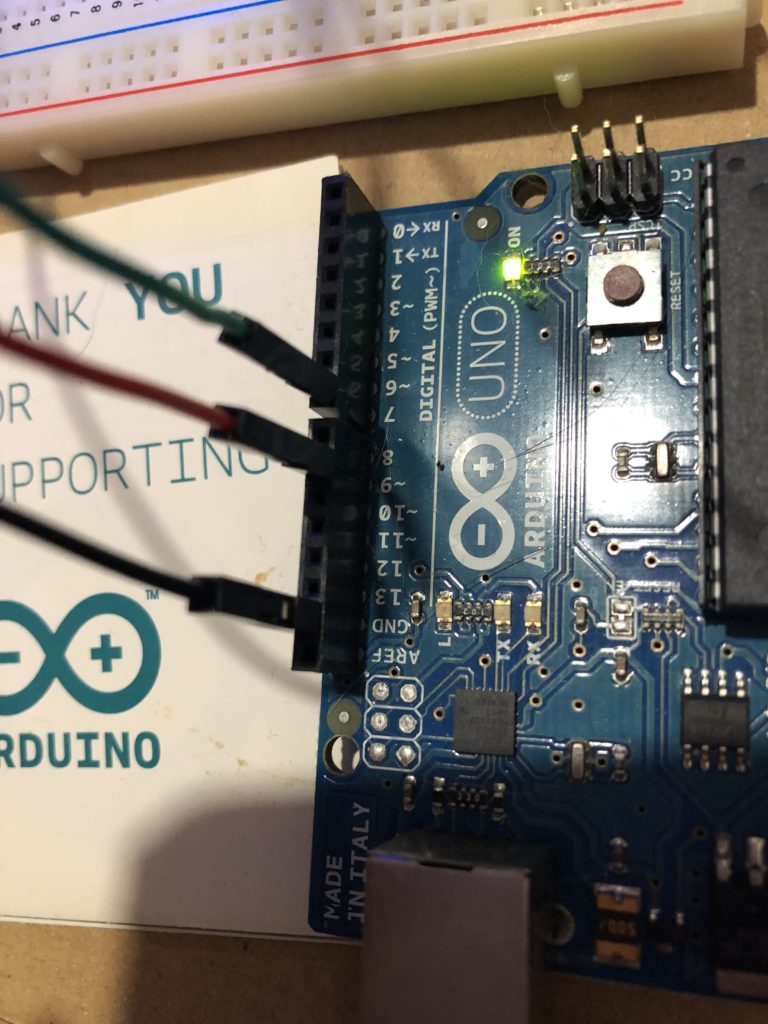
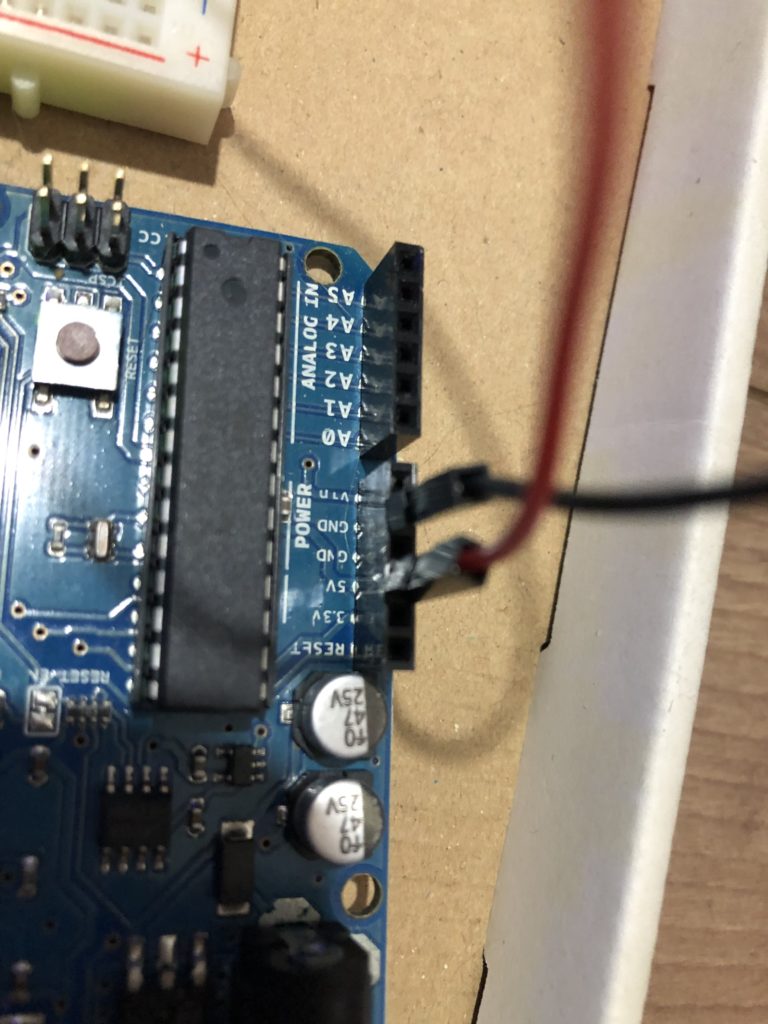
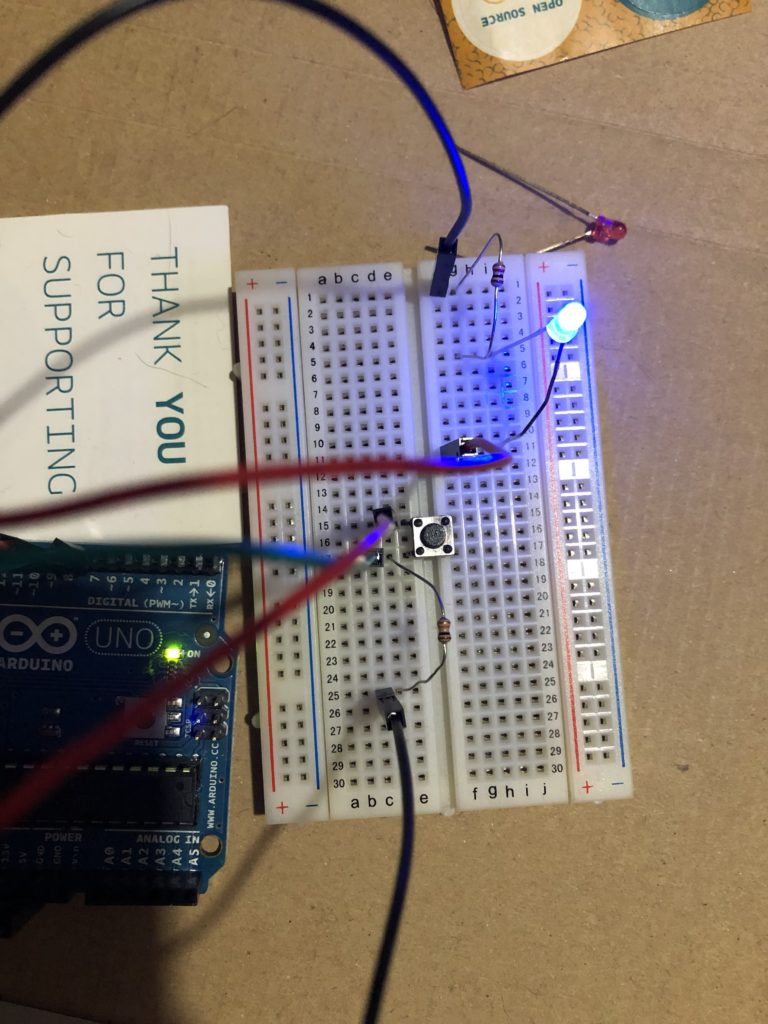
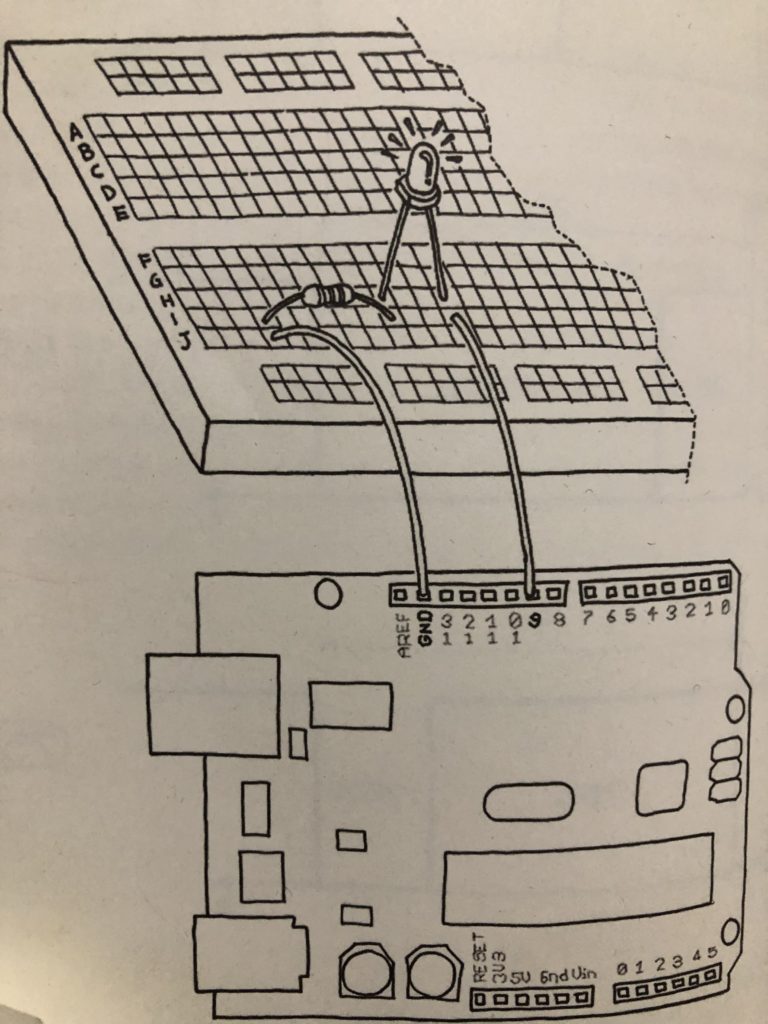
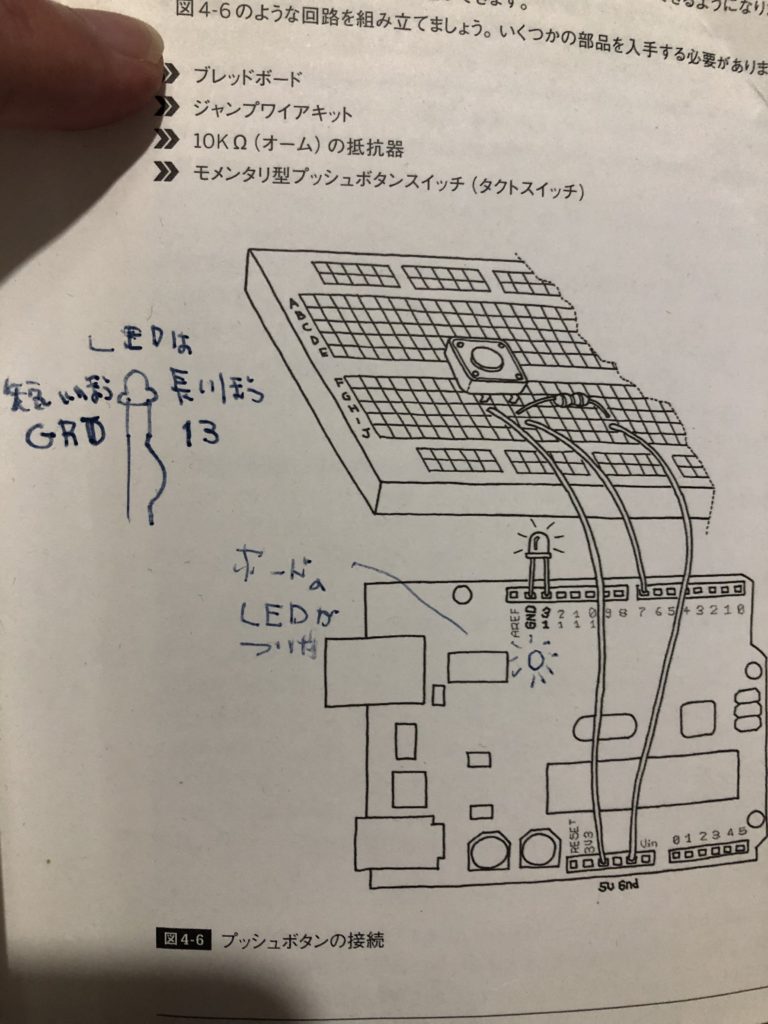
v03_AnalogBrightnessLoopBtnState.ino
int LED = 9;
int BUTTON = 7;
int val=0;
int old_val=0;
int state=0;

int brightness=128;        //明るさ
unsigned long startTime=0; //いつ初めたか?
int i=0;

void setup(){
  pinMode(LED,OUTPUT);   //LEDが出力である
  pinMode(BUTTON,INPUT); //BUTTONが入力である
}

void loop() {
  val = digitalRead(BUTTON);
  //変化があるか?
  if((val==HIGH)&&(old_val==LOW)){
      state=1-state;
      startTime=millis();
      delay(10);

  }
  //ボタンが押し続けられているか?
  if((val==HIGH)&&(old_val==HIGH)){
    //500ms以上押されているか?
    if(state==1 && (millis()-startTime)>500){
      brightness++;
      delay(10);
      if(brightness > 255){
        brightness=0;
      }
    }
  }

  old_val=val;

  if(state==1){
      analogWrite(LED, brightness);
  }else{
    analogWrite(LED, 0);
  }
}